CR6 SE Direct Drive BMG Adapter
thingiverse
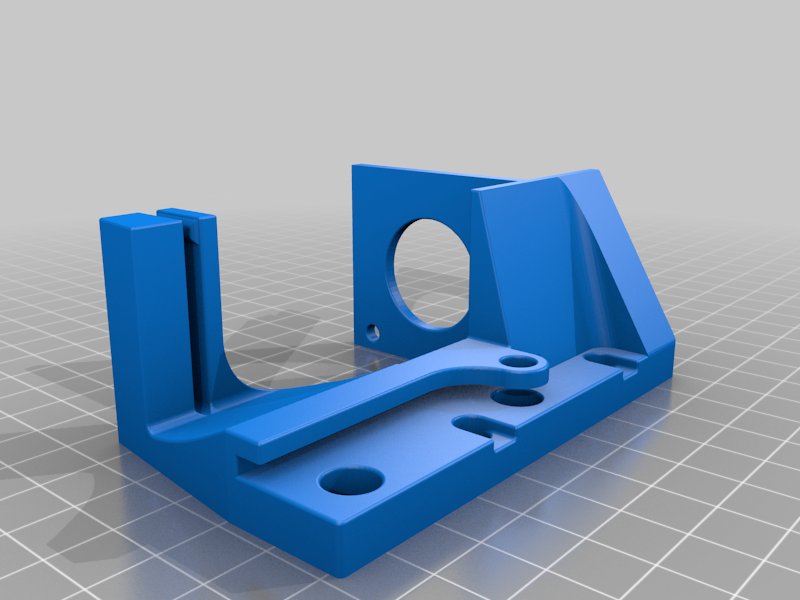
HI all. Here is my direct drive conversion on the creality CR6 SE using the BMG dual drive extruder. I've been using this for several weeks now and has been working great with no problems. (although there may be small updates to the design if I find improvements as time permits) This design requires no extra hardware besides the BMG dual drive extruder itself, (I also got a 23mm stepper motor to reduce weight, but should work fine with factory stepper motor.) and was designed with minimal supports in mind to make printing easier and quicker. This design dose requires tight tolerances to fit and work well, so make sure your printer is dialed in. I printed it in Petg with a .4mm nozzle and it fits perfect. It works with all factory hotend parts and keeps the hot end in the factory position. (although I am using it with the Triangle Labs Dragon hotend and the adapter for it that I designed to suit the CR6.) Its mounted using the top 2 wheel mounts of the hotend carriage and locates using the back of the thread extrusion that hold the hotend cover on. To install it you can do it while its still attached to the printer, but some might find it easier to remove it to complete installation. Ether way you need to remove the the hotend cover, remove the 2 screw that hold in the breakout board, unscrew the hotend PTFE coupler, remover the top 2 wheels. Install the 2 metal spacers into the printed bracket from the wheels, they should be a tight press in fit if its printed well, keep the spacers flush with the face closes to the hotend bracket. Now you can clip it over and locate it using the smaller holes form the back of the threads for the cover mount. It will be tight, but mine clipped in with a nice click once lined up and abit of pressure applied. At this point you can reinstall the wheels followed by everything else in the revers order. Almost time to start installing the extruder and stepper. But first you will need to work out the correct length PTFE tube, depending on your setup this will change. With my setup using my adapter and dragon hotend it was 56mm. Install the PTFE tube now. Now to install the extruder put the 3 screws in till they are flush with the bottom of it, then slide it into the bracket from the back and rotate it while inserting the PTFE tube, then slide the screws in the rest of the way, install the stepper, tighten screws starting from the bottom back one where the cutout relief is, this is what I found the best. Credit to https://www.thingiverse.com/thing:4654645 for the cable holder that I've integrated into my design as I liked how it manages the cable. Thanks for your work on that. You will now need to wire and tune your new setup. I used these for cable management https://www.thingiverse.com/thing:4636618 I also designed a new mount for the filament run out sensor to direct it toward the back that works very well this this setup. Will upload that soon as well if i haven't already by the time you are reading this. P.S. Although I had no problems with the PETG iv'e since printed in carbon fiber nylon to reduce weight and increase strength. V2 adds rigidity with more support and utilities one of the wheel bolts to clamp it in position, making installation easier, relying less on tight tolerances, and eliminating the possibility of movement. V2.1 is mostly a cosmetic update with fillets and a few other small changes. STEP file now added
With this file you will be able to print CR6 SE Direct Drive BMG Adapter with your 3D printer. Click on the button and save the file on your computer to work, edit or customize your design. You can also find more 3D designs for printers on CR6 SE Direct Drive BMG Adapter.