Crayford Focuser Reducer 1:10
thingiverse
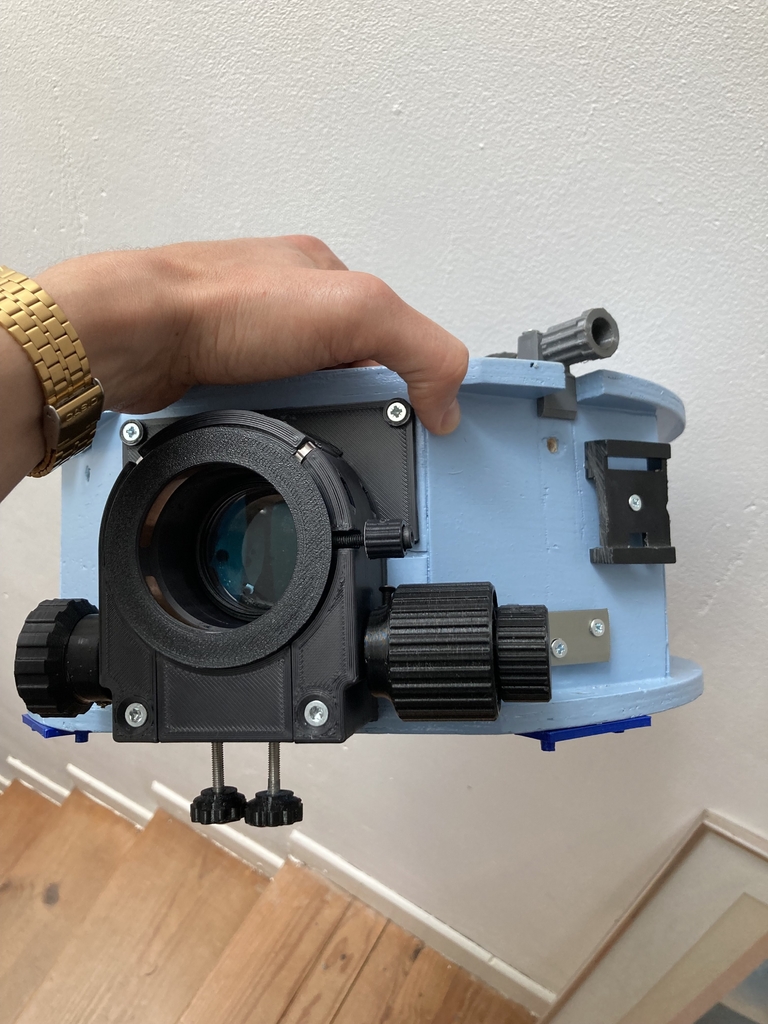
# 3D printed 1:10 reducer for crayford focusers ## Update History Update 1 : Added a fillet on the reducer support + added all step files ## Informations The exact reduction is around 1:10.24 WARNING : This is not a "print-and-go" solution, you will need to customize one of the parts that will be used to fix it to the focuser WARNING 2 : The Planetary Gear are CRITICAL pieces of this assembly. Their printing MUST be ALMOST perfect to avoid any problems or hard spots. Check your slicing up-close for any bridges between parts and feel free to test your prints BEFORE assembly. You must have almost NO resistance when you turn the planetary gear reducers slowly individually. When you will print the planetary gear, due to their very small size, they will probably be stuck and not move. You need to use something (like a flat screwdriver) to make them turn GENTLY and SLOWLY to not damage the hole. Try to make multiple prints and experiment with settings until you get perfect (or almost) planetary gears for assembly. ## Parts list Parts to be printed : - 2 Planetary Gear A and B - Reducers support fixation * - Carrier - Insert C (between planetary and reduced button) - Insert D (between planetary and carrier) - Main button (that contains the system) - Reduced button * : this is the part that will require rework/customization for your upper telescope assembly. Materials needed for assembly : - 2 x 4 nails ( 1.3mm thick & 20mm long & flat head) - Cutting plier (to adjust nails size) - Hammer - Superglue / cyanoacrylate or similar ## Assembly instructions 1) Start by cutting 2 nails to have a 18.5mm size (full size including head) 2) Add a point of superglue on each hole (except center) of the external side of the Main button 3) Insert previously cut nails in each hole. Apply pressure to ensure the flat head is correctly inserted 4) Join the Insert C and the Reduced button. Insert with your hand slowly, then complete with hammer 5) Join the Insert D and the Planetary Gear B. The longest side goes in the middle of the Planetary gear. Insert with your hand slowly, then complete with hammer 6) Almost similar as the beginning, add a point of superglue on each hole of the carrier (largest side) (except center), and insert a nail in each. Apply pressure to ensure the flat head is correctly inserted 7) Insert the carrier into the remaining side of the Insert D. Push until it touch the marked delimitation on the Insert. 8a) Insert carrier nails into the planetary gear A. Put everything on the planetaries support fixation. Planetary gear A must be on the side of the support with the 2 holes. 8b) Cut nails at correct size (should be around 14-15mm full size including head) and undo the previous step OR 8) Cut nails at 14-15mm (full size including head) 9) Insert the remaining side of Insert C in Planetary Gear A. Complete with hammer 10) Insert carrier nails into the planetary gear A. As you can see, there is 2 "spots" for the planetary gears in the Planetaries support part. Apply superglue on the 2 spots, then put on the assembly as a whole and apply pressure until superglue has fixed the system. Planetary gear A must be on the side of the support with the 2 holes. 11) Finally, correctly align planets from Planetary Gear B with the nails inside the Main Button and insert the system within the button 12) If you firmly maintain the reducers support part with your hand, you can now use the Main and Reduced button. The objective is now to customize the reducers support part to bind it to your upper telescope assembly ! It must be static for the movement transmission to work. ## Credits This design was first to be used with this amazing 2" crayford focuser created by marcosatm here : https://www.thingiverse.com/thing:4424419 Thanks for letting the step files available too ! But it can be retrofitted to any other crayford focuser if there's enough clearance. It may need a little customization. ## License This work is licensed under the Creative Commons Attribution-NonCommercial-ShareAlike 4.0 International License (CC BY-NC-SA 4.0). To view a copy of this license, visit http://creativecommons.org/licenses/by-nc-sa/4.0/
With this file you will be able to print Crayford Focuser Reducer 1:10 with your 3D printer. Click on the button and save the file on your computer to work, edit or customize your design. You can also find more 3D designs for printers on Crayford Focuser Reducer 1:10.