Crazyflie Flying Bumper Cage
thingiverse
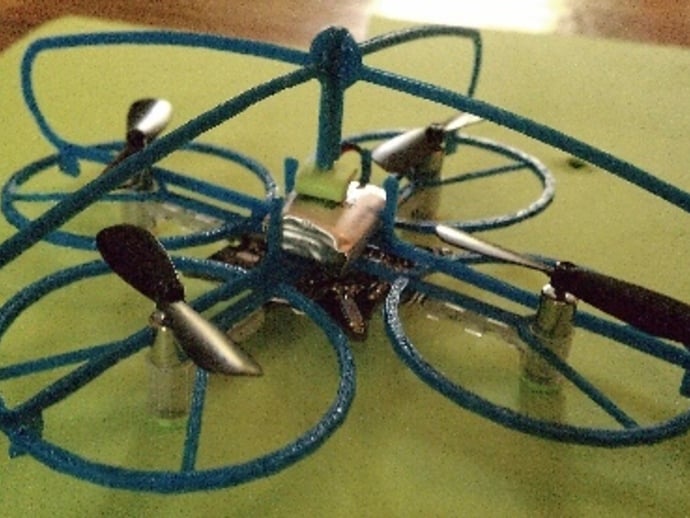
Protect your Crazyflie and household with this V2 prop bumper shield. This accessory will also make it simple and quick to swap out batteries to extend your flying time. Total weight is ~5.4 grams. Can be made lighter if you print only 1.02mm of thickness. Edit - May 20, 2013 ---- > Flies Great! Instructions Print Two of the Bumper Shields. Cement or glue the two bumper shields to make an assembly to match the above picture. Install on Crazyflie with small pieces of doubleback tape. Print One each of the two Bumper Cage files. Cement the two halves together. Look to the picture for reference. The central circular hubs overlap to make it easy to glue and align the two halves. Once each file is printed and the halves are glued together then slip the two resulting parts together at the central hub. Clip the assembled Cage onto the Shield to best fit and orientation for the battery. Use small drops of glue where the Cage touches the Shield to hold the Cage into position. Do Not Glue to the Crazyflie. Install the battery. You may still need a small amount of doubleback tape underneath the battery but, much less and easier to remove than original. The down pointing pillar on the central hub of the Cage is to help hold the battery in position. I use a folded piece of hobby foam sheet between the pillar and battery to add pressure onto the battery.
With this file you will be able to print Crazyflie Flying Bumper Cage with your 3D printer. Click on the button and save the file on your computer to work, edit or customize your design. You can also find more 3D designs for printers on Crazyflie Flying Bumper Cage.