Creality CR6-SE V6 Mount Kit
thingiverse
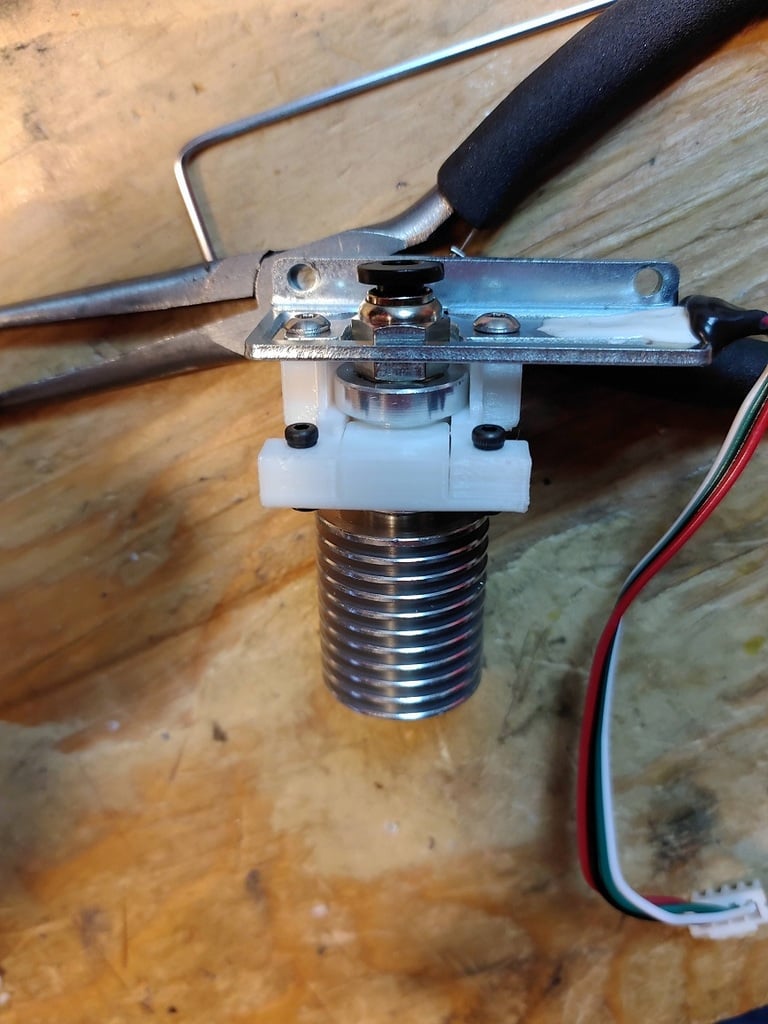
Update #1: I modified the hotend cover and moved the hotend fan back slightly. The original design had it too close to the heat block. When I screwed up my stock CR6-SE heatblock (don't over-tighten the nozzle, folks) I realized a replacement was a good 3 week wait. I didn't want to wait that long to continue printing, so decided to cobble together a mount for a V6 setup I had lying around. The resulting kit here is a remix of FlorentDoug's reworked CR6 Hotend Cover (https://www.thingiverse.com/thing:4669438), yokusan's adapter for threaded V6 heatsinks (https://www.thingiverse.com/thing:4671237), and a V6 clamp I found originally here on Thingiverse but has now mysteriously vanished (if it comes back I will like it here to give the original designer credit!). I also use joshuarowley42's v6 fan vent (thttps://www.thingiverse.com/thing:340312) and a optical sensor trigger of my own design. (I tried to link each of these objects in the remix box when making this post, but stupid Thingiverse couldn't find any of them even though each is clearly findable on the website's regular search). The reworked hotend cover has been tweaked with a lower hole for the heatsink fan and a lower mount for the hotend fan to accommodate the taller v6 setup. The optical sensor for the Z axis is based on the OEM design, but with a longer trigger to also accommodate the taller v6 setup. Assembly: 1. The clamp comes in two parts and should fit snugly at the collar of the V6 heatsink. The clamp is attached using two m2 screws and nuts. If you use screws too long they will poke into the fan vent right below. 2. The mount kit attaches to the strain gauge via the original two m3 screws. 3. The fan vent clips on the v6 like normal, and the original 30mm fan mounts to that with two of the original M3 screws. 4. Swap out the metal optical sensor trigger for the printed version (make sure to TEST THIS BY HAND to ensure it's mounted correctly...you don't want it curved off to the side too much and taking out the sensor when you home it for the first time...THIS IS IMPORTANT TO CHECK!). 5. The original hotend fan and vent attach to the modified vent cover. 6. Adjust the pot for the strain gauge to ensure it's not too sensitive or not sensitive enough. You should turn the screw until it trips the sensor (blue led comes on) when you touch the underside of the nozzle. 7. Attach the hotend cover+fan to the front via the original two M3 screws. 8. Test the side optical trigger to ensure it lowers correctly into the optical switch. (See #4). 9. Home the hotend and adjust your Z offset accordingly. 10. Conduct a PID tune (I didn't need to do this step, but it's probably a good idea to do if you see variations on your E0 temps). Notes: I suggest you print all the pieces in ABS or PETG with at least 50% infill. This is obviously a work in progress, and I am NOT a trained CAD designer, so if you find a way to improve on my Frankenstein designs, please do so and share your results!
With this file you will be able to print Creality CR6-SE V6 Mount Kit with your 3D printer. Click on the button and save the file on your computer to work, edit or customize your design. You can also find more 3D designs for printers on Creality CR6-SE V6 Mount Kit.