Creality Ender 2 ReBoot - a slight overhaul with 161% buildvolume!
thingiverse
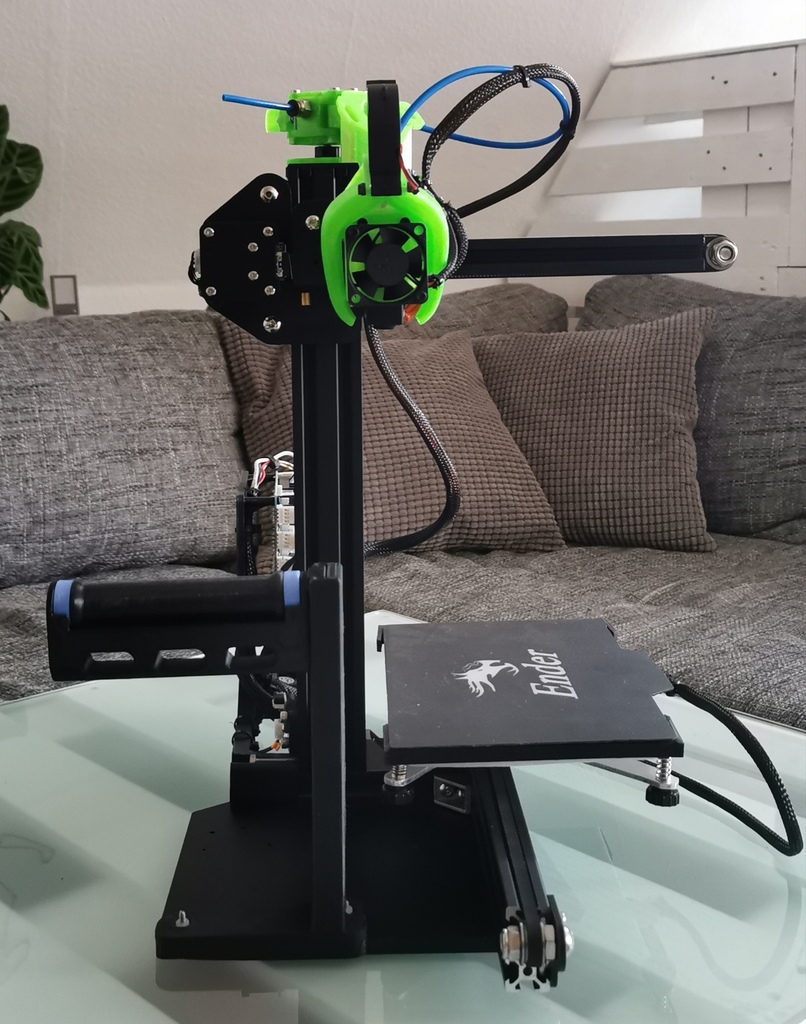
TL;DR first: <h2>Welcome to my Overhaul of the Creality Ender 2!</h2> Im starting here with version V2 (V1 is only in one picture; there was too much wrong with that), which will come in 2 iterations/stages: ++++++++ Stage 1: ++++++++ - changing out the Heatbed to a 150x230mm 12V PCB Heatbed - changing out the Y-Extrusion - making a new Y-carriage with 3-point-leveling - adding a glasbed with holders. That is the budget-orientated version. ++++++++ Stage 2:++++++++ - everything of the above, plus - bringing everything on the Ender 2 up to 24V - 150x230mm Heatbed in 24V - Duet Maestro as the control board - Mobius 3 Extruder - E3D V6 Hotend - 5015 Partcoolingfan - Duet Maestro Mount for the rear of the Ender 2 - Spoolholder in front That is a tad more expensive... ++++++++ ++++++++ ++++++++ ++++++++ ++++++++ ++++++++ ++++++++ I leave the printbed-solution to each on their own. You cant print directly on the PCB-Heatbed! So, you could either take the classic approach, and take a 3mm thick aluminium buildplate, or go fancy, and put a glassbed on top. I went extra fancy, and went with glass and a magnetic buildplate. ;-) ++++++++ ++++++++ ++++++++ ++++++++ ++++++++ ++++++++ ++++++++ With both updates, youll get the 161% increase in buildvolume. The original buildvolume of the Creality Ender 2 is 150x150x200, which is 4.5l. The new buildvolume is 150x230x210, which is 7.245l, so 160,9% the buildvolume of the original ender 2! And technically i already lied to you in the title. If that isnt a good start, i dont know any more! \o/ The longer version: ++++++++ Why? ++++++++ I wanted two printers which will fit into the space i still had, and one candidate was the Creality Ender 2. I looked at everything i printed so far, and came to the conclusion that a buildplate of 150 by 150 would be ok for roughly 50% of my workload. But while i waited on them to arrive, i found an aliexpress offer, showing 150x230mm heatbeds, in 12V and 24V! So, i dont have the space for wider printers, but deeper? Thats no problem! The idea was born. ++++++++ a Mobius 3? ++++++++ I have a Mobius 2 on my two first printers, and i printed close to 2500h on each of the two. They both never let me down, and i like the concept. The Mobius 3 is easier to print, but slightly worse to maintenance. I would probably say go with a Mobius 2 when you can. I will upload a slightly modified case for the Mobius 3 and 2 in the near future. ++++++++ Why a piece of ptfe-tube on the "intake" of the Mobius 3? ++++++++ Thats because im using Capricornus tubing. Thats a ptfe-tube that has an inner diameter of 1.9mm, making your extrusion more consistent. But if you dont use also a piece of capricornus on the intake of the Mobius 3, and your filament is bad in diameter, and your filament gets stuck on the way to the hotend, your Mobius 3 will push the filament into the small cavity before the push fitting, and maybe push the push fitting out of the Mobius 3 case, damaging the thread. So you have to reprint the Mobius 3 part with the push fitting to get printing again. If you have the capricornus tubing on the intake, and your filament gets stuck there, your Mobius 3 will simply rip apart your filament while trying to pull it in, and nothing else will happen. Simple as that. ++++++++ Why an E3D V6? ++++++++ The hotend of the Ender 2 is good enough for the job. There is not much of a reason to switch that out, but i like the E3D V6 more, also its a thing of ease of maintenance over my 5 different printers if all have the same hotend. You wont push insane printing speeds with an Ender 2 anyway, and probably wont never exceed the capabilitys of either original MK10 (?) or E3D V6 hotends. ++++++++ Why a 5015 for part cooling? ++++++++ Because it works. Also, go and print a fitting fanduct to that, with not that much 90° bends. Or even no 90° bends. Please. ++++++++ Why switch everything to 24V? ++++++++ Less amps in the system; only half of the current with using 12V. I just personally like that more. ++++++++ Why switching to a Duet? ++++++++ There is no real reason to do so. For a 24V conversion i couldnt use the original board, but thats not the reason. The reason being i was looking for an easy manageable solution over all 5 of my printers, and Duet won that. To be absolutely clear here, a Duet wont push your quality or speed. You wont see insane speeds on an ender 2, and an 8-Bit board will still be fine. That said, if youre doing the 24V conversion, you could also look into using an SKR v1.3 Board with TMC 2208/2209s. That would also make a very nice and silent printer, and wont cost an arm and a leg. (because i went with Duet Maestro clones. Still a SKR v1.3 with tmc´s is cheaper, and youre only missing out on the WebControl if you dont use Octopi) ++++++++ Why the setup with the spool in the front, and board in the back? ++++++++ I like a small footprint, but also dislike a spool on top of the printer (because of vibrations, especially if youre printing higher). So i came up with that solution, and it really functions nice. ++++++++ What will that all cost me? ++++++++ ++ Stage 1: ++ - 12V 150x230 Heatbed 13€ - 350mm black 2040 Extrusion for Y 12€ - plasmacut Y-Carriage (depends on your location; but around 20€) - a borosilicate glassbed in 150x230 12€ So thats a whopping 57€ ($65 or £52) ++ Stage 2: ++ - 24V 150x230 Heatbed 13€ - 350mm black 2040 Extrusion for Y 12€ - plasmacut Y-Carriage (depends on your location; but around 20€) - a borosilicate glassbed in 150x230 12€ - 24V Ender 3 PSU 25€ - Trianglelab E3D V6 Hotend 16€ - 5015 24V Pengda blower style fan 2€ - Mobius 3 parts ~25€ - FYSETC Duet Maestro 70€ - Sunon 4020 24V 5€ And thats a whopping 200€ ($225 or £180). Thats nearly two Ender 2. Or... what i paid for two Ender 2. Really. ++++++++ Is Stage 2 worth it? ++++++++ What? Hell no! 3D Printing is a hobby, and rebuilding or "reboot"ing (who came up with that idiotic phrase anyway... oh, that was me...) a 3D printer is a money sink. If you want a bigger printer for cheap, go Ender 3! Or 5! Or... i dont know. <h1>If somebody even cares, comment! And thanks for even reading until here!</h1>
With this file you will be able to print Creality Ender 2 ReBoot - a slight overhaul with 161% buildvolume! with your 3D printer. Click on the button and save the file on your computer to work, edit or customize your design. You can also find more 3D designs for printers on Creality Ender 2 ReBoot - a slight overhaul with 161% buildvolume!.