Creality Ender-3 Pro filament guide
thingiverse
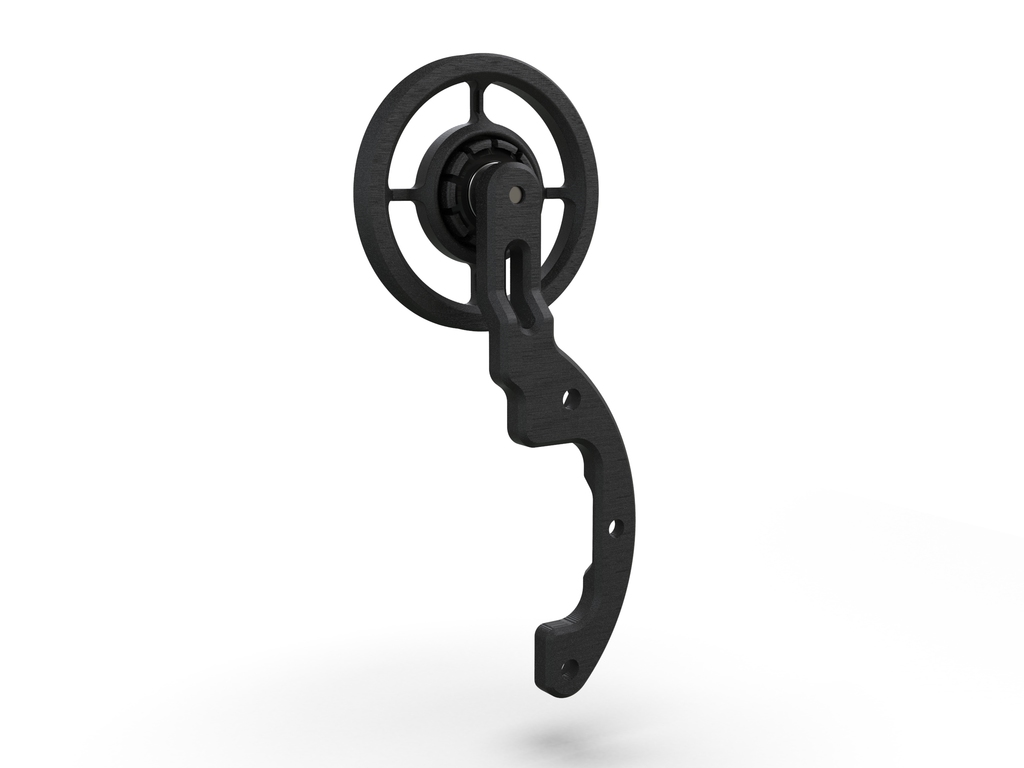
This is a super easy to fit filament guide and measuring gauge for the Creality Ender-3 Pro (and possibly the Ender-3, let me know..). This guide allows filament to smoothly enter the extruder with out bending, reducing the likelihood of breakages. The kit contains 1 bracket and 2 guide wheel options. Option 1 - Using a regular 16mm press fit bearing (needs to be purchased) Option 2 - Uses a spare roller left over from my Creality Ender-3 Pro Linear bearing Z-Axis conversion link: https://www.thingiverse.com/thing:4431225 Both wheels are designed to rotate half a turn for every 100mm of filament used which can be easily noted by marks viewed through a slot in the mounting bracket. The bracket mounts directly to the left X-axis chassis end plate using the existing roller holes. You will need to replace the 2x 35mm m5 bolts with 2x 45mm m5 bolts that came spare with the printer. All parts have a 0.2mm tolerance I hope it works for you and please accredit me if you share or link to it.. If using Option 1, you will need to purchase: 1x O.D-16mm I.D-5mm W-5mm bearing 1x 20mm M5 bolt (there should be a spare one that came with your printer) The link below is an example of what to order: https://uk.rs-online.com/web/p/ball-bearings/6189907?cm_mmc=UK-PLA-DS3A-_-google-_-PLA_UK_EN_Pneumatics_%26_Hydraulics_%26_Power_Transmission_Whoop-_-Ball+Bearings_Whoop-_-6189907&matchtype=&pla-340041866069&gclid=EAIaIQobChMIy6vXtuz06QIVmK3tCh2ZfAT3EAQYASABEgKsKvD_BwE&gclsrc=aw.ds Fitting Guide: Step 1 Option 1 - Press fit the bearing into the Guide wheel. Option 2 - Clip the spare roller into the Guide wheel. (This is removable and wont damage the roller, so don't worry) Step 2 Use a 20mm x M5 bolt to attach the guide wheel to the bracket. Make sure the bearing sits against the bracket. This is important with option 1! Step 3 Remove the existing 35mm x M5 bolts fixing the left outer rollers to the X-axis chassis end plate. Keep the nuts for the next step. Replace with 45mm x M5 bolts Step 4 Insert the M5 nuts into the appropriate holes in the bracket and attach to the rear of the chassis end plate, tightening the bolts to give the desired resistance on the rollers. The guide wheel should line up exactly with the filament hole in the extruder. Done! If this design has helped fix your machine and saved you a few pounds at the same time, then please think about donating what you feel is fair to: https://paypal.me/kitkaye Every little helps!
With this file you will be able to print Creality Ender-3 Pro filament guide with your 3D printer. Click on the button and save the file on your computer to work, edit or customize your design. You can also find more 3D designs for printers on Creality Ender-3 Pro filament guide.