Creality Ender 3 Y Axis Linear Rail Mod V2
prusaprinters
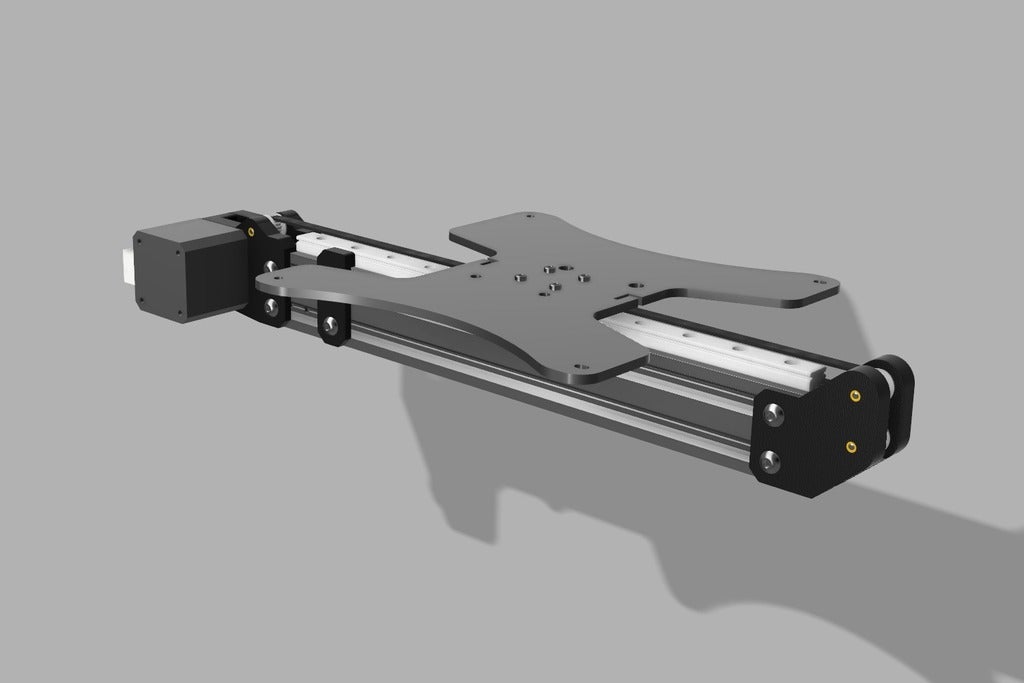
<h3>Linear Rail.</h3> <h3>Y Linear Rail Mod V2.</h3> <p><a href="http://bobblejot.com">Bobblejot Website</a><br/> <a href="https://github.com/Bobblejot/">Bobblejot GitHub</a><br/> <a href="https://twitter.com/bobblejot">Bobblejot Twitter</a><br/> <a href="https://www.patreon.com/join/bobblejot?">Bobblejot Patreon</a></p> <p><strong>Update 070419</strong></p> <p>Added<strong>Y_Idler_NI.stl</strong> & <strong>Y_Motor_Mount_Back_NI.stl</strong>, The only change being the removal of the holes for the brass inserts. Not everyone likes them or wants to use them so this way you can just thread into the plastic body.</p> <p>Added<strong>Y_Limit_Switch_Bracket.stl</strong> & <strong>Y_Limit_Switch_Bracket_Offset.stl</strong> to mount the original Ender 3 Endstop to the right hand side of 2040 extrusion ( closest to the z motor ), It should position the endstop to activate of off the edge of the bed plate.</p> <p>I have uploaded the 2 versions because i haven't been able to test the bracket and one of them should work to get the endstop in the correct position.</p> <p>This is the second version of a linear rail mod for the Creality Ender 3 and the one i am using now.</p> <p>This mod was done to improve the belt path alignment and create a sturdier platform.</p> <p>With this mod i have provide a drill guide for either the standard or the wide version of the mgn12 carriages.</p> <p>In my pictures you will see a smooth idler it was only used because i ran out of toothed idlers and had to order more and was too impatient to wait for them to arrive before doing the mod :-)</p> <p>when the belt wraps around the platform tabs i go over then wrap under so the teeth of the belt are gripping each other then i tie wrap them together.</p> <p>When installing i fix the motor mount solidly and leave the idler slightly loose and pushed as far back onto the extrusion as possible. I then tighten the the belt and then straighten and tighten the idler, this has given me good tension so far without being too tight.</p> <p>The Y Axis stop that is included i use for the Y home position as i use sensorless homing on my X & Y axis. I changed my controller to an Einsy Rambo on my Ender 3's.</p> <p>Because i have changed to 16T Idlers and Pulley the steps/mm for the Y Axis need to be changed to<strong>100</strong>.</p> <p>I have checked the files and 20T Idlers could also be used so you you wouldn't have to change the Y Stepper pulley or the Firmware steps/mm.</p> <p><strong> Drill Guide</strong></p> <p>The drill guide surface with top on it faces upward and the arrow faces towards the front edge of the carriage plate. The straight edge of the guide should match up with the straight edge of the carriage plate at the front. I have now uploaded a picture to thingiverse. The 1 and 2 just identify the original wheel hole positions from the 2 different versions of the plate that i know of, you can use these as well as the ones on the other side to bolt the guide to the plate. The inner 4 M3 holes are for a standard MGN12H carriage and the other 4 M3 holes spaced slightly wider apart are for the MGW12H carriage.</p> <p>There is a very rough video below of it in action along with my X Axis Rail mod.</p> <p><strong> Materials:</strong></p> <p>1 x <a href="http://s.click.aliexpress.com/e/PDonyrq">300mm long MGN12H Linear Rail</a> - Aliexpress</p> <p>or</p> <p>1 x <a href="http://s.click.aliexpress.com/e/blQBHrr2">300mm long MGW12H Linear Rail</a> - Aliexpress</p> <p>3x16T Idlers with M3 bore<br/> 1x16T Idler Pulley with M5 bore<br/> 1x New Length of GT2 6mm Belt</p> <p>I just bought these because i needed spares.</p> <p><a href="http://s.click.aliexpress.com/e/6zbsJWY">Powgee 8pcs GT2 Idler Pulley + 5M Belt</a> - Aliexpress</p> <p><a href="http://s.click.aliexpress.com/e/bcJDT4cY">Powgee 10pcs GT2 Toothed Idler</a> - Aliexpress</p> <p>6 x <a href="http://s.click.aliexpress.com/e/cFcqHJ6C">M3 T-Nuts</a> - Aliexpress<br/> 8 x M3x6mm Cap Head Bolts<br/> 5 x M3x22mm Cap Head Bolts<br/> 10 x M5x8mm Button Head Bolts<br/> 10 x <a href="http://s.click.aliexpress.com/e/mcshP2u">M5 Spring nuts</a> - Aliexpress<br/> 3 x M3 Brass Inserts</p> <p>And That’s it.</p> <p>Enjoy :-)</p> <h3>Print instructions</h3><h3>Print Settings</h3> <p><strong>Printer Brand:</strong> Creality</p> <p><strong>Printer:</strong> Ender 3</p> <p><strong>Notes:</strong></p> <p>Printed in Sunlu Filament Black PETG purchased from Amazon.</p> <p><a href="https://www.amazon.co.uk/gp/product/B075Q65H5D/ref=as_li_ss_il?ie=UTF8&psc=1&linkCode=li2&tag=lmcse-21&linkId=70ef76095cf853685d5e0f3e74369cf4&language=en_GB"></a></p> <p>Print Temp : 245°C<br/> Bed Temp : 70°C<br/> Print Speed : 50mm/s</p> <p>Top Layers : 5<br/> Bottom Layers : 5<br/> Perimeters : 3</p> <p>Infill : 20%</p> <p>Printed on Buildtak.</p> <p>Using these print settings all parts should fit on a single plate and take roughly 51/2 hours to print and use around 90g of filament.</p> <h3> Video</h3>
With this file you will be able to print Creality Ender 3 Y Axis Linear Rail Mod V2 with your 3D printer. Click on the button and save the file on your computer to work, edit or customize your design. You can also find more 3D designs for printers on Creality Ender 3 Y Axis Linear Rail Mod V2.