Croc Rivet / Pin
prusaprinters
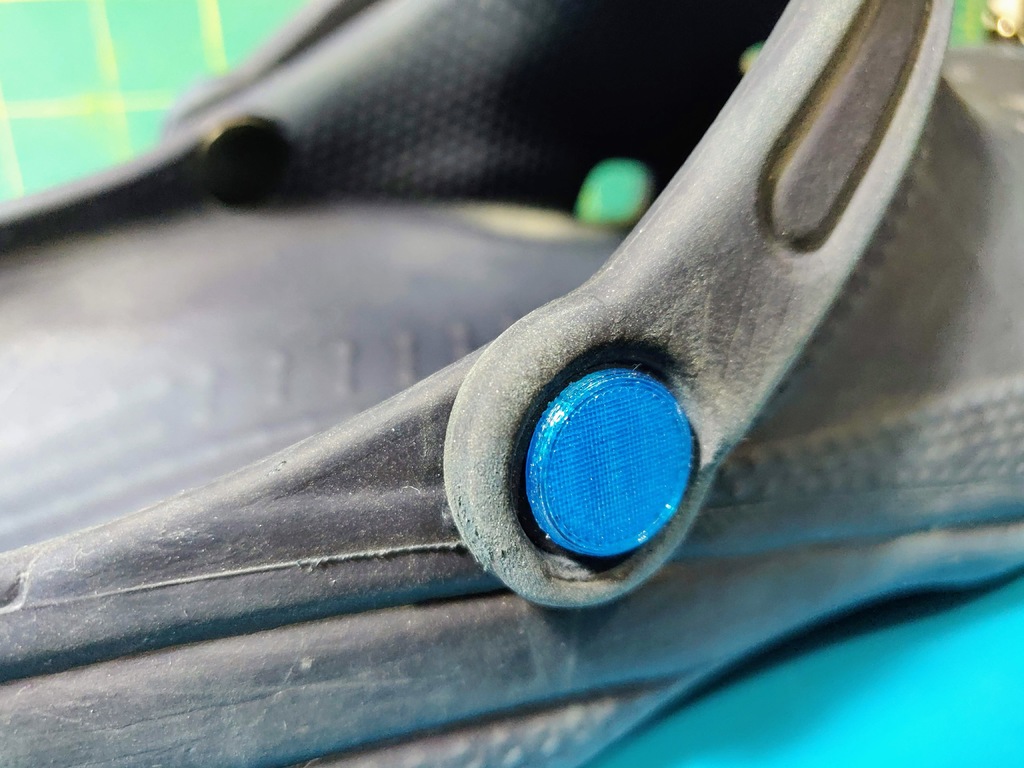
<p>A sturdy Croc rivet held together with a DIY paper clip "Cotter" pin. A bit of a pain to assemble but it will hold and last. I had one last for about 8 months, but then I sheared the head of on something in the garage. Probably shouldn't be working in the garage wearing Crocs, I know.</p> <h3> Print Settings</h3> <p><strong>Printer Brand:</strong></p> <p>Prusa</p> <p><p class="detail-setting printer"><strong>Printer: </strong> <div><p>i3 MK2S</p></div><strong>Rafts:</strong></p> <p>No</p> <p><p class="detail-setting supports"><strong>Supports: </strong> <div><p>No</p></div><strong>Resolution:</strong></p> <p>.15 mm</p> <p><p class="detail-setting infill"><strong>Infill: </strong> <div><p>100%</p></div><br/> <strong>Filament:</strong><br/> [</p> <h3> NOVAMAKER PETG ](http://www.amazon.com/s?url=search-alias&field-keywords=NOVAMAKER+PETG&tag=thingiverse09-20) Transparent Blue <br/> <p class="detail-setting notes"><strong>Notes: </strong> </p><div><p>You need to user PETG or stronger filament.</p></div> Post-Printing</h3> <p><strong>Some assembly required... Seems like that's always the case.</strong></p> <p><div><p>So I ruff up the two halves of the post with some 220 grit sandpaper first and the use superglue to join them together. Typically I press the flat round part down on the table while simultaneously pinching the two halves together keeping everything aligned properly. (Glue will get on the table, you have been warned.)</p> Just so you know a standard size paper clip will work fine for the DIY "Cotter" pin, and it's actually easier to work with than the mondo sized one I used in the photos. (only one I could find)</div></p> <p>I pre-bend a short stopper on the end of the straightened paperclip AFTER test fighting it through the button side. Then cut the wire off at the outer edge of the button.</p> <p>Now for the the really painful part... Getting the holes aligned and the DIY "Cotter" pin pushed through and then bending the other side of the pin with pliers to keep it all in place.</p> <p><strong>Stuff you'll need...</strong></p> <p><strong>Two halves of the post Superglued together.</strong></p> <p><strong>Test fit the DIY "Cotter" pin" (regular sized paper-clip works fine and is easier to work with)</strong></p> <p><strong>Make sure to keep the holes aligned.</strong></p> <p><strong>Get the "cotter" pin started in the button side and push onto the post side keeping the holes aligned.</strong></p> <p><strong>Push and pull the "Cotter" pin till it the bend in the other side is up against the back side of the button.</strong></p> <p><strong>Final step is to bend the "Cotter" pin over with needle nose pliers.</strong></p> <h3> How I Designed This</h3> <p>I run Ubuntu Linux on all my home computers and this limits my choices for CAD software. I have been teaching myself how to use FreeCAD since there is a native Linux version that seems to be getting more stable as time goes by.</p> </p></p></p> Category: 3D Printing
With this file you will be able to print Croc Rivet / Pin with your 3D printer. Click on the button and save the file on your computer to work, edit or customize your design. You can also find more 3D designs for printers on Croc Rivet / Pin.