Crow - Detachable Aerial Photography Quadcopter Drone
prusaprinters
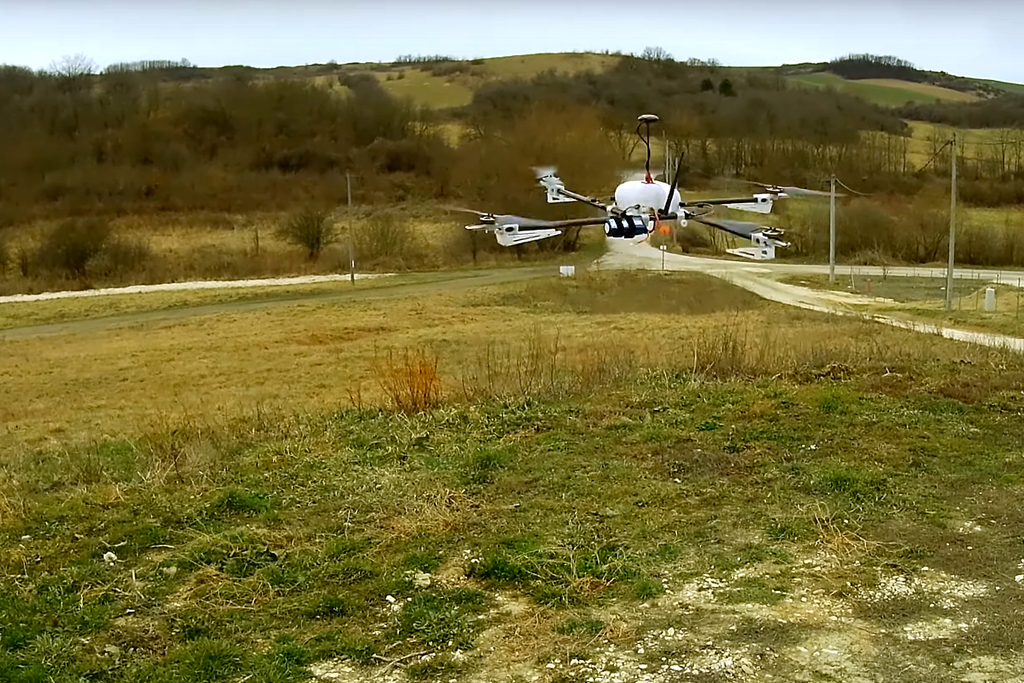
<p>I'm creating a bigger and more efficient quadcopter (for longer flying time) that can be easily disassembled (to carry).</p> <p>I'd like to be control from the ground station, maybe later with optical recognition by raspberry pi using opencv or tensorflow.</p> <p>videos about fly:</p> <p><a href="https://www.youtube.com/watch?v=qqBWV4xeB7c">crow to reduced angle P value</a> <a href="https://www.youtube.com/watch?v=krTDv05QTa4">crow loiter mode</a></p> <ul> <li>The quadcopter weight is 1.6kg without the gimbal and battery and without raspberry pi (check the photos).</li> <li>The 2 axis gimbal, 5000mAh 6S battery, and gimbal holder part, thieye t5 edge is 1kg together.</li> </ul> <p>According to the RC timer table, one motor can lift 1570g at 22.2V 9.6A. That is 6280g at total 22.2V. When we use 6S battery we use 25.2V as supply voltage. So this must be able to raise more than that.</p> <p><strong>2020-02-07</strong></p> <ul> <li>Added GPS pipe holder:<ul> <li>pipe holders - GPS holder pipe bottom_20200206.stl</li> <li>pipe holders - GPS holder pipe top_20200206.stl</li> </ul> </li> </ul> <p><strong>2020-02-06</strong></p> <ul> <li>Added a new flat electronic box "electronic box - box cover flat 20200203.stl". It's flat so you can put the batteries on top. (For this need a holder for the arms to hold the GPS.) I'll upload it later when I printed it and tried it.</li> </ul> <p><strong>2019-05-21:</strong></p> <ul> <li>I'm changed the propellers from 17" to 18" and fighting with vibrations. These motors with 18x5.5 propellers can lift 1570g per engine according to the datasheet at 9.6A 22.2V. But I couldn't fly stable with it with a payload of 0.5kg, I think I installed too thin power lines wires between PDB and ESC. So I need to replace this wires too.</li> <li>I cut the carbon frame arms from 50mm to 40mm this made the frame more rigid, the whole system can be handled easier, the motor-motor distance is about 74cm now. (I'm not yet fly with this new setup)</li> <li>I started to design a 3 axis gimbal for crow, couse the cheap banggood gimbal is not enough stable (and it has only 2 axes). I want the gimbal be able to carry a gopro size and a nex5 size camera too.</li> <li>I removed the sonar from the main electronic box and put it on one arm. I think I try to print a new electronic box cover (with vertical sides) and place the batteries on the top. Therefor I need to remove the GPS holder and put it on other arm. This whole changes allows to easily place the gimbal and other things under the frame.</li> </ul> <p>I'll upload the stl files later if it is flys good. But you can still export from the source files from cad.onshape.com.</p> <p><strong>2019-04-07:</strong></p> <ul> <li>uploaded pixhawk 2.4.8, PDB, ESC and motors connection diagramm.</li> <li>added electronic part assembly description text</li> <li>added main BOM section</li> <li>vibrations successfully eleminated from the gimbal (i'll upload the stl files later), now I can balance the motors and the propellers</li> </ul> <p><strong>2019-04-03:</strong></p> <p><strong>You can print it now. It can fly.</strong> I uploaded all the files what I have now. You can check the youtube videos how it flys.</p> <p>I need to design the battery holder, and I think I need to remove the bottom sonar from the electronic box base and put somewhere out, to be able to put the battery nearer to center of gravity. (but i'm not sure it is neccessery)</p> <p>Now I try to decrease resonations coused by the motors and propellers...</p> <p><strong>2019-03-21:</strong></p> <p>Finally flying. I added a video about loiter mode. Few days and upload the final STL files.</p> <p>(The gimbal holder part is not ready yet. But it can fly now.)</p> <p><strong>2019-02-26:</strong></p> <p>Increased motor holder - top.stl thickness with 1mm to be more rigid.</p> <p><strong>2019-02-21:</strong></p> <p>I redesigned the motor holder, couse I dont like the cable connections. I printed one, and I think this is the final motor holder now.</p> <p>Uploaded this files:</p> <ul> <li>motor holder - top.stl</li> <li>motor holder - bottom.stl</li> <li>motor holder - leg and motor cable fastener.stl</li> <li>leg - leg.stl</li> <li>leg - spacer.stl</li> </ul> <p><strong>2019-02-10:</strong></p> <p>Printed the electronic box base, some changes needed, so corrected the design and printed again. Now it seems good. I uploaded the latest stl.</p> <p><strong>2019-02-10:</strong></p> <p>Changed electronic box base, I think it is the final version now to fly. It was very hard and long work to get all the parts good place. I print it then start to put all the electronics inside. :)</p> <p><strong>2019-02-06:</strong></p> <p>Added:</p> <ul> <li>electronic box cover with place to gps holder</li> </ul> <p>Updated:</p> <ul> <li>electronic box base</li> </ul> <p><strong>2019-01-28:</strong></p> <p>Added:</p> <ul> <li>redcon cm703 radio rx holder</li> <li>APM PDB holder</li> <li>replaced electronic box base (added cm703, APM PDB, replaced sonar and pdb position because the carbon pipe was near to sonar)</li> </ul> <p><strong>2019-01-21:</strong></p> <p>Added:</p> <ul> <li>i2c externder holder</li> <li>pixhawk 2.4.8 holder</li> <li>electronix box base</li> </ul> <p>Electronic box base will be modified later. Now supports the following parts fastening:</p> <ul> <li>pixhawk buzzer</li> <li>3dr radio telemetria (it need some modification for correct fastening)</li> <li>pixhawk (flexible) fastening</li> <li>PDB fastening (30mm*30mm hole distance)</li> <li>GY-US42V2 sonar</li> <li>I2C holder</li> </ul> <p><strong>2019-01-14:</strong></p> <p>I get out pixhawk PCB from the plastic box. It will be hold directly with the pixhawk holder, trough a silicon rubber.</p> <ul> <li>Added pixhawk holder stl.</li> </ul> <p><strong>2019-01-10:</strong></p> <ul> <li>Changed<em>carbon pipe fastener</em> to M4 screws, couse the nut head surface is bigger and when u fasten the screw it holds better.</li> <li>Added<em>karbon pipe fastener knob</em> to be able to fasten with hand when disassembling/assembling.</li> </ul> <p><strong>2019-01-08:</strong></p> <p>There is a new carbon pipe fasteren. I printed the first and seems enough rigid. Uploaded the new stl file. And a photo about it.</p> <p><strong>2019-01-06:</strong></p> <p>I modifed the motor holder to cut out the side part. It is not yet printed. (The actual photos shows the old version.)</p> <p><strong>Part list:</strong></p> <p>I'm using this things things now (later i'll make it more detailed, to a full BOM):</p> <ul> <li>4x carbon pipes od: 16mm, id: 14mm, 500mm length</li> <li>4x rctimer 5010-260kv motors</li> <li>4x 1755 17X5.5 Carbon props</li> <li>4x Holybro Tekko32 F3 35A ESC</li> <li>pixhawk 2.4.8</li> <li>raspberry pi 3b+</li> <li>3dr radio telemetry</li> <li>some 2 axis gimbal</li> </ul> <h3>Print Settings</h3> <p><strong>Printer:</strong></p> <p>prusa i3 rework 1.5 custom</p> <p><strong>Rafts:</strong></p> <p>No</p> <p><strong>Supports:</strong></p> <p>No</p> <p><strong>Resolution:</strong></p> <p>0.2</p> <p><strong>Infill:</strong></p> <p>50%</p> <p><strong>Filament:</strong> spectrum petg</p> <p>glassy</p> <p><strong>Notes:</strong></p> <p>infills:</p> <p>carbon pipe fastener: 70%</p> <p>carbon pipe fastener knob: 70%</p> <p>motor holder top: 70%</p> <p>motor holder bottom: 70%</p> <h3>How I Designed This</h3> <p>Here are the source files:</p> <p><a href="https://cad.onshape.com/documents/3bdcb9f78bed2b0df5938d6f/w/d8500baf52c00b1dfe3719d2/e/f6b60db2dcd92a5585872667">https://cad.onshape.com/documents/3bdcb9f78bed2b0df5938d6f/w/d8500baf52c00b1dfe3719d2/e/f6b60db2dcd92a5585872667</a></p> <h3>connect electronics</h3> <p><strong>connect pixhawk, motors, esc, pdb</strong></p> <p>For me the firmware update does not work stable trough the pixhawk (using blheli passtrough) function, so u can use an arduino to update the firmware on the ESC's.</p> <p>After you finished the frame assembly put the electronics box in place. You need to drill holes to get the ESC wires out from the carbon pipe under the electronic box (the holes are the inner part of the pipe). You need to drill the hole about 1cm from the nearest part of the frame holder. Check for the pictures.</p> <p>Connect the things together following the uploaded wiring diagramm. On the electronic box side we use MT60 connectors. Connect the VCC, GND, SIGNAL wires to this this connector. (Connect VCC to + sign on the connector GND to - sign and signal cable to the last.) The ESC's are far from the pixhawk, so for decreasing the noise twist the cables going inside the pipe. This 3 wires is going into the ESC directly from the pipe side, the ESC other side is motor connections, cut the motor cables for the needed length.</p> <p>Check that the<strong>low rpm protection is off</strong> in the ESC's (for low kv motors what we use it is needed).Because the DSHOOT protocol we need to use<strong>chibios</strong> firmware for the pixhawk, and we cannot connect the motors to normal connection instead<strong>we use the 1-4 servo output</strong> and need to reconfigure pixhawk to use this ports to connect the ESC's there:</p> <p>servo9_function: motor1</p> <p>servo10_function: motor2</p> <p>servo11_function: motor3</p> <p>servo12_function: motor4</p> <p>You need to select the DSHOOT protocol. (I'll write here later how.)</p> <p><strong>connect gps, sonar, 3dr radio</strong></p> <h3>BOM</h3> <p>2019-04-08: This is not full yet, when it is ready i remove this line.</p> <p>I link here the parts and names where I bought (maybe it is not the cheapest, but feel free to search..), and maybe the sellers links will change in the future but here is it:</p> <p><strong>motors</strong></p> <ul> <li><a href="http://rctimer.com/?product-1301.html">4x -> Rctimer 5010-260KV Multicopter Brushless Motor (4.0mm shaft)</a></li> </ul> <p><strong>flight controller</strong></p> <ul> <li><a href="https://www.banggood.com/Pixhawk-PX4-2_4_8-Flight-Controller-32-Bit-ARM-PX4FMU-PX4IO-Combo-for-Multicopters-p-1040416.html">1x -> Pixhawk PX4 2.4.8 Flight Controller 32 Bit ARM PX4FMU</a></li> </ul> <p><strong>ESC's</strong></p> <p>4x-> Holybro Tekko32 F3 35A ESC BLHeli_32 3-6S F3 MCU Dshot1200</p> <ul> <li><a href="https://www.banggood.com/Holybro-Tekko32-F3-35A-ESC-BLHeli_32-3-6S-F3-MCU-Dshot1200-Build-In-Current-Sensor-WS2812B-LED-p-1347490.html">from banggood</a></li> </ul> <p>or</p> <ul> <li><a href="https://www.aliexpress.com/item/Holybro-Tekko32-F3-35A-ESC-BLHeli-32-3-6S-F3-MCU-Dshot1200-Build-In-Current-Sensor/32948877835.html">from aliexpress</a></li> </ul> <p><strong>PDB</strong></p> <ul> <li><a href="https://www.banggood.com/5-in-1-V3-PDB-LED-Power-Hub-5V-12V-Dual-BEC-Low-Voltage-Buzzer-Tracker-For-FPV-Racer-p-1118201.html">1x -> 5 in 1 V3 PDB LED Power Hub 5V 12V Dual BEC Low Voltage Buzzer Tracker For FPV Racer</a></li> </ul> <p><strong>pixhawk power module</strong></p> <ul> <li><a href="https://www.banggood.com/APM-Power-Module-with-5_3V-DC-BEC-Available-with-T-or-XT60-p-1035032.html">1x -> APM Power Module with 5.3V DC BEC with XT60 connector</a></li> </ul> <p><strong>bottom sonar</strong></p> <p>(I think I will be remove it from the electronic box and put outside somehow):</p> <ul> <li><a href="https://www.banggood.com/GY-US42-I2C-Pixhawk-APM-Flight-Control-Ultrasonic-Distance-Measurement-Module-p-1309970.html">1x -> GY-US42 I2C Pixhawk APM Flight Control Ultrasonic Distance Measurement Module</a></li> </ul> <p><strong>radio telemetry</strong></p> <ul> <li><a href="https://www.banggood.com/3DR-500mw-Radio-Telemetry-Kit-With-Case-433MHZ-915MHZ-For-MWC-APM-PX4-Pixhawk-p-1007099.html">1x -> 3DR 500mw Radio Telemetry Kit With Case 433MHZ 915MHZ For MWC APM PX4 Pixhawk for RC Drone FPV Racing - 433Mhz</a></li> </ul> <p><strong>propellers</strong></p> <p>For the propellers I'm using carbon propellers now, but I ordered a set tarot</p> <p>Tarot TL100D10 1760 folding propellers, but it's not here yet.</p> <p>Now I'm using:</p> <p>4X 1755 17X5.5 Carbon fiber CW/CCW Propeller prop for RC FPV Multirotor F8A9 from ebay. <a href="https://www.ebay.com/sch/i.html?_from=R40&_trksid=m570.l1313&_nkw=2+Pairs+1755+17X5.5+Carbon+fiber+propeller&_sacat=0&LH_TitleDesc=0&_osacat=0&_odkw=2+Pairs+1755+17X5.5+Carbon+fiber+">The original order is not accessible now. So try pick one from this:</a></p> <p><strong>GPS, and holder</strong></p> <ul> <li><a href="https://www.aliexpress.com/item/NEO-M8N-M8N-8N-8M-GPS-High-Precision-GPS-Built-in-Compass-w-Stand-Holder-for/32908773973.html">1x -> NEO-M8N M8N 8N 8M GPS High Precision GPS Built in Compass w/ Stand Holder for APM AMP2.6 APM 2.8 APM2.8 Pixhawk 2.4.6 2.4.8</a></li> </ul> <p><strong>500mm carbon pipes for the arms</strong></p> <ul> <li><a href="https://www.aliexpress.com/item/4Pcs-DIY-16-14mm-500mm-Vanished-Surface-Carbon-Fiber-Tube-Tail-Tube/32634554477.html">1x -> 4Pcs DIY 16* 14mm 500mm Vanished Surface Carbon Fiber Tube Tail Tube</a></li> </ul> <p><strong>radio rx</strong></p> <p>I have a spectrum dsmx controller, if you have other one please replace:</p> <ul> <li><a href="https://www.banggood.com/REDCON-CM703-2_4G-7CH-DSM2-DSMX-Compatible-Receiver-With-PPM-Output-p-1076460.htm">1x REDCON CM703 2.4G 7CH DSM2 DSMX Compatible Receiver With PPM Output</a></li> </ul> <p><strong>connectors</strong></p> <ul> <li><a href="https://www.aliexpress.com/item/1-Pair-MT60-3-5mm-3-Pole-Bullet-Connector-Plug-Male-Female-For-RC-ESC-to/32883070257.html">1 Pair MT60 3.5mm 3 Pole Bullet Connector Plug Male & Female For RC ESC to Motor JUN5-A</a></li> <li><a href="https://www.aliexpress.com/item/Free-Shipping-New-5-Pairs-XT60-Male-Female-Bullet-Connectors-Plugs-for-RC-Lipo-Battery/32615933233.html">5 Pairs XT60 Male Female Bullet Connectors</a></li> </ul> <p><strong>i2c splitter</strong></p> <p>I you do not want to use the sonar, just the gps then you dont need this:</p> <ul> <li>(CRIUS Pixhawk I2C Splitter Expand Module For Pix APM Flight Controller)[<a href="https://www.banggood.com/CRIUS-Pixhawk-I2C-Splitter-Expand-Module-For-Pix-APM-Flight-Controller-p-984147.html">https://www.banggood.com/CRIUS-Pixhawk-I2C-Splitter-Expand-Module-For-Pix-APM-Flight-Controller-p-984147.html</a>]</li> </ul> <p><strong>other things</strong></p> <ul> <li>we need JST XH connector for the external gimbal connection I used 5p type, but ordered a set: <a href="https://www.banggood.com/40-Sets-JST-2_5mm-XH-2P-3P-4P-5Pin-Male-Female-Housing-Connector-with-Crimps-p-1180083.html">40 Sets JST 2.5mm XH 2P 3P 4P 5Pin Male Female Housing Connector with Crimps</a></li> <li>for the gimbal connection the external part is an 5P JST XH, I ordered a set too: <a href="https://www.banggood.com/10pcs-JST-XH-Connector-2-6S-Imax-B6-Balance-Charger-Cable-Wire-Adapter-Plug-10cm-p-1138762.html">10pcs JST-XH Connector 2-6S Imax B6 Balance Charging Cable Wire Adapter Plug 10cm</a></li> <li><a href="https://www.banggood.com/Micro-2_4G-Receiver-Antenna-Protective-Tube-Cap-For-FPV-RC-Drone-p-1364617.html">1x -> Micro-2_4G-Receiver-Antenna-Protective-Tube-Cap</a></li> <li><a href="https://www.aliexpress.com/item/30-28-26-24-22-20-18awg-5-colors-Flexible-Silicone-Wire-Tinned-Copper-line-5/32872439317.html">18awg silicon cables for connecting the motors and esc-s, this is a bigger set</a></li> </ul> Category: R/C Vehicles
With this file you will be able to print Crow - Detachable Aerial Photography Quadcopter Drone with your 3D printer. Click on the button and save the file on your computer to work, edit or customize your design. You can also find more 3D designs for printers on Crow - Detachable Aerial Photography Quadcopter Drone.