CTC Heated Build Platform Thermistor Fix
thingiverse
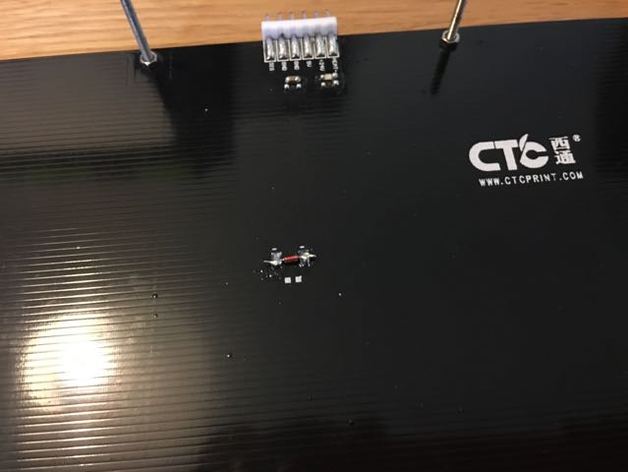
Many owners discover that their CTC Dual Printer's Heated Build Platform is poorly calibrated. The HBP is based on the Replicator HBP design but has a tweaked PCB layout to fit a large thermistor or SMD part. In many cases, the actual temperature doesn't matter as long as it remains consistent. However, my printer was off by a significant margin - 90C resulted in an actual platform temperature of about 60 degrees, while the maximum allowed set temperature of 130 degrees resulted in an actual platform temperature of just 90 C. This inconsistency made the HBP unable to reach reliable ABS print temperatures. The root cause of this discrepancy is that the CTC chose the wrong thermistor part for their printer. The used thermistor's beta value was way off from what's required. I'm running Sailfish 7.7, and according to the source code, the firmware requires a 100k thermistor with a beta of 4066K and an R2 resistance of 4.7K. Replacing the thermistor with a better part should solve this problem. I chose the EPCOS B57540G0104J thermistor for its small size but high performance. You can find it at RS, Digikey, Farnell, or similar suppliers. Here's how to replace the thermistor: Step 1: Remove the HBP by fully removing the four bed levelling wing nuts and disconnecting the power connector. Step 2: Locate the original thermistor on the board. Use your soldering iron and a solder sucker or wick to remove it, keeping it as a spare. Step 3: Identify the two unused pads next to the thermistor where you'll solder the new one. The new thermistor is tiny; make sure its legs aren't twisted before installing it. Step 4: Solder the new thermistor about an inch away onto the SMD pads. Apply a small piece of kapton tape to keep the bead in contact with the board. Step 5: Reassemble your printer, making sure to tighten the levelling nuts tightly so that the platform is definitely low enough for bed levelling. Use ReplicatorG's monitor tool to set a test temperature for the HBP. After replacing the thermistor, my temperatures measured on the underside of the HBP are within about 2% of the set temp, and the surface temperature is a little lower than that. When I set 130 degrees, the underside of mine is at 127 and the top surface gets to 118 - perfect!
With this file you will be able to print CTC Heated Build Platform Thermistor Fix with your 3D printer. Click on the button and save the file on your computer to work, edit or customize your design. You can also find more 3D designs for printers on CTC Heated Build Platform Thermistor Fix.