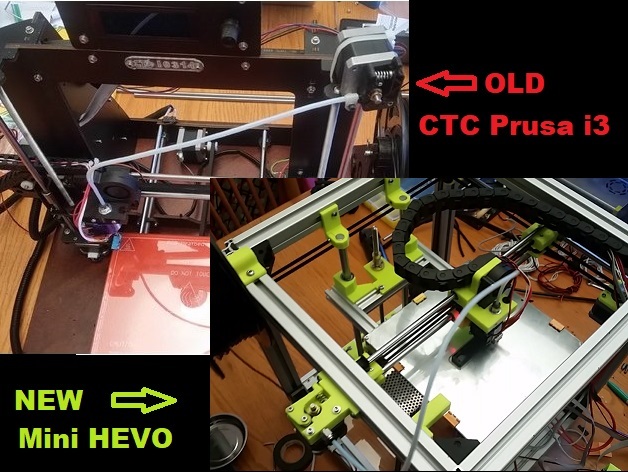
CTC PRUSA i3 Pro B Upgrade --> Mini Hypercube Evolution (HEVO)
thingiverse
This is a configuration file for Klipper, an open-source firmware for 3D printers. The file appears to be specific to a CoreXY printer configuration and is tailored for use with an Arduino Mega (ATmega1280) microcontroller. Here's a breakdown of the key sections in this config file: 1. **Stepper Motor Configuration**: This section defines the pins used for each axis stepper motor, including X, Y, and Z axes. 2. **Extruder Configuration**: This section defines the extruder settings, including the step pin, direction pin, enable pin, and temperature control parameters like PID gains and heater and sensor pin assignments. 3. **Heater Bed Configuration**: Similar to the Extruder configuration but for the heated bed, it specifies PID gains and sensor pin for temperature control. 4. **Fan Configuration**: This section simply assigns a pin for a fan (in this case, `ar7`). 5. **MCU Configuration**: Specifies the microcontroller's pin mapping and serial port settings. 6. **Printer Configuration**: Defines various printer parameters like kinematics mode (CoreXY), maximum velocities and accelerations, and some specific settings for Z-axis motion. 7. **Probe Configuration**: Defines a probe that can be used to detect bed height or other positions. In this case, it's set up to use an external probe but doesn't specify how to activate or deactivate it through G-code commands, suggesting manual setup might be required for the probe activation/deactivation process. **Key Takeaways** - This config file is specific to a CoreXY printer with certain hardware components (e.g., ATmega1280 microcontroller). - It includes detailed settings for each axis stepper motor, extruder, heated bed, and fan. - The configuration also sets up a probe that can be used for height detection but doesn't specify how to activate or deactivate it through G-code commands. **Practical Usage** To use this config file, you would need: 1. **Firmware Compilation**: You'd first compile the Klipper firmware with specific settings for your printer's hardware (e.g., ATmega1280) using a tool like `make`. 2. **Flashing Firmware**: Then, you'd flash this compiled firmware onto your printer's board. 3. **Config File Editing**: After flashing, you could edit parameters in the config file to suit your specific printer setup and operational preferences. **Additional Notes** - This configuration is quite detailed and includes settings for PID control of temperature, which suggests a high level of precision and adjustability. - The use of an external probe indicates a focus on precise bed leveling and potentially advanced calibration techniques.
With this file you will be able to print CTC PRUSA i3 Pro B Upgrade --> Mini Hypercube Evolution (HEVO) with your 3D printer. Click on the button and save the file on your computer to work, edit or customize your design. You can also find more 3D designs for printers on CTC PRUSA i3 Pro B Upgrade --> Mini Hypercube Evolution (HEVO).