Cup Holder (Slides Under Desktop or Tabletop)
prusaprinters
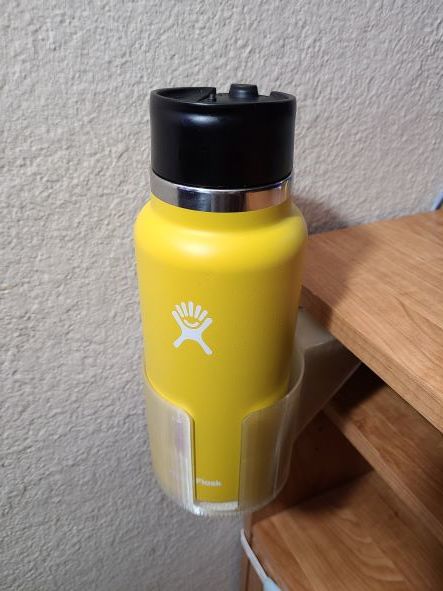
<p>EDIT: This is a simple design. Requires no supports, and slides under the desk when not in use. Has a long print time, but well worth it as it only requires mount screws beyond the print material.</p> <p>======================================================</p> <p>I spent some time trying to find a desktop cup holder that would free up my desktop space and avoid the risk of my beverages tipping over onto a keyboard, or worse. I didn't find any I liked, so I designed my own. Please note as part of your installation plans that the cup holder part inserts from behind, not from the front, to allow the stopper mechanism to exist, so you'll need to leave enough room for that.</p> <p>Design Notes: This design went through about 9 iterations before I came upon the size/shape/printability that I was willing to share with Thingiverse. I wanted something simple and effective. No hardware (beyond wood screws to mount the rail to the underside of the desk) are required. It’s just two parts as I’m following the KISS principle in design. No supports are needed if you follow the guidance below. This write up is very comprehensive and written for someone who is not very experienced with 3D-printing/additive manufacturing. For those who are seasoned veterans, I apologize for the lengthiness of the write up. You can just download and print.</p> <p>I spent a lot of time developing this because I couldn’t find a good under desk cupholder on Thingiverse that was easy to print, required no “assembly” and looked robust & functional. I didn’t want a clamp on the side of desk cup holder. I didn’t want something that required numerous prints followed by hardware/glue assemble. I didn’t want something that required massive supports for the print. The design I’ve shared has an inner cup holder diameter of 100mm, which is plenty big enough for most large coffee mugs as well as easily fitting a 40oz insulated Hydroflask (which is 96mm in diameter). The design only requires two prints, the sliding cupholder itself, and the under desk rail mount. I’ve put a lot of time and effort in to ensure this is going to work for most folks, however, if you have suggestions for improvements/tweaks to fit your application, please let me know and I’ll do my best to accommodate.</p> <p>There are three versions to accommodate your preference as to where the handle slot is located (left side 60°, right side 60°, middle), with the intent that you are going to want the handle easily accessible depending on which side of your desk you mount it. I can move the slot to any angle easily, so I’m willing to upload requests for other angles/locations.</p> <p>If you follow the guidance below, the prints themselves are rather forgiving as I did go through enough iterations to feedback what was working, and what wasn’t working, in the final design.</p> <p>Here’s some hints to ensure the ~30 hour total print time (~18hr for the cup slider, ~ 12hr for the rail mount) print is a success on the first try:</p> <p>For printing the sliding cup design.</p> <ol> <li>You’ll want to print with a brim to ensure it holds to the print surface and doesn’t distort as it cools and contracts.</li> <li>I’d suggest 50% print infill if you follow suggestions 3 & 4 below. You could probably use less, but why risk it when the difference in print time is a couple of hours at most.</li> <li>The walls of the cup holder “surface” are 1.6mm, with the intent that a 0.4mm nozzle will yield no “infill volume” if you use the typical 2 walls in your slicer settings (2 inside walls + 2 outside walls = 4 total wall width = 1.6mm)</li> </ol> <p>a. Note: My first version had 3mm thick walls, and it was a 24 hour print and it was clear that it was overbuilt when I tested out the 1.6mm wall thickness. [If you want this version for whatever reason, I’m happy to post upon request] 4. It would behoove you to use 23 Top Layers to ensure the dovetail is at 100% infill and avoid “danglys” with printers that aren’t dialed in. [if your printer is dialed in with your particular filament, you could leave the stock settings for top later count, which is typically 4 layers] 5. If it isn’t obvious, you’ll want to print this in the upright orientation as it would be used, with the open end of the cup holder pointing upright.</p> <p>For printing the under desk rail mount.</p> <ol> <li>I personally would print 100% infill for this to ensure tolerances are kept and there’s no sagging. I’ve gotten away with 50% infill on some prints, but the time savings (an hour or 2) just doesn’t seem worth it to me. Stick with 100% infill and you’ll have a really solid tight fitting design.</li> <li>I would also highly recommend printing with a brim to ensure the part does not distort when cooling as that will mess up the tight tolerances of the dovetail slider.</li> <li>If it isn’t clear, this should be printed inverted from the orientation it would be mounted to a desk, so the part that interfaces with the underside of the desk is face down on the print bed.</li> </ol> <p>For assembly and tolerance check.</p> <ol> <li>Once you have both parts printed, carefully remove the brim using the method of your choice. I personally prefer a metal deburring tool. ()</li> <li>Add a little bit of oil on the rail dovetail inside crease as well as the sliding surface of the rail. I use Lilly White clear sewing machine oil, but any good lubricating oil will work that doesn’t dissolve your print material. In a pinch, Canola oil, or Olive oil, would do just fine. The goal is to make the sliding surfaces that interface slide super smooth and avoid binding.</li> <li>The sliding cup holder is inserted into the under desk rail mount from the “rear”, such that the slot and stopper prevent the cup holder from being pulled too far out. The current design has a 60mm overlap when the guide hits the stop, which should be plenty to distribute the load from a full 40oz hydroflask, let along a cup of coffee/tea/other beverage.</li> <li>If you are getting any binding of the sliding mechanism after using a little oil, you’ll need to inspect for where the interference is happening. Don’t give up, the tolerances are spot on in the design, so it’s something print related if it’s not sliding easily with 1 or two fingers worth of pressure.</li> </ol> <p>a. First, I’d see if the sliding cup dove tail needs a minor trim to the very edge of the dovetail to increase the gap with the rail mount.</p> <p>b. Second, I’d look for any “danglys” on either of the two parts where the dovetail is angled, and carefully remove them.</p> <p>i. I printed in silver color filament on my printer and it was spot on, no modifications required, then switched to purple filament that very same day on the same exact printer, and ended up with a bunch of “dangly” strings which caused the parts to bind. An exacto blade and a fingernail file fixed that issue in under 5 minutes.</p> <p>For final install and use.</p> <ol> <li>Ok, it’s easy to check how you want to mount it just by holding the rail and installing the cup slider from the back. Slide the cup holder all the way forward to the stop, and determine how far you want it to stick out from the edge of your desk when the cup holder is at the “stop”.</li> <li>Make your appropriate marks for location and hole alignment. It’s up to you what screws/bolts you want to use. The holes are plenty big at 4.5mm minimum diameter and could easily be drilled out a little if you are going with crazy large diameter screws.</li> <li>If you’re using pan head screws, just check that the top will remain below the sliding surface so as to not interfere with the sliding dovetail. The screw holes can accommodate standard tapered head screws or pan head screws.</li> <li>There is a reason there are 4 screw holes at one end and only two at the other end. The tension loading on the screws is only on one end when the cup holder is fully loaded as the back end is under compression (aka, those screws don’t do mcuh when fully loaded) Depending on the screw your using, and table thickness, you could probably get away with just using 4 mounting screws for the rail, but why not beef it up and use all 6 to ensure it’s solid as a rock.</li> </ol> <p>Other items to note:</p> <ol> <li>Assuming your cup is tall enough to stick above the top of the cup holder edge, it’s pretty much impossible to push it back and have it “unmount” (aka fall out the back end). However, if your cup sits below this, you could easily put something at the back end of the slider to ensure it can’t get bumped so far under the table that it falls out onto the floor. I think this is a pretty unlikely scenario so I didn’t bother designing some sort of “catch latch”.</li> <li>When you’re not using it, it can push back under the table so it’s out of view. If you care to, you can take the cup slider completely out of the rail and store it in a drawer.</li> <li>If you want to use significantly smaller diameter cups, you could design an insert that drops into the cup slider. Probably not necessary though as it’s pretty tall, accommodating an errant tip over of a cup by catching it before it’s tilted over to far.</li> <li>I’d love feedback on what needs tweaking, or just a totally different approach. I’m happy to add more STL files based on folks requests. Team effort will make this a highly desired item for practical daily use.</li> </ol> <h3>Print Settings</h3> <p><strong>Printer Brand:</strong></p> <p>Creality</p> <p><strong>Printer:</strong></p> <p>Ender 3 Pro</p> <p><strong>Rafts:</strong></p> <p>No</p> <p><strong>Supports:</strong></p> <p>No</p> <p><strong>Resolution:</strong></p> <p>0.2mm layers (0.4mm nozzle)</p> <p><strong>Infill:</strong></p> <p>50%</p> <p><strong>Filament:</strong> Any PLA or PLA+</p> <p>An</p> <p><strong>Notes:</strong></p> <p>Print with at least 23 top layers to ensure the dovetails are solid to maximize load bearing capability.</p> <p>When installing under your desk or table, take care to note that the cup holder part installs from the back, sliding forward, and out from under the desk. This is for the safety stop mechanism to function properly.</p> Category: Organization
With this file you will be able to print Cup Holder (Slides Under Desktop or Tabletop) with your 3D printer. Click on the button and save the file on your computer to work, edit or customize your design. You can also find more 3D designs for printers on Cup Holder (Slides Under Desktop or Tabletop).