Cupcake Filament Cutter
prusaprinters
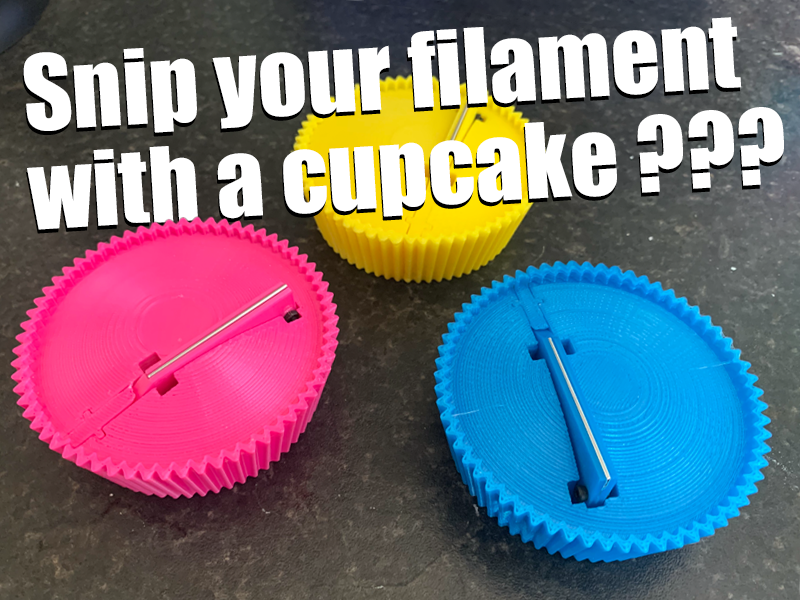
<p>We all have to do it, we all have to snip the ends of our filaments before loading them into the printer. But maybe instead of having snips around, we could just use a cupcake?</p><p>Once printed and assembled, just slide in filament and snip!</p><figure class="image"><img src="https://media.prusaprinters.org/media/prints/64623/rich_content/bee9171a-9937-4496-ac42-c18792fe2593/img_7505.jpg#%7B%22uuid%22%3A%2242c2e289-192f-4d02-8f33-7f485f1147ab%22%2C%22w%22%3A4032%2C%22h%22%3A3024%7D"></figure><h4>Ben of Materials</h4><ul><li>1x Bright coloured filament (swap for boring colours if you prefer)</li><li>2x M2x6mm hex bolts and nuts</li><li>1x Single edge blade (if you aren't sure what ones, <a href="https://www.amazon.co.uk/gp/product/B005O251NK">it's these</a>)</li></ul><h4>Printing Instructions</h4><p>Print at 0.2mm layer height.</p><p>No supports needed.</p><p>When printing the blade lock, you may want to use a brim.</p><p>There are two versions of the cupcake, a normal one which will cut at a 45 degree angle to the filament, and one that cuts at 90 degrees. Print the one that best suits your printer!</p><p>If you are left handed, you might prefer to print everything mirrored.</p><h4>Assembly</h4><ol><li>Insert one M2 bolt through the blade spring and clamp and loosely fasten the nut</li><li>Insert the blade between the clamp and spring and then insert the second M3 bolt</li><li>Tighten both M2 nuts with a small spanner or pliers</li><li>Partially insert the blade lock into the slot on the cupcake</li><li>Position the curved end of the blade assembly between the two lock pillars</li><li>Push the blade lock along with the blade assembly into the cupcake</li></ol><p>If you have done things correctly, the lock will be flush with the rest of the cupcake, and the end of the blade assembly furthest from the lock will be springy.</p><h4>Usage</h4><ol><li>Insert filament into the hole furthest from the blade, and slide until it is exposed at the hole nearest the blade</li><li>Press down on the blade until it snips</li><li>Say, “You've been cupcaked!” (this is optional)</li><li>Remove the filament</li><li>Remove the… okay do you really need any more instructions? You can use a 3D printer but you can't use a cupcake???</li></ol><h4>Disassembly</h4><ol><li>Use a small flat blade screwdriver to lift the blade lock until it is free</li><li>Lift the spring blade mechanism out of the cupcake</li><li>Undo the bolts</li></ol>
With this file you will be able to print Cupcake Filament Cutter with your 3D printer. Click on the button and save the file on your computer to work, edit or customize your design. You can also find more 3D designs for printers on Cupcake Filament Cutter.