Cupcake XY Stage Quick Release Kit
thingiverse
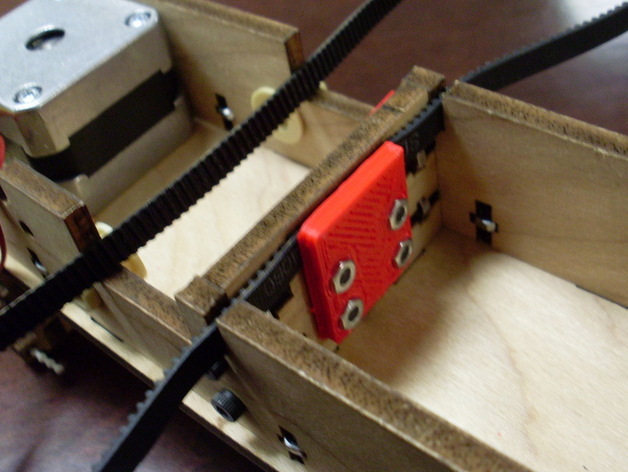
Like TwoTimes, I've been experimenting with new chassis designs. I became so frustrated with repeatedly tearing down and reassembling my Makerbot that I designed this kit to make removal of the entire XY stage a breeze. It also makes cleaning out the floor of the build area very easy. The entire process takes less than a minute and requires NO TOOLS!!! To change the XY stage out on a stock Makerbot, I typically had to: 1) Remove the 8 bolts holding the rod covers on the left side of the bot with a hex wrench and needlenose pliers to hold the nuts. 2) Remove the rod covers and slide the rods out. 3) Loosen the X Idler with a different hex wrench and an open end wrench 4) Put a band-aid on the cut I got when the wrench slipped 5) Take the XY stage off and loosen the 4 bolts holding the belt retainers on, removing the belt from the XY stage. 5) Fish around for the nuts that I dropped and lost in my Cupcake, and after giving up, pull new ones from my spares box 6) Put the experimental stage on the belt and place the assembly into the Cupcake. 7) Wrestle with holding tension on the idler with one hand, hold the bottom nut with my second hand, and tighten the M8 bolt with my third hand, hoping that I've gotten it tight enough but not too tight. 8) replace the guide rods and begin replacing the rod covers and bolts. 9) Pretend I'm a neurosurgeon or operating the Mars rover by blindly trying to thread a nut onto an M3 bolt using needlenose pliers, holding the nut between the idler pulley and guide rod. 10) Put a dollar in the Swear Jar after dropping the nut for the 16th time. 17) Finally get it all together and realize 30 minutes have passed and I'm no longer in the mood to use the Makerbot. With the parts in this kit, the process is more like this: 1) With your FINGERS, slide the guide rod covers down until the keyholes in the covers allow them to fall off in your hand. 2) Leave the screws right where they are, knowing they will be held in position by the nut retainer on the inside of the bot. 3) (assuming #2 even counts), Slide the guide rods out. 4) Slide the XY stage to the left and with your FINGER, push inward on the right tab on the X belt retainer (from this kit) just inside the hole that the X belt runs through. Pushing in on the tab releases tension on the belt. 4) Push the XY stage rearward to release the belt's teeth and pull up on the XY stage, removing it from the bot. 5) To replace it, simply slide the belt into the slot on the XY stage and wiggle it back and forth until you feel the belt teeth seat into their slots. 6) Push on the tab on the LEFT side of the stage, which will tension up the belt, locking it in place. 7) Replace the guide rods. 8) Push on the inner nut retainer, which will hold the bolts for the rod cover plates solidly in position as you slide the keyholes of the rod caps over the bolts. 9) Push up on the rod caps, moving the bolts onto the thin section of the keyhole. The integrated spring will hold the covers in place. Your bot is ready to use. Full disclosure - Although this was a unique creation, I later discovered that my spring design for the rod cover was already "invented" by Wasjazn (http://www.thingiverse.com/thing:3745). I was using it to hold the cover in place against gravity, while Wasjazn used it to take rattle out of short guide rods. I have since modified my design to include the anti-rattle function, but my design's keyhole installation and nut retainer are completely unique. Instructions Print two sets of X Rod Covers and one set of Quick Release. Warning: The x Belt quick release uses four small, detailed parts that WILL need some cleanup to make them slide well. Also, if you have a high-rez profile, I'd recommend using it. Assembly of the rod covers is pretty self explanatory. Clean the holes, press fit the nuts and assemble as in the photos. The belt tensioner is not as straightforward however (although if you look at the pieces and the photo, you can figure it out) The belt retainer plate is just as simple as the rod cover (press-fit the nuts) but the other three parts are more finicky. The double ramp section is placed into the fixed middle piece with the high parts of the ramps facing to the right. The long pin on the sliding piece of the tensioner points to the left. The M3 nuts pass through the slots of the sliding piece, through the holes in the fixed piece, and screw into the nuts on the retainer. With the slide in it's rightmost position, tighten the M3 bolts until the belt is secure (but it doesn't need to be too tight). When you move the slider to the left, about 3mm of extra space is created as the slide moves down the ramp. The belt can easily come out.
With this file you will be able to print Cupcake XY Stage Quick Release Kit with your 3D printer. Click on the button and save the file on your computer to work, edit or customize your design. You can also find more 3D designs for printers on Cupcake XY Stage Quick Release Kit.