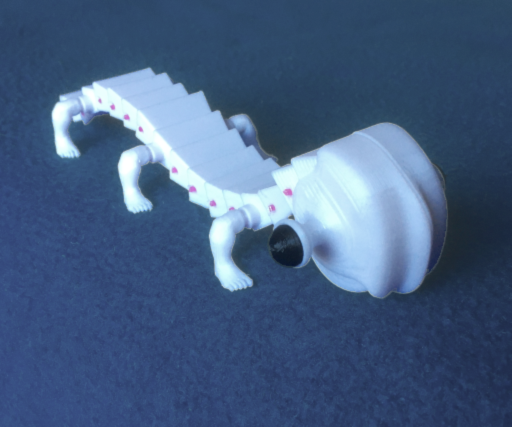
Curl-Up
thingiverse
Print your own articulated wentelteefje! Curl-up (aka Wentelteefje aka Rolpens) is the subject of M.C. Escher's lithographs, "Curl-up", and his "House of Stairs" series. This is a poseable model with body segments held together with shafts of 1.75mm filament. The joints are not very durable and this is really not a toy for children, at least in this version. The three "plate_xxx" files should have all the body segments you need for this build, though you will also need to print a head. The remaining STLs are individual parts for reprints. You may want to print with brims, particularly the arm-leg plate. The arm-legs are a mashup of atartanian's [Beefy Arm Starter Kit](https://www.thingiverse.com/thing:217849) and [Foot holder](https://www.thingiverse.com/thing:4058969) from Stevie135s. The head model is from [Escher Worm](https://www.thingiverse.com/thing:3014319) by sergioinglese. The head comes in two versions, a single-piece mesh and a two-part mesh, split down the middle and held together with two pins. The pin system is from [PLA Pin Connectors v2](https://www.thingiverse.com/thing:130879) by whpthomas. Printing the head in two halves is the best way to print the eye stalks cleanly on a filament printer, and you can change filament at the eye layer to change colors, or just paint the eyes. The single-piece head might be better for SLA. The head is the heaviest part of the model and can be printed with 5% infill. I've included illustrations of the parts list, and how they go together. It may seem a little complicated but there are basically only three sizes of body segments, large, medium, and small. For convenience, the large segments are marked with three dots in front, medium with two, and small with one. There's only one small segment. Of the other two sizes, there are varieties with leg joints and without leg joints. Furthermore these segments each have one piece that has thicker walls than the rest, which appears at the transition between sizes. So the body starts with large segments at the front, followed by medium segments, and then a final small segment and the tail. At each size change there is a segment with thick walls, which keeps the following smaller segment from fitting too loosely. Line up the holes between two adjacent segments and jam a piece of filament down the hole. It should pass all the way through to the other side, then trim the ends with flush cutters. In some parts (and possibly due to variances in filament diameter) the filament will get stuck halfway through. In that case you can just trim the one end and then jam in another piece of filament from the other side until it sticks.
With this file you will be able to print Curl-Up with your 3D printer. Click on the button and save the file on your computer to work, edit or customize your design. You can also find more 3D designs for printers on Curl-Up.
