Cursed IC - Coffin shaped candy dish (or "dead parts" bin)
thingiverse
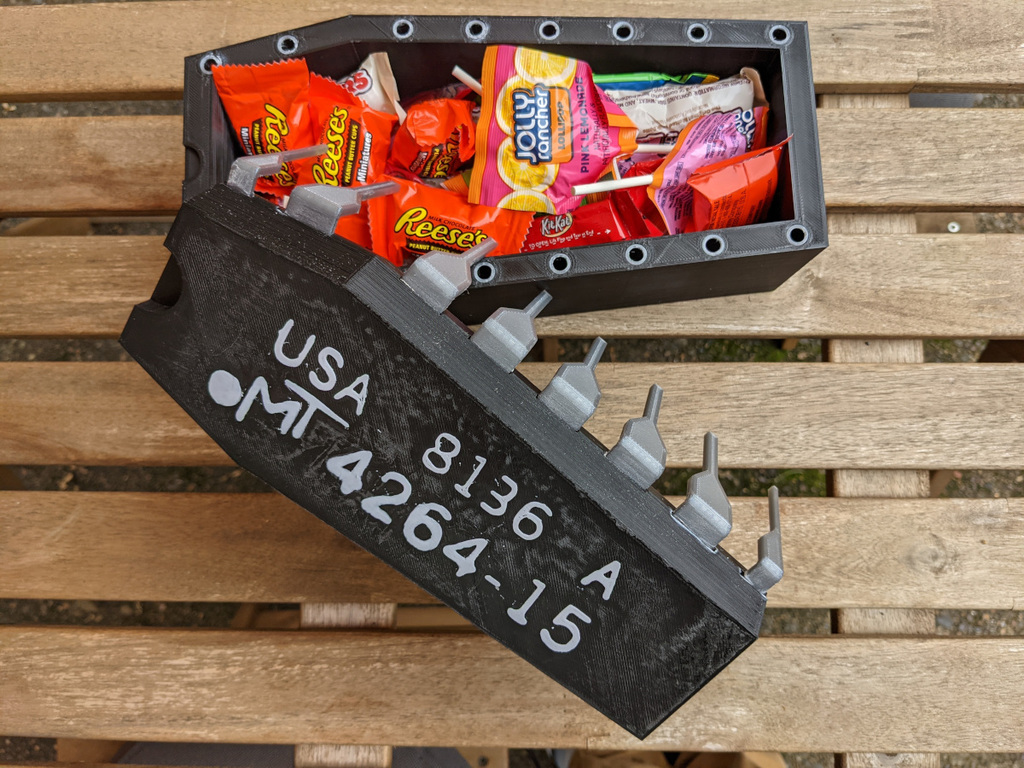
## About this print Inspired by the Commodore 64 "Repairathons" done by Adrian Black on YouTube (channel: Adrian's Digital Basement), I've tried to make this as much of a cursed object as I could by including appropriate markings for the unreliable MT memory chip and a socket with round holes. ## Max Hex For maximum cursed object aesthetic, print the pins using a metal-filled filament (see Protopasta), assemble, use a heat gun to bend out one of the legs out of the socket, and then spray with vinegar or something else corrosive to cause the metal-filled filament to tarnish. ## 1xScale vs 12xScale files: - 1xScale files are as close to original scale to a memory chip that I could create, but are modeled for 12x scale parts to fit together well. I've only included these files to aid modification and scaling. - 12xScale files will fit on a 300x300 print bed. - YMMV for scales smaller than 12x (1200%) ## Changes I've made to the model since the photo was taken: - Slightly Enlarged the slots on the IC for the pins to interface into so sanding of the head (fattest part) of the pins should no longer be needed. - Thinned the "iron-on" text to print as a single 0.2mm layer to make text appear less blobby when ironed on. ## iron-on (or glue-down) text: - Put down a single sheet of aluminum foil down on your print bed - Fix the corners down with binder clips, pulling the foil tight - Apply glue stick to the foil - Double check that the foil will not interfere with the movement of the printer and will not come into contact with homing sensors - Print onto the aluminum foil. - Trim excess, position lettering onto "IC_COFFIN_LID" print, cover with a paper towel, and use an iron (I set mine to maximum heat) to soften the text until it adheres to the main "IC" body. CAUTION: Be very self-aware of how the iron is positioned to avoid deforming prints. NOTE: Glue stick residue will be left behind. TIP: See Prusa's iron-on t-shirt tutorial for helpful details ## Untested files: The stencil file is untested. The intent is for the pieces of the stencil to be hot-glued into place, paint to be applied, and then the stencil to be removed. GLHF. ## Print list: ### silver or metal-filled: - `FULL_PIN_12xScale`: 12 needed - `HALF_PIN_A_12xScale`: 2 needed - `HALF_PIN_B_12xScale`: 2 needed - `SOCKET_HOLE_FILL_12xScale`: 16 optional ### matte black or black: - `IC_COFFIN_LID_12xScale`: 1 needed - `SOCKET_COFFIN_BOX_12xScale`: 1 needed ### matte grey (recommended) or white (as pictured): - `LETTERING_IRON_ON_12xScale`: 1 optional ### whatever color is at the end of the roll: - `LETTERING_STENCIL_12xScale`: 1 optional
With this file you will be able to print Cursed IC - Coffin shaped candy dish (or "dead parts" bin) with your 3D printer. Click on the button and save the file on your computer to work, edit or customize your design. You can also find more 3D designs for printers on Cursed IC - Coffin shaped candy dish (or "dead parts" bin).