Curtain Automation
thingiverse
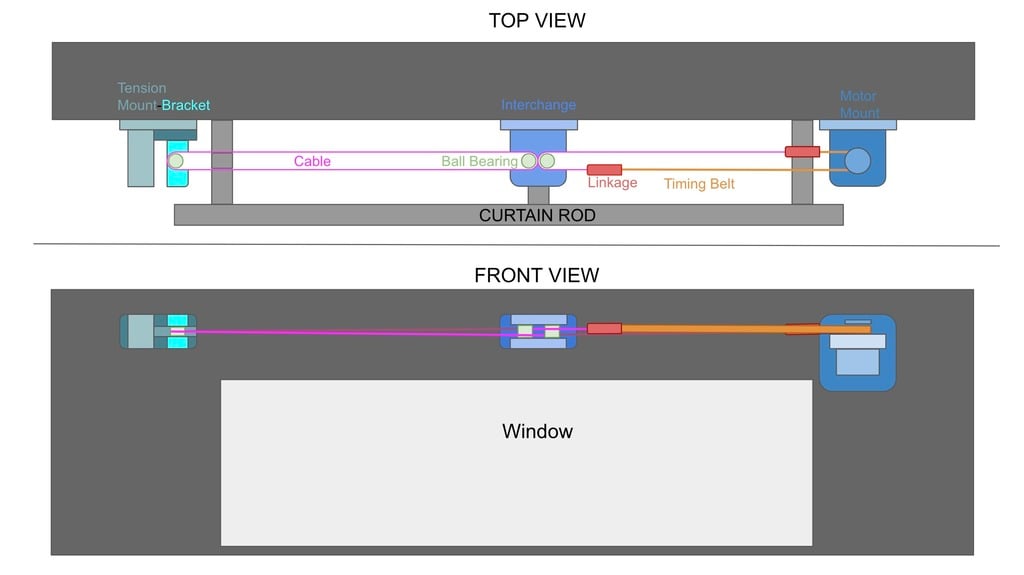
About: I created a DIY home automation for my curtains using a Nema 17 Stepper, TB6600 Driver, and a Raspberry Pi. Depending on the software you choose to implement, you can use either the Pi Zero W or Pi 3A+. Initially I used the Raspberry Pi Zero W with Adafruit IO to connect via IFTTT for Google Assistant activation. Since then I have upgraded to Pi 3A+ to run a database and maintain logs, and to create future events automatically based on those logs. A php server allows me to display and create future events. I will post the code on github and link it once I make an easy implementation for it. Required hardware: - Raspberry Pi Zero W or 3A+ - Nema 17 Motor (or equivalent with similar power and can fit in housing) - TB6600 Stepper Driver (or one that can power motor) - Pi power supply - Power supply for driver (suggested 3Amp, 12V) - Connector for power supply to driver - Wire for power connection and to connect to pi - 4x13x7mm grooved ball bearings - Gt2 timing belt (at least 1/2 width of window) & 16 tooth 5mm pulley for motor - 3/32 cable (~2x width of window) - Appropriate cable stops (x2) - #6 machine screws and nuts (various sized for mounting ball bearings and tension bracket) - 4mm 10mm long screws (x4) - 2.5mm ~5mm long screws (x12) - Screws to mount to wall Setup: The tension bracket and mount are joined together with #6 screws and nuts. In the end of the bracket and in the interchange go a total of 3 4x13x7mm grooved ball-bearing. The tension mount is screwed to the wall on one side of the curtain, the interchange is screwed to the middle of the curtains, and the motor goes on the opposite side of the tension mount. From here the timing belt goes into the two linkages and around the motor. With one end of the timing belt attached to each of the ends of the timing belts, the other ends attach to the cable with attached stops. When the cable/timing belt is implemented, it will make a stretched figure-8 with the loop intersection going through the interchange to prevent rubbing, one end going around the motor and the other going around the tension bracket pulley. To connect the curtains to the cable, I use U-bolts, but I do not find this to be a perfect system and would love suggestions. Code can be found at https://github.com/MPZinke/SmartCurtain Please let me know what you think. I'll post pictures and diagrams soon.
With this file you will be able to print Curtain Automation with your 3D printer. Click on the button and save the file on your computer to work, edit or customize your design. You can also find more 3D designs for printers on Curtain Automation.