Custom Printable Perplexus - "CurviLinear"
thingiverse
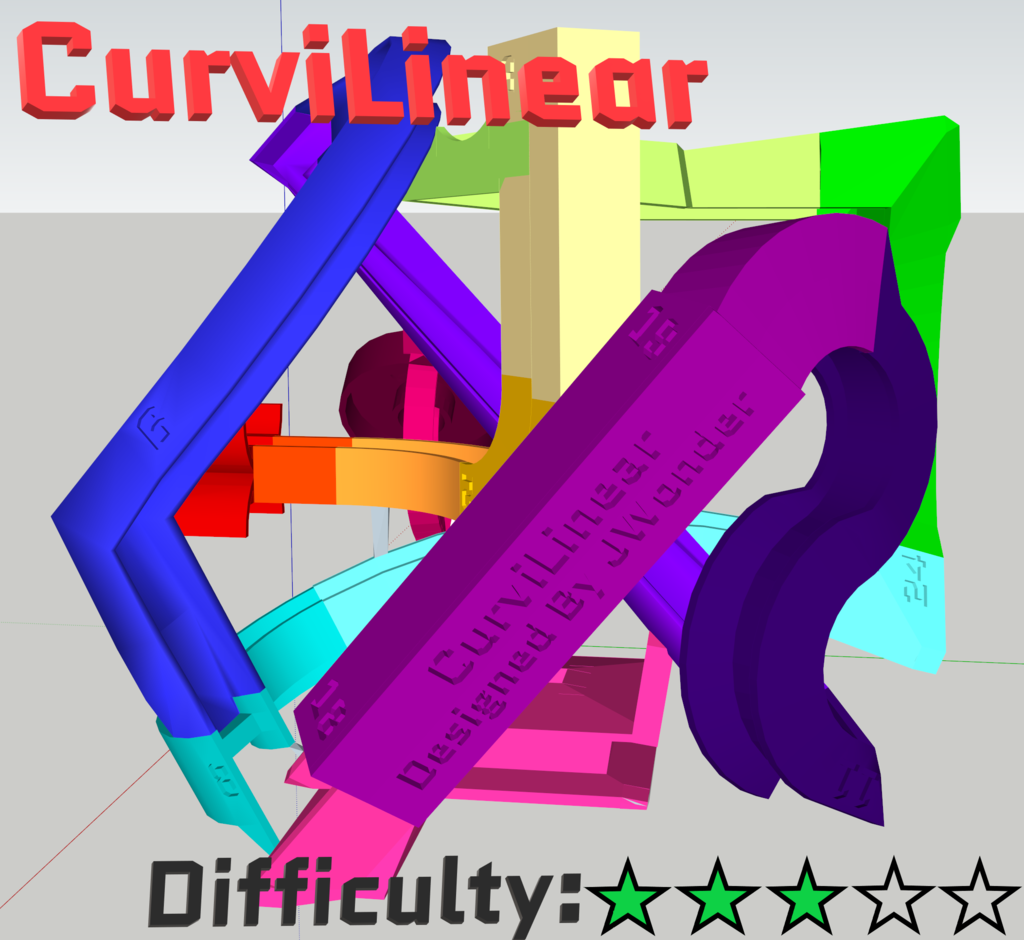
A Perplexus is a three-dimensional maze challenge that requires navigating a ball through obstacles using gravity to your advantage. Inspired by the Instructables "Design Your Own Perplexus," this custom-designed puzzle, called CurviLinear, was created on SketchUp Pro instead of Autodesk inventor, and it utilized the sweep command in conjunction with push/pull, follow me, and align faces commands. CurviLinear fits inside a 95mm^3 plastic cube and uses a >6mm ball bearing. If you don't have a ball bearing, you can print one. This custom-designed Perplexus features about 28 obstacles, every part is double-sided, and it could be played in reverse. As the name implies, CurviLinear is moderately difficult and includes features such as the "Twisty Rope," curvy arches, tubes, sharp turns, inconsistent walls, and drops. To create your own Perplexus, there are two ways to do it. The first way is to 3D Print the preassembled Perplexus all in one shot, which is convenient and quick but will require more support material and result in a lower quality print. The second way is to 3D Print all 14 separated parts and then assemble them using PLA soldering, hot glue or superglue. Use the images and STL files as a guide when doing so, since the parts are color-coded and numbered. Support material is necessary but must be blocked in certain areas, as it can be difficult to remove. Higher infill percentages or more walls will lead to a less fragile chassis. Lower speeds will increase print quality. The enclosure instructions provide guidance on how to create a stable surrounding grip for the puzzle when playing with it and eliminate the need for buying a plexiglass enclosure. The vornoi cube enclosure is included within the files, split into two halves to minimize support material and make it possible to install the Perplexus inside. Each half has nodes connected to the walls that may require support, ensuring the Perplexus is in place and will connect to different parts. To install the enclosure, try fitting the completed Perplexus when both halves are closed, properly oriented, and lined up. The parts should line up with the faces of the nodes. Once confirmed it fits, take the halves off and apply superglue to the bottom half node faces where the puzzle faces will make contact, as well as glue in areas where the puzzle itself will make contact with the enclosure's web. I plan on continuing this series and creating more levels of difficulty. The next ones will be "Learning Curve" (hard) and "Hypersphere" (harder). Let me know what you think and if you have any success. Create your own Perplexus by following the video tutorial at https://www.youtube.com/watch?v=qGxX3rpv1Lw. Update: All numbers are engraved, obstacle #9 obstruction fixed, wall height adjusted for tricky parts, STLs for separate parts, and new voroni enclosure included.
With this file you will be able to print Custom Printable Perplexus - "CurviLinear" with your 3D printer. Click on the button and save the file on your computer to work, edit or customize your design. You can also find more 3D designs for printers on Custom Printable Perplexus - "CurviLinear" .