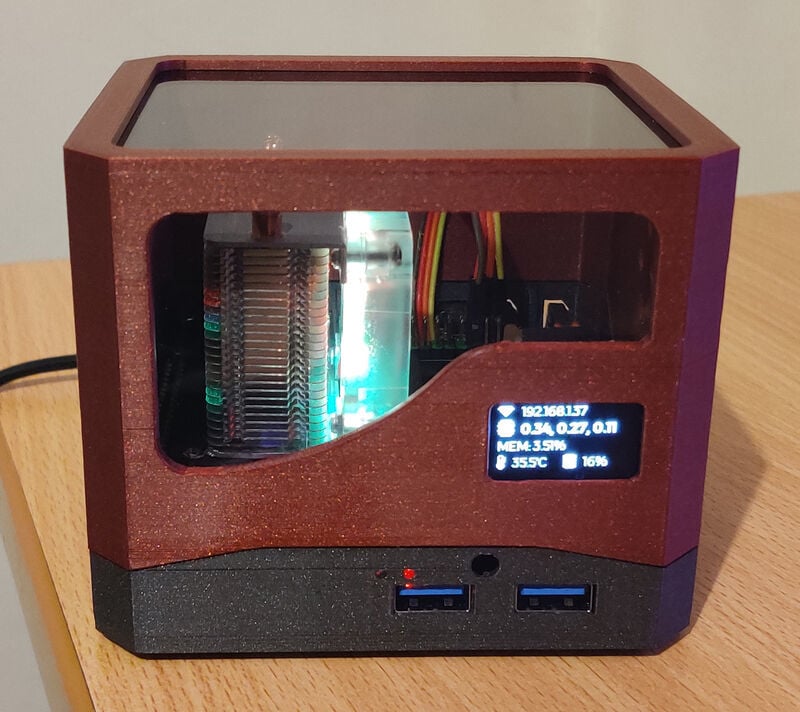
Custom Raspberry Pi 4 Build - Mini Box Server with Ice Tower Cooler, OLED Status Display and Argon One Extender Board
thingiverse
Custom Raspberry Pi 4 Build - Mini Box Server with Ice Tower Cooler, OLED Status Display and Argon One Extender Board For a long time, I have been looking for the ideal Raspberry Pi case, however, they all seemed lacking it some way, preventing me from building one as I had liked, complete with: • Effective cooling. • Inclusion and space for an SSD. • Position of peripheral ports – Ideally HDMI and USB ports at the back, with optional USB ports at the front. • A power on / off button. • Modern design. With a 3D printer and some basic knowledge of 3D CAD the world is your oyster. SHOPPING LIST A shopping list, along with where to buy, URLS and price is included in the files for reference. I've used an 8Gb Raspberry Pi 4, but you don't need the 8GB version, so long as it's the Pi 4. I've also used a 512GB SSD - It doesn't need to be 512GB, but for this shopping list you need a 42mm SATA m.2 SSD (not nvme). M2 SATA SSD Caddy https://www.amazon.co.uk/dp/B08GRBFZLY/ref=cm_sw_em_r_mt_dp_W1QFQEKEF9H6VHW5G4W4?_encoding=UTF8&psc=1 M.2 SATA 512GB (42mm) https://www.amazon.co.uk/gp/product/B07MSQMGLT/ref=ppx_yo_dt_b_asin_title_o04_s00?ie=UTF8&psc=1 USB 3 4 Port Both Side Hub https://www.amazon.co.uk/gp/product/B01N0BFBUD/ref=ppx_yo_dt_b_asin_image_o05_s00?ie=UTF8&th=1 I2C 0.96-inch OLED Display SSD1306 128x64 https://www.amazon.co.uk/dp/B01L9GC470/ref=cm_sw_em_r_mt_dp_VCMV8E3EAWT1SYXKSG6B?_encoding=UTF8&psc=1 Jumper Wires https://www.ebay.co.uk/itm/262202710636?_trkparms=ispr%3D1&hash=item3d0c7fda6c:g:M~8AAOSwnyVg6SBm&amdata=enc%3AAQAGAAACkPYe5NmHp%252B2JMhMi7yxGiTJkPrKr5t53CooMSQt2orsStdebXPz4ZTXCT8FI9kPBh6CwK0qj7rZ8X4IEl78LKv4VRhWmfl3nWArFvVOazdq3Y84Ql%252BM7yDO45%252BIFRtv3M6jmSQ83dqs4gfSNEmP2mQOCzwamQFdWLvNe%252BLVU%252FPDD2JJx0GGt4A9T6oaOGD2dYdUThY%252BmThnmewGqiurRgTWMOKPrdDwfOtaGWqemDCLNVKdFobaib2DjqImyGz7IKXoQqZo%252BwJVstt1TWCxtOIgA5j3MrASRbFyWg8QsVrrF%252F7xnehFUiAyxEdm5J87lGjPNcBcDr5LlC9DI63S6Px1Plmnm9DvLkLWympuGhj7AfxZ53iDWFeKrbzpAbbjW9Wuf8bKIltrCZmq%252BmKRy8khf4fuxxtdsTbVtO6AX2AmNcS7QIl3JO%252BR1Ntu1CQcEB%252FZNQC0E1m1lzFdgBHvvAPz5BeeNj5Uqs%252Bhz0JUL7L3NBEWkFce9nTNwGoZ65vLbJCy%252FE9xg%252Fw5yqAl99mFA91XptRYh5CZoarMden2XvMV%252BYfmC33e%252FUHwkfzdPr32nWunfuhXiu6VKQ9kv6bHxE5BU9kqsbHVSKLr%252BcjJimCtiMbKCJeny4yxgK2RSwIbu2UaSWdKPBGNdaaLoZy39pGS3hPOzisdlvvKIK4D6HoPV9DNkQjT3mHxb9ARA1p2himpY9YGJmetEz44Z%252Bm8URBBLqp9CtKzA3fJ86h642llcYRPcQy31Ae1HwomE0PruVGnXRLRqo%252BWq6QaXuicTYhfCyh5KrKCYFP1KoSw%252FTza5PKHnCmkEpJVItnE%252B23YB7kASfOM49MInHEo0GoTAmsaN8kS%252BdvOMzZMwOFVdE6Ok%7Cclp%3A2334524%7Ctkp%3ABFBM6Luq7alf M3 8mm Female / Female Brass Pillar Set https://www.ebay.co.uk/itm/223540979011?var=522292283613 A4 Sheet 3mm Perspex (Grey Tinted) https://www.ebay.co.uk/itm/142366466112?var=441389092291 Raspberry Pi 4 8GB https://thepihut.com/products/raspberry-pi-4-model-b?variant=31994565689406 Ice Tower RGB Cooler https://thepihut.com/products/ice-tower-raspberry-pi-4-cpu-cooler?variant=31037545447486 Argon ONE V2 Raspberry Pi 4 Case (you just need the boards from this) https://thepihut.com/products/argon-one-raspberry-pi-4-case?variant=31245160349758 Argon ONE Power Supply (IMPORTANT - Has slightly higher output) https://thepihut.com/products/argon-one-raspberry-pi-4-power-supply-5-25v-3-5a ALTERNATIVE SOLUTION FOR CONNECTING SSD PI (Tidier back) USB Bridge https://geekworm.com/products/usb3-0-connector USB 3.0 Adapter Coupling Connector https://www.amazon.co.uk/dp/B012G8K08U/ref=cm_sw_em_r_mt_dp_9H5DST2GV5ZKRFTPSFQE?_encoding=UTF8&psc=1 RASPBERRY PI OS, Argon One Fan Hat Script and OLED Display - The Ice Tower Cooling plugs into the Argon One fan it. It has variable fan RPM for different temperatures - It requires you to run the Argon One Setup Script. - The OLED Display also requires various scripts to be run and python files to configure and output. ... I've documented these and placed in zip files of the files: OS, Argon One and Display Setup.zip PERSPEX TEMPLATES The top and front has perspex windows. Included in the files is a zip file: Perspex Cut Templates.zip which contains the templates... They're just png images, so be sure to size them correctly. I used a rotary tool to cut the perspex and to sand the edges. PRINTING I printed the base using PETG and the top using PLA. I used 100% infill for the best sturdiness and printed at 0.2 mm layer heights. Supports are required, but block out the the holes for the pillars on the bottom of the base (don't put supports here) or you'll struggle getting the supports out and be unable to insert the pillars for the boards to screw to. Support Parts There are two odd looking STL files you may find. One is just a small pillar. This is to support the Argon one boards, they have too much give. There is also a sort of 'wedge' with a screw hole. This fits in the front left corner, to again, support the boards - You may need a slight longer screw. Feet There is an SLT file for the feet of the base - They designed so you glue them to the base and stick the rubber feet to it, which are provided when you purchase the Argon One case. Alternative Feet Added taller feet - If you're using the base extension to add a fan so there's some airflow underneath. Also included some 'corner feet' - If you're just using the base with extra ventilation. Please post your make - would be interested to see. ----------------------------------------------------------------- EDIT: (15/12/2021) IMPORTANT - Go for a different m.2 SATA to USB 3 adaptor chipset to the one listed if I was you... The first build worked flawlessly, the second build... Lots of issue with JMicron chipset. Forums suggest power draw inconsistencies. EDIT (18/12/2021) - OK, you can possibly ignore the statement above. Yes, you do need a a decent power supply, and yes, there are known issues with the JMicron chipset, but I managed it once without issue so why not again with the same components? I believe the actual issue is with regards to heat! The SSD controller sits directly under the CPU of the raspberry pi and it gets hot! So... I'm gonna add some more ventilation to the base and upload a new version. EDIT (20/12/2021) - Extra ventilation solves the issue. I've added 3 more STL files which are optional: 1. Base with extra ventilation 2. Base with 40mm Fan Hole 3. Base Extension to hold fan Since I already printed out my base and have the components hot glued inside, I elected to cut a 40mm hole to fit a 40x10mm Noctua fan and print a base extension to hold the fan, rather than print an entirely new base. I have however, provided a new base with the fan hole. How do you power the fan do you ask? Either, route wires to attach to the GPIO, or (which is what I've done) - Found an old USB wire, cut the end off and wire the live and ground wires to the fan and then plug the USB into the spare USB port of the USB hub - Provides a nice 5v.
With this file you will be able to print Custom Raspberry Pi 4 Build - Mini Box Server with Ice Tower Cooler, OLED Status Display and Argon One Extender Board with your 3D printer. Click on the button and save the file on your computer to work, edit or customize your design. You can also find more 3D designs for printers on Custom Raspberry Pi 4 Build - Mini Box Server with Ice Tower Cooler, OLED Status Display and Argon One Extender Board.