Customizable Aerobar Bike Computer Mount
thingiverse
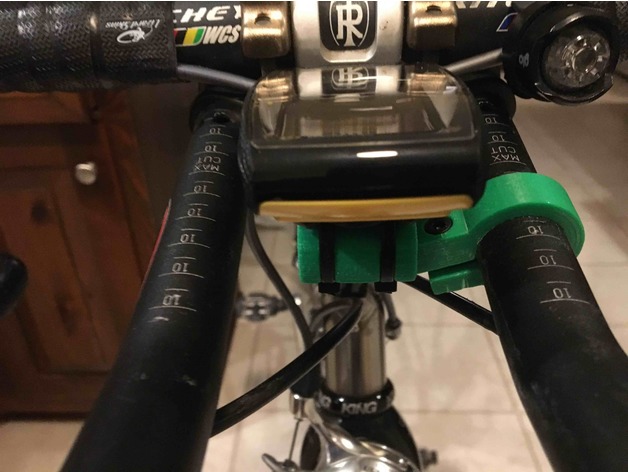
This is a highly customizable means of mounting a bicycle computer to your aerobars. Many aspects can be customized, to include: clamp inner diameter (to fit your aerobar diameter) clamp wall thickness clamp width adapter diameter (to mimic a handlebar diameter appropriate for your computer mount) arm angle (to achieve the desired height above/below/at the aerobar height) arm length (to allow desired horizontal positioning on aerobar) height of top of adapter above arm (to again allow vertical customization) channel depth/width/spacing for securing computer mount fastening straps (zip tie, rubber o-ring, etc) bolt/nut dimensions (for countersink of nut and bolt) fudge factor for dimensional tolerance of adapter that fits on arm (it can be hard to get a 3D printer to produce the same inner and outer dimensions for a specified value...) whether to print the arm, the adapter, or both (as well as which orientation to print the adapter in - vertical or horizontal) and more :-) This can be printed in PLA or ABS, but if you anticipate possibly leaving your bike in a hot car, ABS might be better. The round adapter piece fits over the arm of the clamp, and mine stays firmly in place as a result of the zip ties used to attach the computer mount base to the aerobar mount/adapter. It could also be glued or a small screw could be used, if desired. (Mine does not move at all, just from the zip ties, which are needed for the computer base, anyway.) Mine is printed in ABS, and has provided a very strong, secure and rigid mount for my computer. Someday I may print another in a different color (black? red? :-), but green was what I had on-hand at the time! Print Settings Notes: The round adapter piece can be printed in a vertical or horizontal orientation. Less support is needed for the vertical orientation, but I've found that the horizontal position, with support, gives better results. (In horizontal orientation, the top of the round adapter is narrow, so the last part prints very quickly, resulting in that section getting a bit too hot. This may result in a ridge along the top, which might require a little work with a knife or sandpaper to smooth out, but the overall quality has been better for me in this orientation, than in a vertical orientation.) The default values for the nut and bolt parameters are for an M4 socket head cap screw, and a nylon lock nut. Adjust as needed for your nut and bolt, but make sure that the dimensions of the clamp are sufficient for your chosen nut and bolt. (These, of course, are customizable - gotta love OpenSCAD!! :-) Note that the heights of the nut and bolt blocks, and the thickness of the clamp ring are interdependent - too tall on the blocks, and/or too thin on the ring, and the blocks can stick up from the ring (still works, but looks ugly). I need to fillet these in smoother, to cover these other cases, at some future point. (The default ring thickness and nut/bolt block heights have worked fine for me, and print w/o any ugliness, with the default params for these features.) How I Designed This This was designed using the ever and always awesome OpenSCAD tool! As such, it can be customized here via Customizer, or you can (and are encouraged to!) download the .scad file, and OpenSCAD, and modify it to your heart's content on your computer. The uploaded .stl files are simply for the Thingiverse preview feature - you'll want to use Customizer or OpenSCAD to modify the settings to suit your needs. Custom Section Customizable Parameters //diameter of the bar onto which the clamp will be mounted clampInnerDia = 22.3; //thickness of the clamp wall wrapping around the bar clampWallThick = 4; //width of the clamp (ie, front-to-back, along the length of the bar) (bear in mind that this width must be greater than the bolt head and nut diameters, as they are countersunk into the clamp) clampWidth = 12; //length of the flat section of the arm - must be long enough to accomodate the needed adapterLen armLen = 30; //height of the arm (and bolt block) armHt = 10; //angle needed to achieve the depth above (negative angle) or below (positive angle) the bar that you need the arm to be (take into account the adapterHt value) armAngle = -20; //thickness of the gap between the nut and bolt blocks blockGapThick = 3; //width of the nut and bolt blocks (ie, distance from clamp toward arm blockWidth = 10; //height (thickness) of the nut block nutBlockHt = 7; //diameter of bolt head inset (use bolt head diameter plus 1-2mm) - must be a sensible value, as compared to clampWidth boltHeadDia = 8; //height of the clamp bolt head (ie, depth of the bolt head countersink) boltHeadInset = 4; //diameter of the shank of the bolt boltShankDia = 4; //circular diameter of the nut, plus about 1mm (for a 6-sided nut, the distance between 2 opposite corners on the nut, plus a little) nutDia = 10; //depth of the nut countersink - must be a sensible value, as compared to nutBlockHt nutInset = 3.5; //length of the round adapter that fits on the arm - must be long enough for bands, ties, etc that hold your computer mount on adapterLen = 30; //outside diameter of the adapter - such that your computer mount will sit on it well adapterDia = 25; //height above the top, flat surface of the arm, that the top of the adapter should be adapterHt = 5; //if your aerobar is at an angle, where you'll be mounting the clamp, it can cant the arm one way or the other (so your computer would sit crooked) - this allows some compensation for that, if needed adapterAngle = 0; adapterStrapChannelSpacing = 15.5; adapterStrapChannelWidth = 4; adapterStrapChannelDepth = 2; //printers tend to over-size exterior dimensions a bit, and correspondingly undersize interior dimensions, so this // fudge factor widens and deepens the slot in the adapter, to allow the adapter to fit onto the arm better //use this if/as needed for your printer. Set to total mm extra width needed. adapterInteriorFudgeFactor = .8; //enable/disable generation of the clamp - in case only want to print one or the other generateClamp = true; //enable/disable generation of the adapter - in case only want to print one or the other generateAdapter = true; //orientation for placement of adapter on print surface - 0 = vertical, 90 = horizontal (just for printing/plating purpose) adapterPrintOrientation = 0;
With this file you will be able to print Customizable Aerobar Bike Computer Mount with your 3D printer. Click on the button and save the file on your computer to work, edit or customize your design. You can also find more 3D designs for printers on Customizable Aerobar Bike Computer Mount.