Customizable Christmas Name Ornament
prusaprinters
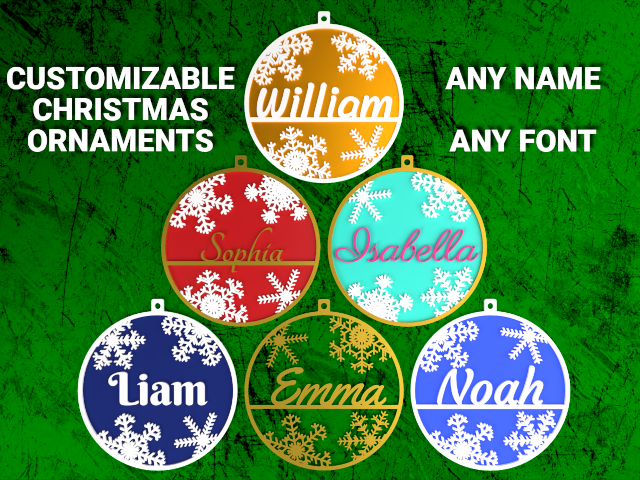
<h4>Customizable Christmas Ornament - Name Ornament - Snowflake Ornament</h4><p>This is a customizer for Christmas ornaments which allows for any text in any font. There is a choice of six different snowflakes which can be placed in four set locations on the ornament. It's sized at 79 mm diameter, but you can scale it in your slicer if you want a different size.</p><p>Update 2020-12-17: Added option to create ornament without a line below the text (name).</p><p>Update 2021-11-22: Added option to create 4 separate STLs (outline, background, name, and snowflakes) for multi-nozzle printing.</p><p>I've added two blank ornaments with the default snowflake configuration so that you can add the names using Fusion 360 or any other 3D modeling software. They're both 2 mm in Z height. One has no name and no background and the other has no name and no line under the name with a 0.4 mm background.</p><h3>Running the Customizer</h3><p>This download includes a .SCAD file to create customized 3D printable models. By simply entering the desired name and optionally setting some simple parameters from drop-down boxes and sliders you can easily create your own customized model.</p><p>You will have to first install OpenSCAD (free software) on your own computer to process the .SCAD file and present the customizer parameters. <a href="https://openscad.org/downloads.html">Download OpenSCAD</a> and get started. For further details on running the customizer see DrLex's instructions on <a href="https://www.dr-lex.be/3d-printing/customizer.html">How to Run Customizer on Your Own Computer</a>.</p><p>You can use any font available on your system. The OpenSCAD "Help=>Font List" menu item shows what fonts are available. Most of the fonts listed in the drop-down selection for this thing can be downloaded from the <a href="https://fonts.google.com/">Google Fonts repository</a>.</p><p>To make a font available to OpenSCAD you have three options:</p><ul><li>Install the font to the system. The procedure for installing system fonts is dependent on what operating system and what version you are using (Ubuntu Linux 16.01, Ubuntu Linux 20.04, Windows 7, Windows 10, Mac OS 9, Mac OS X, etc. ). If you don't know how to install a font on your system then search the web for instructions.</li><li>Add the font file to your fonts folder, creating the folder if it doesn't already exist. On Linux this would be something like "/home/YOURUSERNAME/.fonts" and on Windows 10 it would be something like "C:/Users/YOURUSERNAME/.fonts".</li><li>Add the font to the folder that contains the OpenSCAD file that you want to use the fonts. You will also have to add to the OpenSCAD file the 'use <fontname.ttf>' command substituting the filename of the font for "fontname.ttf".</li></ul><p>Close OpenSCAD if it was open while you were making the font available and then relaunch it after you have installed/added the font.</p><p>For additional details, see the Using Fonts and Styles section on the following page:<br><a href="https://en.m.wikibooks.org/wiki/OpenSCAD_User_Manual/Text">https://en.m.wikibooks.org/wiki/OpenSCAD_User_Manual/Text</a></p><p>If OpenSCAD throws a CGAL error when rendering an ornament it can probably be solved by moving the name down (or up) slightly by specifying a non-zero value for the "name Y offset" parameter in the Advanced Parameters section. This happened for the Sophia ornament shown in the picture and moving the name down 0.1 mm resolved the issue.</p><h5>Alternative to Installing OpenSCAD on Your Computer </h5><p>This model is also <a href="https://www.thingiverse.com/thing:4681765">published on the Thingiverse web site</a> and the Thingiverse online customizer may be used to create your personalized models.<br><br>Beware that the Thingiverse web site has been an unstable disaster since March 2020 and they weren't even processing their customizer jobs for over 2 years (July 10, 2020 to August 4, 2022). If you try to use it and your job is still sitting in the queue after several minutes, that probably means they stopped creating the customizer models again and your job is never going to be processed. It might be only a temporary stoppage so you could hope for the best and try again later.</p><h3>Dual Colors with a Single Extruder</h3><p>Printing multiple colors with a single extruder is really easy.</p><p>I printed my dual-color prints with a single extruder by pausing the printer after the colored backround part had completed and then swapping in a spool of white filament. My printer doesn't support the M600 pause command so I have to pause it manually. The printer shows me the height it's at while it's printing and as soon as it finishes the background layers at 0.6 mm I pause it using the menu on the printer control panel.</p><p>Most printers support the M600 G-code command, so you may be able to add pauses in using your slicer program. You may find the Colorprint tool useful if your printer supports the M600 command, but your slicer doesn't support adding pauses: <a href="https://www.prusaprinters.org/color-print/">https://www.prusaprinters.org/color-print/</a></p><p>After switching filament colors, the nozzle may not be primed and the first bit printed may be under-extruded, so to compensate for this, I always add in a little cylindrical tower and get the slicer to start the layers on that tower. For Cura, the settings that control this are Layer Start X and Layer Start Y, which are in the Travel section. I put the cylinder above the top right corner and set Layer Start X and Layer Start Y to a high number like 500. I've included the 2 mm tall swap tower that I use.</p><h4>Swapping Filaments</h4><p>When changing filament, never yank the old filament out as this may cause the extruder to move and you don't want the extruder moved even the slightest when the printer is paused mid-print. Instead, cut the filament off where it enters the extruder, <strong>being very careful to not cut any wires</strong>, and then start a load filament process on the printer. After it extrudes the filament left inside the extruder, just feed in the new spool of filament following it.</p><h3>Slicer Settings</h3><p>For the best looking ornaments with a colored background, you'll want the top infill area of the background to be a single continuous solid print from one side to the other, instead of going around the areas where the letters and snowflakes will be added in later layers. To accomplish this in Cura, set the Skin Expand Distance to a high number like 10.</p><h3><strong>Remix Sources</strong></h3><p>The snowflakes were created with the <a href="https://www.thingiverse.com/thing:1159436">The Snowflake Machine by mathgrrl</a>.</p>
With this file you will be able to print Customizable Christmas Name Ornament with your 3D printer. Click on the button and save the file on your computer to work, edit or customize your design. You can also find more 3D designs for printers on Customizable Christmas Name Ornament.