Customizable Hard Hat Inserts
prusaprinters
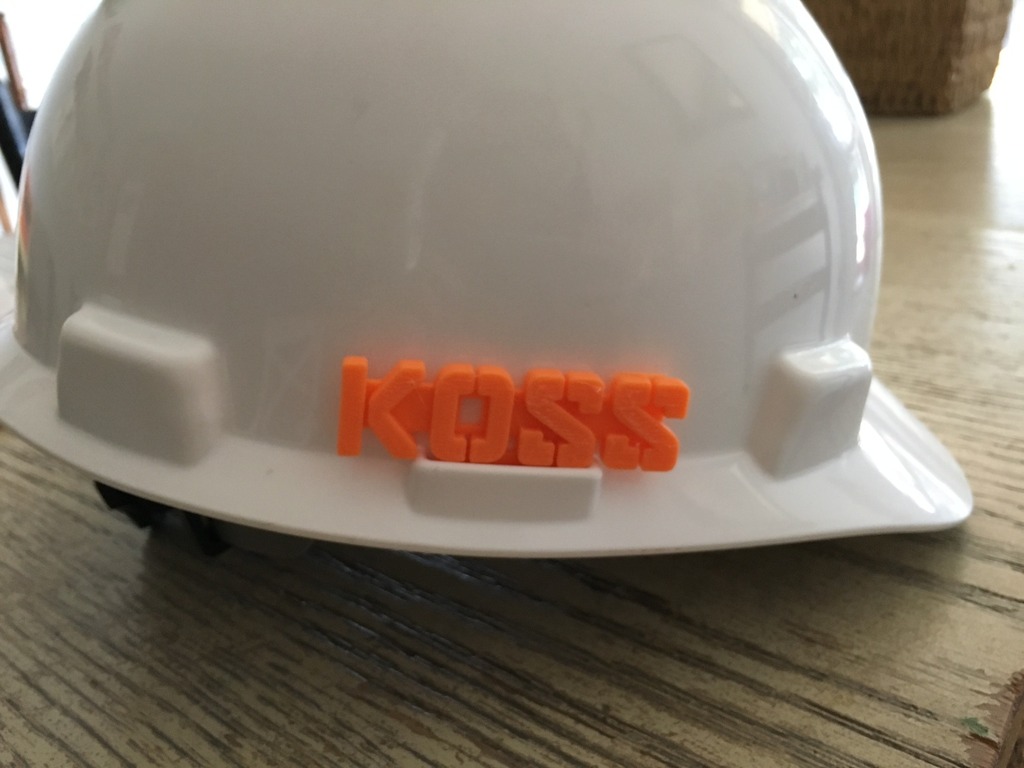
<p><strong>1/2022 </strong>This is imported from Thingiverse and I don't think the Prusa library has a customizer interface (yet?). I recommend using OpenSCAD to generate the tag but if you're not comfortable with that the web customizer is still available over at Thingiverse… for now at least. </p><p><strong>4/2018</strong> Customizer is back up and running apparently. Don't know what happened or when it happened. This feels like one of those "the fewer questions asked the better" type of situations.</p><p><strong>2/2018</strong> Sorry everyone. Customizer is broken for this project and I'm not sure why. Thingiverse help say's they're looking into it. Until then try out OpenSCAD: <a href="http://www.openscad.org/">http://www.openscad.org/</a> The .SCAD file is the same code that Customizer uses just a little less user friendly. Send me a message if you get stuck and I'll try to help.</p><p><strong>UPDATE No. 5</strong><br>Chatting with someone who has been customizing a lot of these I learned that they were further modifying the output with TinkerCAD. So I added a new tab "Non Hardhat Options" to add a button hole in the center of the tab, an option to add a counterweight and the ability to change the width (x) and length (y) of the tab. Changing any of these will likely make the tab unusable for hardhats.<br>I also took the chance to fix the error that was causing the CatchThemAll=0 to still "cast a net" for one catch. Now it actually recognizes a zero input.</p><p><strong>UPDATE No. 4</strong><br>Okay. While I was in the file mucking around with the settings I tried a new way to catch abandoned geometry. Check out Ver5.</p><p>Use the XT, YT boxes to move the "nets" to intersect the lost geometry and a nearby solid geometry. Use the XS, YS to change the "net" size. The script will add as many nets as you enter in the "CatchThemAll" variable. When generating the final STL the net will add a tab that's 1/3 the height of the font to connect the lost bits.<br>The downside is the massive amount of text entry boxes. On the plus side there are much fewer glitch artifacts compared to the other way. Does anyone know if there is a way for users to enter array's in customizer?</p><p>What does everyone think of this modification? Is it easier? Ver4 is still available if you prefer that one. (I just tweaked Ver.5 to make the font spacing actually work and try to fix a rendering issue.)</p><p><strong>UPDATE No.3</strong><br>Version 4 is up. Thanks to Lagger for the suggestion to make the clip and bottom a dynamic variable too.<br>I still don't like how the Orphan Control feature works. It creates too many glitches in other places. I have some new ideas for the orphan dots problem if I'm motivated to tackle that sometime. I just have to figure out how to show hidden geometry in the customizer window and not export it.</p><p><strong>UPDATE No2</strong><br>Version 3 is up. The connection between lines above Line 1 are now two posts at about +/- one character width from center. Very few, very narrow characters (i,I,j,l.. etc.) will create problems. I don't think there will be many issues with it though. You may just have to work around it. I would like feed back though, is a full sized plate style connection better? Or the current two posts? I've tried to keep the two post going to the next available solid but not all the way to the previous base line. Is that creating problems?</p><p>I've also further mimicked makkuro's name plate's handling of dots for i's and j's. There is a new parameter to adjust the sensitivity of the correction so to speak. If the dots aren't connecting then play around with the "OrphanSize". It works for now but I'd like to find a more elegant way of fixing it. Any suggestions?</p><p><strong>UPDATE No1</strong><br>Version 2 is up. It's a different method for handling the bar across the bottom. Inspired by MC Geisler (thing:714444). That .SCAD file taught me not to forget about the intersection function. With that in mind version 2 still needs the i/j/!/? support bars.</p><p><strong>Original</strong>After a successful pony hardhat insert I copied my notes for the accessory slot tab into OpenSCAD and created an automated tab insert.</p><p>In Customizer you can add up to 4 lines of text. I've updated the text quite a bit since first posting. The font spacing still handles a little funny. Each letter is given the same amount of space. But the connecting line (formally the "backer" option) is now automatic. Even with multiple rows of text.</p><p>If you download the .scad then you can union with other .STL files. I'm new to OpenSCAD so please forgive my sloppy coding. Hopefully it makes at least a little sense and you can figure out how to use it. If you're looking for specific shapes like ponies for the STL then it helps to use a combination of Inkscape and TinkerCAD. I found a silhouette of a pony and imported it into Inkscape. Then used Path > Trace Bitmap > Edge Detection. Save the .SVG and load it into TinkerCAD to create the STL. Save as STL with the object centered on the X axis and positioned at 0 on the Y. Or adjust the "shiftx", "shifty" and "shiftz" variables as needed. (They just translate the STL file along respective axis').</p><p>The STL included was an STL combination from TinkerCAD while experimenting. It's still very much a work in progress so suggestions and tips are welcome!</p><h3>Print Settings</h3><p><strong>Printer Brand:</strong></p><p>RepRap</p><p><strong>Printer:</strong></p><p>Prusa i3</p><p><strong>Rafts:</strong></p><p>Doesn't Matter</p><p><strong>Supports:</strong></p><p>No</p><p>Category: Accessories</p>
With this file you will be able to print Customizable Hard Hat Inserts with your 3D printer. Click on the button and save the file on your computer to work, edit or customize your design. You can also find more 3D designs for printers on Customizable Hard Hat Inserts.