Customizable Slider Puzzle Generator (Print-In-Place)
prusaprinters
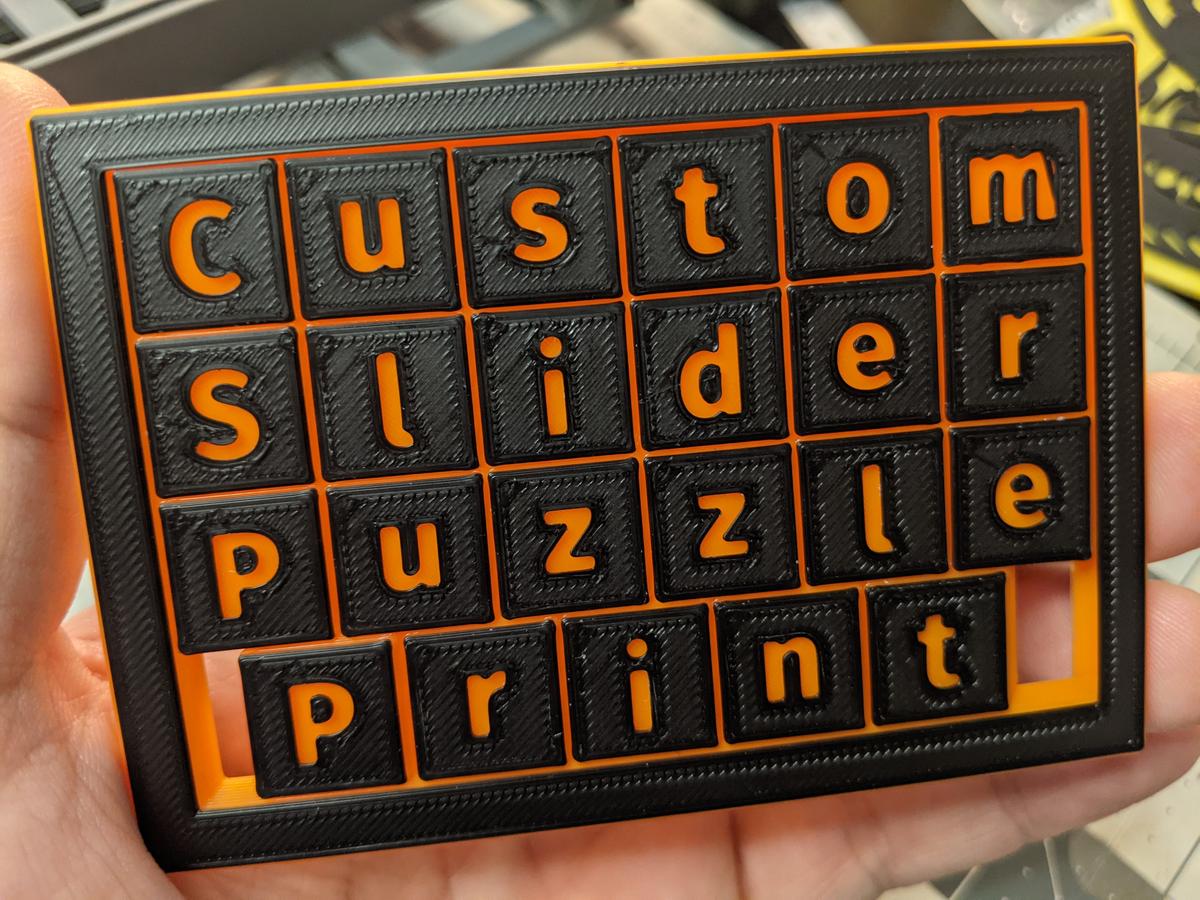
<p>I tried to print a couple of different versions of this style of puzzle, but I had no luck… One puzzle fell apart while trying to solve it, while the others fused parts together. Despite attempts to adjust my flow rate and scale the model, I was having no luck. So, I decided to make my own version, but make it customizable via OpenSCAD!</p><p>The puzzle prints together as one frame and multiple squares. The squares are the parts that move, and the frame is the piece that restricts the squares. The number and size of the squares can be customized, and the frame will automatically size itself. The text and font of the squares can also be edited.</p><p>This design has a few features to make it easier to print. Elephant foot is less of an issue because the bottoms of the internal squares are chamfered. The gap between pieces can be changed depending on the accuracy of the printer. The height is directly related to the “overlap” of the squares, so even loose puzzles won't fall apart if the height is large enough.</p><blockquote><p>Don't be afraid to experiment: if you break something or encounter an error, just re-download the file and start fresh!</p></blockquote><h3>Prerequisites</h3><ul><li>Install <a href="https://openscad.org/">OpenSCAD</a></li><li>Install <a href="https://github.com/revarbat/BOSL">BOSL</a> for OpenSCAD</li></ul><h3>Intro to OpenSCAD</h3><p>When you open up the <i>PuzzleGenerator.scad</i> file, you'll see some code on the left of the screen and a rough preview on the right. The model will look incorrect: it'll be flat and won't have any text.</p><p>To see an accurate model visualization, simply press <code>F6</code>. Do note that the model will take some time to render; on my machine, it can take between 10 and 30 seconds. Adding more squares or more complex fonts will increase the time.</p><p>If it looks good, use <code>F7</code> to export the model as an STL file. Make sure to append <i>.stl</i> to the file name when saving the model.</p><h3>Customization</h3><p>All relevant variables are located at the top of the file. Change the necessary values, save the file (<code>CTRL + S</code>), re-render the model (<code>F6</code>), and export it (<code>F7</code>).</p><figure class="table"><table><thead><tr><th style="width:80px;">Variable</th><th>Name</th><th style="width:75px;">Example</th><th>Notes</th></tr></thead><tbody><tr><td>cols</td><td>Columns</td><td style="text-align:center;">3</td><td>Number of squares along the <strong>X</strong> axis</td></tr><tr><td>rows</td><td>Rows</td><td style="text-align:center;">3</td><td>Number of squares along the <strong>Y</strong> axis</td></tr><tr><td>sqText</td><td>Text for Squares</td><td style="text-align:center;">…</td><td>Content for each square in puzzle; see below for details</td></tr><tr><td>size</td><td>Square Size</td><td style="text-align:center;">14</td><td>Side length of visible portion of each square</td></tr><tr><td>height</td><td>Height</td><td style="text-align:center;">6</td><td>Height of puzzle; at least 4, but 6 is recommended</td></tr><tr><td>frame</td><td>Frame Width</td><td style="text-align:center;">6</td><td>Width of frame; must be at least equal to <i>height</i></td></tr><tr><td>inCham</td><td>Square Chamfer</td><td style="text-align:center;">1</td><td>Size of chamfer applied to each internal square</td></tr><tr><td>ouCham</td><td>Frame Chamfer</td><td style="text-align:center;">2</td><td>Size of outer frame chamfer; must be less than half of <i>height</i></td></tr><tr><td>gap</td><td>Tolerance</td><td style="text-align:center;">0.4</td><td>Gap between parts; start with nozzle size and experiment</td></tr><tr><td>textFont</td><td>Text Font</td><td style="text-align:center;">"Arial"</td><td>Font for text; can append “:style=Bold” for variants</td></tr><tr><td>textSize</td><td>Text Size</td><td style="text-align:center;">6</td><td>Size for text; reduce if more than one character per square</td></tr><tr><td>textDep</td><td>Text Depth</td><td style="text-align:center;">1</td><td>How far to recess text; make negative to raise text</td></tr><tr><td>textRt</td><td>Text Shift Right</td><td style="text-align:center;">0.3</td><td>Move text right; make negative to move left</td></tr><tr><td>textUp</td><td>Text Shit Up</td><td style="text-align:center;">0.3</td><td>Move text up; make negative to move down</td></tr><tr><td>textDeg</td><td>Text Rotate Degrees</td><td style="text-align:center;">45</td><td>Rotate text by a number of degrees</td></tr></tbody></table></figure><h5>Font</h5><p>Be careful with your font choice. Some fonts with fine details won't print well. Opt for bold, display fonts with no thin features. Adding “:style=Bold" to the font name really helps. Also, make sure <i>textDep</i> is a multiple of your layer height.</p><h5>Tolerance</h5><p>First, make sure your flow is dialed in. Your e-steps should be calibrated, and you should know the correct temperatures for your chosen filament. Try to reduce elephant foot as much as possible.</p><p>Start by setting <i>gap</i> to your nozzle size. Print a simple 2x2 puzzle with three squares and a height of 6. If the pieces feel loose, reduce the value by 0.05. If the pieces are too tight or fuse together, increase the value by 0.05. If the squares print successfully, but the pieces still feel “wobbly," consider increasing the height. The height dictates the “overlap” between the squares and can add stability to the puzzle.</p><h5>Squares' Text</h5><p><i>sqText</i> is an array of strings for the puzzle. </p><p>Make sure each string is surrounded by double quotes and separated by a comma. If the string is set to <i>false</i> or there's not enough strings in the array, then those squares will not be added to the puzzle. </p><p>Multiple letters can be used (ex. “10”), but make sure to decrease <i>textSize</i>. Depending on the font, you may need to adjust <i>textRt</i> and <i>textUp</i> as well.</p><p>Breaking this array into multiple lines does not change the layout of the puzzle: you must adjust the <i>cols</i> and <i>rows</i> variables for correct sizing. </p><p>Be sure to include one “hole” in the puzzle by setting one element of the array to <i>false</i>. If you don't, your puzzle won't move.</p><p>Below are some examples of <i>sqText</i> with the column and row count. Pay close attention to the formatting in the <i>sqText</i> array and how it's represented in the rendered puzzle.</p><figure class="image"><img src="https://media.prusaprinters.org/media/prints/72861/rich_content/9aef4aec-e39b-454d-9ba1-49908c48bad1/smorgasbord.png#%7B%22uuid%22%3A%22c644f354-021d-422b-947d-3bfa22479646%22%2C%22w%22%3A769%2C%22h%22%3A481%7D"></figure><figure class="image"><img src="https://media.prusaprinters.org/media/prints/72861/rich_content/3b8e4913-314d-45ab-bf28-2d4f7ae7ea67/1-8_.png#%7B%22uuid%22%3A%22281251d6-0f84-44ae-a22b-c6b53f942345%22%2C%22w%22%3A546%2C%22h%22%3A624%7D"></figure><figure class="image"><img src="https://media.prusaprinters.org/media/prints/72861/rich_content/7c6f03a9-5e1d-4247-8071-722ebeb3558a/xyz_.png#%7B%22uuid%22%3A%225bb1b478-26cd-4b92-8b1c-eb09a35ec4f1%22%2C%22w%22%3A526%2C%22h%22%3A489%7D"></figure><figure class="image"><img src="https://media.prusaprinters.org/media/prints/72861/rich_content/aaee4709-bb90-4e38-aef5-cc0656f5153a/prusa_printers.png#%7B%22uuid%22%3A%22df0a6fd1-9321-464b-866e-252b3cf45332%22%2C%22w%22%3A1041%2C%22h%22%3A534%7D"></figure><h3>Printing</h3><ul><li>Nozzle: 0.4mm</li><li>Layer Height: 0.2mm</li><li>Infill: 15%</li></ul><p>The default settings on PrusaSlicer work great after adjusting your tolerances above. </p><p>The squares may stick immediately after printing. Simply work the squares around to loosen it up.</p><p>If you change filament at the same height as <i>textDep</i>, you can make the text stand out. I like to set <i>textDep</i> to <strong>1mm</strong> and <i>height</i> to <strong>6mm</strong>. Then, I'll print the first millimeter in one color, the middle four millimeters in another, and the last millimeter in the first color. Check out the black and green puzzle in the photos.</p><h3>Don't forget to rate and share a make!</h3>
With this file you will be able to print Customizable Slider Puzzle Generator (Print-In-Place) with your 3D printer. Click on the button and save the file on your computer to work, edit or customize your design. You can also find more 3D designs for printers on Customizable Slider Puzzle Generator (Print-In-Place).