Customizable sliding word-switcher
prusaprinters
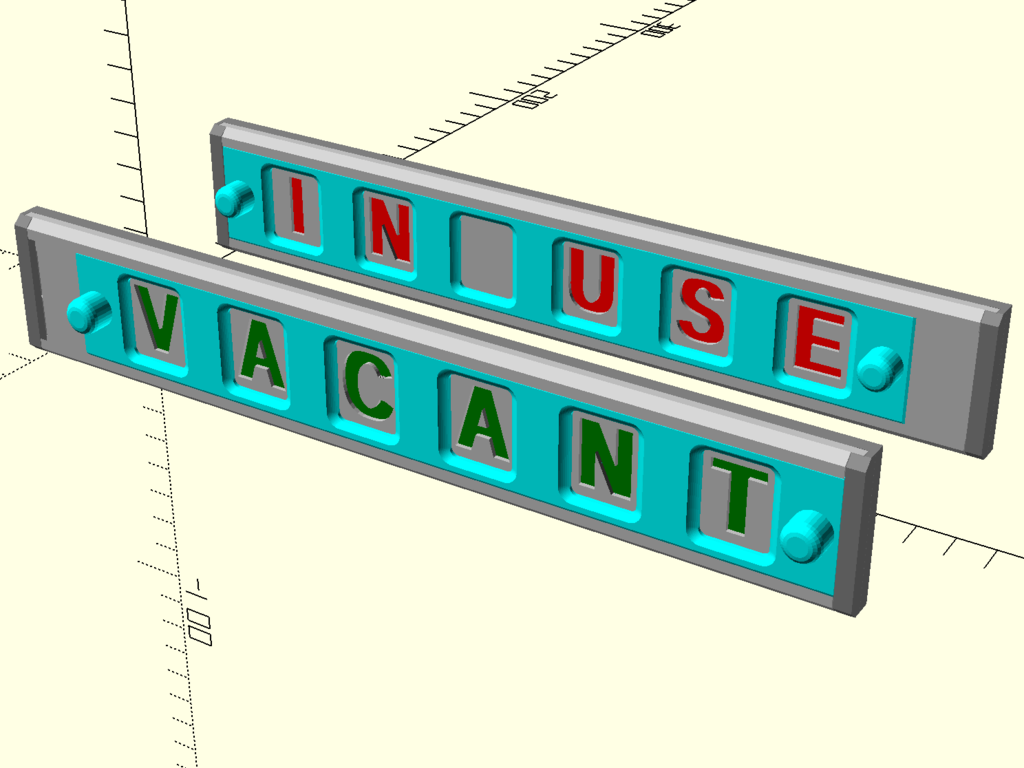
<p>This dishwasher CLEAN / DIRTY sign is a parametric model that can be customized to switch between any two text strings of the same length, such as COME IN / GO AWAY or BUSY / FREE. Examples are given in the OpenSCAD code and in the pictures.</p><p>This is my first design for my Prusa MK3S/MMU2S multi-color printer. I wanted something simple to start with, although the design evolved in complexity. The parts snap-fit together. While printing, only 6 color changes are needed, during the 2 layers of the faceplate when the text backing color is laid down.</p><p>The model includes pockets for three magnets. The STL file for the base accommodates 10mm dia x 3mm thick magnets, but you can customize the magnet pocket dimensions for any refrigerator magnets. This Thing needs strong magnets to overcome the 0.5mm gap imposed by the part. I used the small powerful magnets from discarded Sonicare toothbrush heads -- before throwing away the used toothbrush head I always use pliers to break out the little magnets, and over the years I've accumulated a large collection of them.</p><p>This was designed for a Prusa i3 MK3S/MMU2S multi-material printer, but parameters and an STL file is included for a single-color printer also.</p><h3>Multi-color printing</h3><p>The only multi-color part is the faceplate. Combine all the STL files with "multicolor" in the name into your slicer to make the faceplate.<strong>Or</strong> if you are customizing your own model, save separate STL files for the output parameters faceplate, leftcolor, and rightcolor, and combine them in your slicer.</p><p>If your printer uses a wipe tower, set all three parts in the faceplate to "wipe to infill" to minimize wasted filament. This should always be done for any multi-color print unless you have semi-transparent sections.</p><p>The slider and base parts are single-color parts. You can print them in a separate session or combine them with the faceplate print. I prefer to print them separate from the faceplate in case I must abort the faceplate print.</p><p>Be sure to assign your desired filament to each part before slicing.</p><h3>Single-color printing</h3><p>Import the file word_switcher_all_parts_1_color.stl into your slicer,<strong>or</strong> if you are customizing your own model, set the output parameter to print_1_color to create an STL file with all the parts to print all at once.</p><p>If you want the text to be a different color from the faceplate, separate the STL into components and print the faceplate component separately, using one filament color up to the first layer of text, and another filament color for the rest. This looks nice, but both words will appear in the same color, unlike the multi-color version.</p><h3>Materials</h3><p>I used PLA for this part because I like the shiny "silk" colors that one can get with PLA. However, PLA can soften and warp if it gets too warm, so if you stick this on a dishwasher, be sure it's well away from the drying exhaust vent. If you need something more temperature resistant, use PETG or ABS.</p><p>My design conserves material as much as possible, but at the expense of printing time. When assembled, it's quite lightweight, about 45 grams. That fractal tree you see on the backside of the base is a small recursive module I wrote in OpenSCAD to serve as a support for a long bridge without needing to print the entire wall.</p><h3>Print Settings</h3><p><strong>Printer Brand: </strong>Prusa</p><p><strong>Printer:</strong> MK3S+MMU2S</p><p><strong>Supports: </strong>No</p><p><strong>Resolution: </strong>0.4mm nozzle, 0.2mm layers</p><p><strong>Infill: </strong>15% gyroid</p><p><strong>Filament:</strong> Generic PLA or PETG or ABS</p><p>3 colors used, for left text, right text, and structure.</p><p><strong>Notes:</strong></p><p>For the letter colors, I used "silk" PLA with solid infill oriented horizontally to maximize the material's light reflection. It is not necessary to have more than 2 bottom layers; this saves some time and material in the print. 4 top layers should be sufficient for bridging the 15% gyroid infill. If you use a powder-coated steel print bed sheet, the long printed parts may pull away from the bed at the corners. use a 4mm brim to counteract this.</p><h3>Post-Printing</h3><p><strong>Assembly</strong></p><p>First put your magnets into the magnet pockets. Use a drop of glue if the magnets are loose. You can stick the base against a metal surface to pull the magnets firmly toward the back of the base while the glue dries.</p><p>Then slide the slider (the piece with the holes) into the faceplate (the piece with the letters). Then slide the snap fit hooks into the slots on each side of the base, pushing it all the way down. The snap-fit isn't tight and may feel rough due to the layer edges that form the slots.</p><p><strong>Weak magnets</strong></p><p>If your magnets are weak, or there is not enough friction between the part and the surface you stick it on, you can coat the back surface with rubber cement and let it dry completely. Or you can re-print the base for bigger, stronger magnets.</p><h3>How I Designed This</h3><p>This was inspired by <a href="https://www.thingiverse.com/thing:3078497">Sliding Word Changing Dishwasher Sign</a> by MiddleFingerBoss. I started out designing this in Tinkercad with a better-looking font, and then realized I wanted something parametric that would let me adjust the text and mount it at an angle, so I rebuilt it in OpenSCAD.</p><p> </p><p>Category: Kitchen & Dining</p>
With this file you will be able to print Customizable sliding word-switcher with your 3D printer. Click on the button and save the file on your computer to work, edit or customize your design. You can also find more 3D designs for printers on Customizable sliding word-switcher.