Customizable stackable boxes
prusaprinters
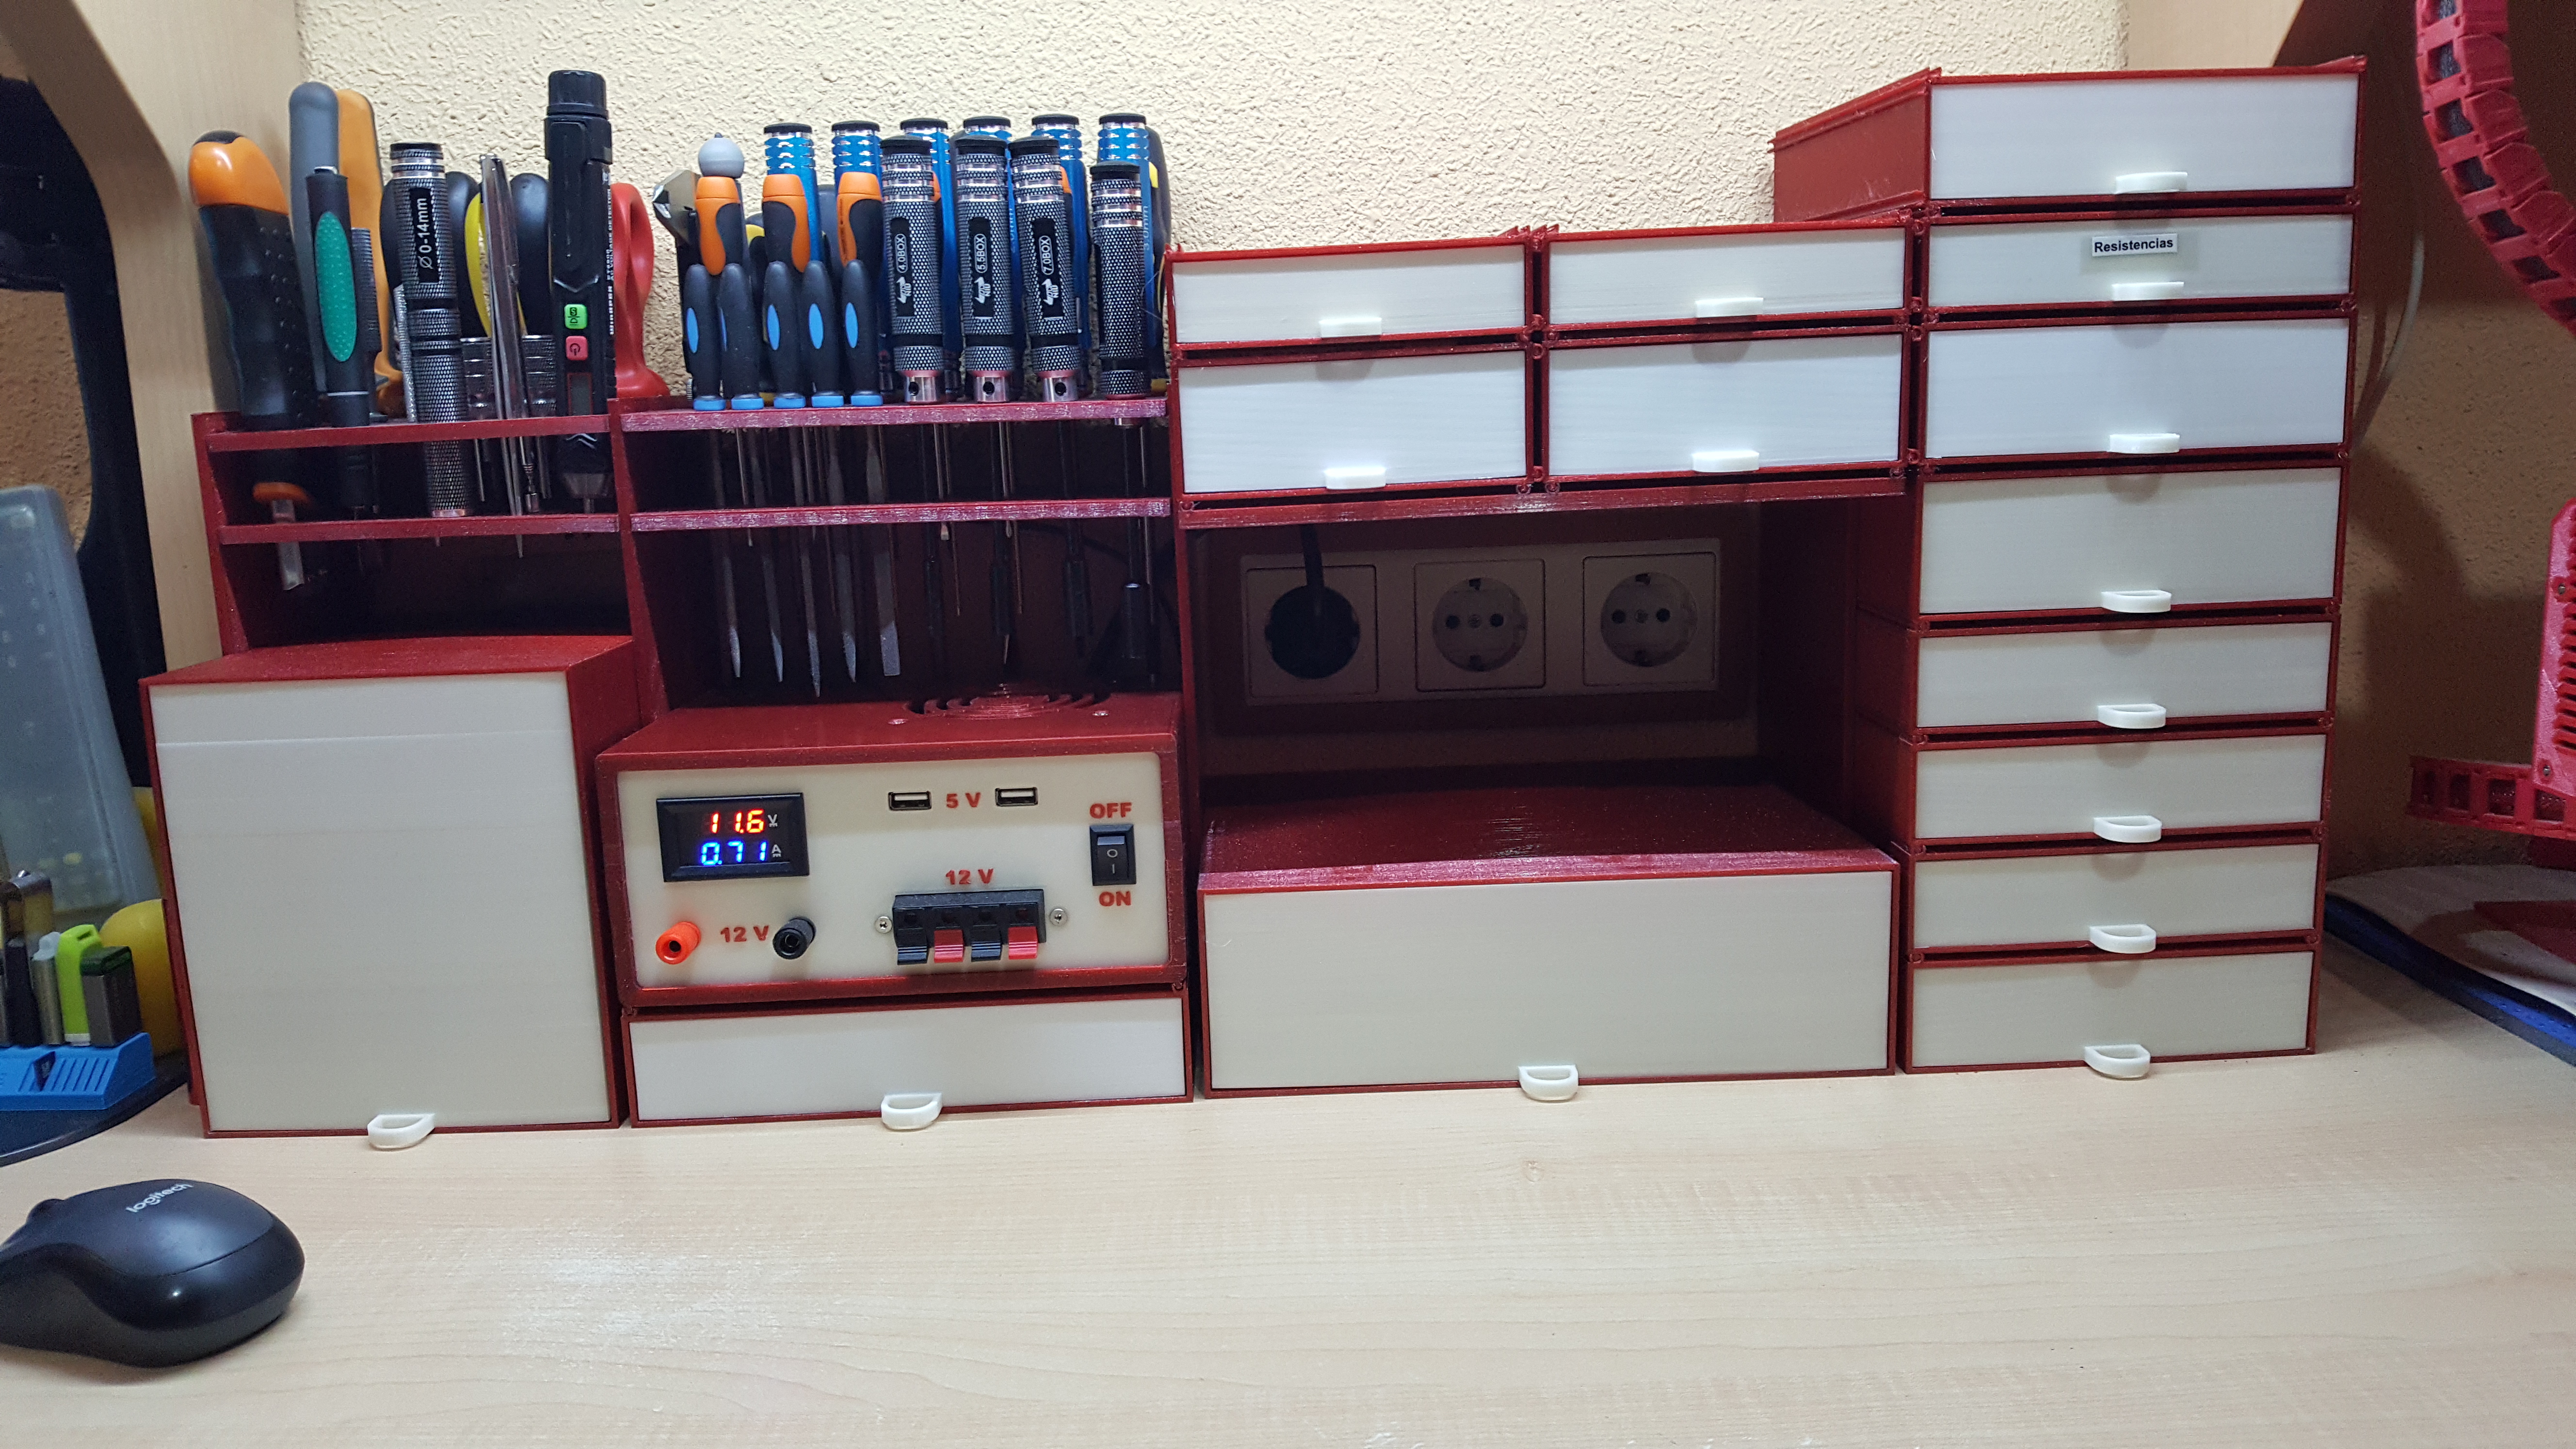
<p>This is a very useful box since its main "merit" is the possibility of customize it and being able to adjust it in a very simple way to the needs of each person. It also allows the creation of sets of boxes that aesthetically can be very nice and that will help us to organize all kinds of objects, both small and large. As you can see in the pictures, with this design you can generate from simple boxes to organize pens, going through jewelers, and even "large" compositions that can be combined with other elements as in my case with the power source I usually use and my tools.</p> <p>I have also generated a file in the form of a library for those of you who design with OpenSCAD so that you can use it (mainly the guides) in the integration with other elements. (Look at the box of my power supply which is printed with the lower guides to be able to "attach" it to the lower box).</p> <p><strong>Note:</strong> The attached stl and 3mf files are just as an example what you can create, but I don't think they can be so useful.</p> <p>Se trata de una caja de gran utilidad ya que su principal "virtud" se encuentra en la posibilidad de personarlizarla y poder ajustarla de una forma muy sencilla a las necesidades de cada persona. Además permite la creación de conjuntos de cajas que estéticamente pueden quedar muy bonitos y que nos servirán para organizar todo tipo de objetos, tanto pequeños como grandes, Como podéis ver en las fotografías, con este diseño se pueden generar desde simples cajas para organizar lapiceros, pasando por joyeros, y hasta "grandes" composiciones que se pueden combinar con otros elementos como en mi caso con la fuente de alimentación que utilizo habitualmente y mis herramientas.</p> <p>También he generado un archivo en forma de librería para aquellos de vosotros que diseñéis con OpenSCAD para que podáis utilizarla (principalmente las guías) en la integración con otros elementos. (Observad la caja de mi fuente de alimentación que está impresa con las guías inferiores para poder "sujetarla" a la caja inferior).</p> <p><strong>Nota:</strong> Los archivos stl y 3mf son solo un ejemplo de lo que se puede crear con este diseño, pero no creo que puedan ser especialmente útiles para nadie.</p> <h3>Print instructions</h3><p><strong>These instructions are primarily intended for those who are not familiar with the OpenSCCAD application and everybody can to benefit fron this design.</strong></p> <p><strong>Note:</strong> The idea was to upload the instructions in a pdf, but since it does not support this kind of files, I have decided to upload the images that should appear in the manual as "Imagen 1" and "Imagen 2".</p> <p><strong>STACKABLE BOX INSTRUCTIONS</strong></p> <p><strong>Intentionality of the design</strong></p> <p>The idea of this design is that boxes with a removable drawer can be generated in a very simple way and that they are customized and according to the specific needs of each person and that they can fit with each other both vertically and horizontally, and those that are at the ends can have a completely smooth surface.</p> <p>This will allow you to generate from stackable compositions to simple open boxes at the top with the number of divisions we want.</p> <p>With this design you can create from small jewelers or simple boxes to have your pens on the desk to "large compositions" to have collected and sorted all your tools and maker’s things.</p> <p><strong>2. How to configure the parameters to customize the printing of the stackable box</strong></p> <p>2.1. To be able to customize the stackable box, you must have the OpenSCAD 3D design application installed on your computer. It is a free software and is available for MS Windows, Mac OS X and Linux / UNIX operating systems. If you do not have this software, you can download it from the web at <a href="http://www.openscad.org/downloads.html">http://www.openscad.org/downloads.html</a> to install it.</p> <p>On this website you will find all available versions of OpenSCAD. If you are a Windows user, be careful to download and install the appropriate version for your operating system (32 or 64 bits).</p> <p>2.2. Once you have installed the application, open it and select "File / Open ...". In the pop-up window locate where you saved the file “Caja_apilable.scad”, select it and click on “Open” or directly double click on the file name.</p> <p>2.3. When you open the file you will see, on the left side of your screen, the programming text of the stackable box, in the central part the image of the box, and on the right side the “customizer”. Your screen will be similar to the following image (depending on the size and format of your screen). (See Imagen 1).</p> <p>2.4. I recommend that, if the window of the image or the "Customizer" are very small, expand them by placing the mouse and dragging with the left button on the vertical line that divides them. This way you will find it much more comfortable to be able to see both the image and the text of the “Customizer”.</p> <p>2.5. Change the image size until you can see it full on your screen. To do this, simply place the mouse pointer over the image, you can enlarge or reduce it by turning the mouse wheel. You can also do it by pressing the magnifying glass icons with the “+” sign and the “-” sign below the image to accommodate the size of the image to that of your screen.</p> <p>2.6. Then, in the “Customizer” area, click on the “measurements”, “shown components” and “Colors” texts to expand the menus and see the parameters that you can modify to fit your needs. You should see what is shown in the following image. (See Imagen 2)</p> <p><strong>3. Parameters to define by user</strong></p> <p>3.1. Below, you will find a brief description of what each of the parameters is and how they influence the design of the piece. All parameters are measured in millimeters, and to change them you only have to change the value that appears in the box, in the drop-down or in the slider that appears next to each of them for which you want.</p> <p>3.1.1. <strong>“Ancho”</strong>: This parameter refers to the outer width of the box.</p> <p>3.1.2. <strong>“Profundidad”</strong>: This parameter refers to the total depth of the box.</p> <p>3.1.3. <strong>“Alto”</strong>: This parameter refers to the total height of the box.</p> <p>3.1.4. <strong> “N Largo”</strong>: This parameter refers to the number of divisions that we want the drawer to have in depth. Note that intermediate values can also be used, such as for example 2.5, which will really generate 3 divisions, but one of them will be half that of the other 2.</p> <p>3.1.5. <strong>“N Ancho”</strong>: This parameter refers to the number of divisions that we want the drawer to have in wide. Note that intermediate values can also be used, such as for example 2.5, which will really generate 3 divisions, but one of them will be half that of the other 2.</p> <p>3.1.6. <strong>“Grue”</strong>: This parameter refers to the thickness of the external walls of both the box and the drawer.</p> <p>3.1.7. <strong>“GrueC”</strong>: This parameter refers to the thickness of the internal walls of the drawer (which will make the divisions). This parameter should never be higher than that of the external walls, since otherwise it will produce an error in the design.</p> <p>3.1.8. <strong>“Diferencia”</strong>: This parameter is the difference between the upper edge of the outer walls and the upper edge of the inner walls of the drawer (if you select “0” there will actually be a difference of 1.8 mm which is the minimum necessary to can introduce the drawer into the box, since it has a small edge that will act as a stop so that the drawer does not come out at all if we do not tilt it up).</p> <p>3.1.9. <strong>“Holgura”</strong>: This parameter refers to the slack between the male and the female of the dovetail between boxes. If the fit between the two pieces is too loose or too tight, change this value so that your printer prints them to an ideal size.</p> <p>3.1.10. <strong>“GuiIz”</strong>: Show or hide the guides on the left side of the box to generate your model.</p> <p>3.1.11. <strong>“GuiDe”</strong>: Show or hide the guides on the right side of the box to generate your model.</p> <p>3.1.12. <strong>“GuiSu”</strong>: Show or hide the guides on the upper side of the box to generate your model.</p> <p>3.1.13. <strong>“GuiIn”</strong>: Show or hide the guides on the bottom side of the box to generate your model.</p> <p>3.1.14. <strong>“Caja”</strong>: Show or hide the box.</p> <p>3.1.15. <strong>“Cajon”</strong>: Show or hide the drawer.</p> <p>3.1.16. <strong>“Tirador”</strong>: Show or hide the drawer handle. This option is very useful if what you want to generate is a simple box open at the top.</p> <p>3.1.17. <strong>“Color1”</strong>: Change the color of the "female" guides. This is only useful for previewing the model.</p> <p>3.1.18. <strong>“Color2”</strong>: Change the color of the "male" guides. This is only useful for previewing the model.</p> <p>3.1.19. <strong>“Color3”</strong>: Change the color of the box. This is only useful for previewing the model.</p> <p>3.1.20. <strong>“Color4”</strong>: Change the color of the drawer. This is only useful for previewing the model.</p> <p><strong>You should NOT change anything in the programming text unless you know how to do it, as this would cause the box to not be generated correctly.</strong></p> <p>3.2. Once you have made all the changes you want in the parameters and the image has appeared on the screen you must press the “F6” key so that the application can render the image (this may take a while). Once you have performed this operation (“Rendering finished” should appear as the last line in the text at the bottom of the image) you will have to select from the menu “File / Export / Export as STL…”. This will open a window where you can choose where you want to save the file and give it the name you want. When you already have the STL file, you can proceed as usual to generate a .gcode file using your slicing software.</p> <p><strong>4. Printing recommendations</strong></p> <p>The stackable box can be printed with virtually any non-flexible material that you want, since the only mechanical effort that will be made is the support of one over the other, and for this it has been taken into account to place the dovetail practically over the side walls, so that it will be much more difficult than with the weight of the upper boxes, the box will be bended or even crashed. (PLA, PETG, ABS, etc.).</p> <p>The recommended layer height for printing is 0.2mm and the filling 100%, since the walls will normally not exceed 3mm.<br/> It is not necessary to use supports for printing.</p> <p>Once the stackable box is printed, it is not necessary to carry out any post-processing work.</p> <p><strong>Note:</strong> Depending on the accuracy of your printer, it may be necessary to modify the “Holgura” parameter for the correct fit of the male guides with the female guides (printed on my MK3 fit perfectly without change anything).</p> <p><strong>Estas instrucciones están principalmente pensadas para aquellas personas que no están familiarizadas con la aplicación OpenSCCAD y que todo el mundo pueda beneficiarse de este diseño.</strong></p> <p><strong>Nota:</strong> La idea era subir las instrucciones en un pdf, pero como no admite este tipo de archivos, he decidido subir las imágenes que deberían aparecer en el manual como "Imagen 1" e "Imagen 2".</p> <p><strong>INSTRUCCIONES CAJA APILABLE</strong></p> <p><strong>Intencionalidad del diseño</strong></p> <p>La idea de este diseño es que se puedan generar de una forma muy sencilla cajas con un cajón extraíble y que estén personalizadas y acorde a las necesidades concretas de cada persona y que se puedan encajar unas con otras tanto vertical como horizontalmente, y que aquellas que queden en los extremos puedan quedar totalmente lisas.</p> <p>Esto nos permitirá generar desde composiciones apilables hasta cajas simples abiertas por su parte superior con el número de divisiones que deseemos.</p> <p>Con este diseño podrás crear desde pequeños joyeros o simples cajas para tener tus lapiceros en el escritorio hasta “grandes composiciones” para tener recogida y ordenadas todas tus herramientas y utensilios de maker.</p> <p><strong>2. Cómo configurar los parámetros para personalizar la impresión de la caja apilable</strong></p> <p>2.1. Para poder personalizar la caja apilable deberás tener instalada en tu ordenador la aplicación para diseño 3D OpenSCAD. Se trata de un software libre y se encuentra disponible para los sistemas operativos MS Windows, Mac OS X y Linux/UNIX. Si no dispones de este software, puedes descargarlo en la web <a href="http://www.openscad.org/downloads.html">http://www.openscad.org/downloads.html</a> para poder instalarlo.</p> <p>En esta página web encontrarás todas las versiones disponibles de OpenSCAD. Si eres usuario de Windows, ten precaución de descargar e instalar en tu equipo la versión adecuada a su sistema operativo (32 o 64 bits).</p> <p>2.2. Una vez que tengas instalada la aplicación, ábrela y selecciona “Archivo/Abrir…”. En la ventana emergente localiza dónde guardaste el archivo “Caja_apilable.scad”, selecciónalo y haz clic en “Abrir” o directamente haz doble clic sobre el nombre del archivo.</p> <p>2.3. Cuando abras el archivo verás, en la parte izquierda de tu pantalla, el texto de programación de la caja apilable, en la parte central la imagen de la caja, y en la parte derecha el “personalizador” (Customizer). Tu pantalla será similar a la siguiente imagen (dependiendo del tamaño y formato de tu monitor). (Ver Imagen 1).</p> <p>2.4. Te recomiendo que, si la ventana de la imagen o del “Personalizador” son muy pequeñas, las amplíes situando el ratón y arrastrando con el botón izquierdo sobre la línea vertical que las divide. De esta forma te resultará mucho más cómodo poder tanto ver la imagen como el texto del “Personalizador”.</p> <p>2.5. Cambia el tamaño de la imagen hasta que puedas verla completa en tu monitor. Para ello, simplemente sitúa el puntero del ratón sobre la imagen, podrás ampliarla o reducirla girando la rueda del ratón. También puedes hacerlo pulsando los iconos de las lupas con el signo “+” y el signo “-” que se encuentran debajo de la imagen para poder acomodar el tamaño de la imagen al de tu monitor.</p> <p>2.6. A continuación, en el área del “Personalizador” haz clic sobre los textos “Dimensiones”, “Elementos mostrados” y “Colores” para desplegar los menús y poder ver los parámetros que puedes modificar para ajustarlo a tus necesidades. Deberás ver lo que se muestra en la siguiente imagen. (Ver Imagen 2).</p> <p><strong>3. Parámetros definibles por el usuario</strong></p> <p>3.1. A continuación, encontrarás una breve descripción de lo que es cada uno de los parámetros y cómo influyen en el diseño de la pieza.</p> <p>Todos los parámetros se encuentran medidos en milímetros, y para cambiarlos solamente deberás cambiar el valor que aparece en la casilla, en el desplegable o en la corredera que aparece junto a cada uno de ellos por el que desees.</p> <p>3.1.1. <strong>“Ancho”</strong>: Este parámetro se refiere a la anchura exterior de la caja.</p> <p>3.1.2. <strong>“Profundidad”</strong>: Este parámetro se refiere a la profundidad total de la caja.</p> <p>3.1.3. <strong>“Alto”</strong>: Este parámetro se refiere a la altura total de la caja.</p> <p>3.1.4. <strong>“N Largo”</strong>: Este parámetro se refiere l número de divisiones que deseamos que el cajón tenga en profundidad. Ten en cuenta que también se pueden utilizar valores intermedios, como por ejemplo 2.5, lo que en realidad generará 3 divisiones, pero una de ellas será la mitad que las otras 2.</p> <p>3.1.5. <strong>“N Ancho”</strong>: Este parámetro se refiere l número de divisiones que deseamos que el cajón tenga a lo ancho. Ten en cuenta que también se pueden utilizar valores intermedios, como por ejemplo 2.5, lo que en realidad generará 3 divisiones, pero una de ellas será la mitad que las otras 2.</p> <p>3.1.6. <strong>“Grue”</strong>: Este parámetro se refiere al grosor de las paredes externas tanto de la caja como del cajón.</p> <p>3.1.7. <strong>“GrueC”</strong>: Este parámetro se refiere al grosor de las paredes internas del cajón (las que nos harán las divisiones). Este parámetro nunca debe ser superior al de las paredes externas, ya que si no producirá un error en el diseño.</p> <p>3.1.8. <strong>“Diferencia”</strong>: Este parámetro es la diferencia entre el borde superior de las paredes externas y el borde superior de las paredes internas del cajón (si selecciona “0” en realidad habrá una diferencia de 1.8 mm que es el mínimo necesario para que el cajón pueda entrar en la caja, ya que ésta dispone de un pequeño borde que actuará como tope para que el cajón no salga del todo si no lo inclinamos hacia arriba).</p> <p>3.1.9. <strong>“Holgura”</strong>: Este parámetro se refiere a la holgura entre el macho y la hembra del encaje entre cajas. Si el encaje entre ambas piezas queda demasiado holgado o demasiado ajustado, cambia este valor para que tu impresora los imprima a una medida ideal.</p> <p>3.1.10. <strong>“GuiIz”</strong>: Muestra u oculta las guías del lado izquierdo de la caja para generar tu modelo.</p> <p>3.1.11. <strong>“GuiDe”</strong>: Muestra u oculta las guías del lado derecho de la caja para generar tu modelo.</p> <p>3.1.12. <strong>“GuiSu”</strong>: Muestra u oculta las guías del lado superior de la caja para generar tu modelo.</p> <p>3.1.13. <strong>“GuiIn”</strong>: Muestra u oculta las guías del lado inferior de la caja para generar tu modelo.</p> <p>3.1.14. <strong>“Caja”</strong>: Muestra u oculta la caja.</p> <p>3.1.15. <strong>“Cajon”</strong>: Muestra u oculta el cajón.</p> <p>3.1.16. <strong>“Tirador”</strong>: Muestra u oculta el tirador del cajón. Esta opción es muy útil si lo que se desea generar es una caja sencilla abierta en su parte superior.</p> <p>3.1.17. <strong>“Color1”</strong>: Cambia el color de las guías “hembra”. Esto es solamente útil a efectos de previsualizar el modelo.</p> <p>3.1.18. <strong>“Color2”</strong>: Cambia el color de las guías “macho”. Esto es solamente útil a efectos de previsualizar el modelo.</p> <p>3.1.19. <strong>“Color3”</strong>: Cambia el color de la caja. Esto es solamente útil a efectos de previsualizar el modelo.</p> <p>3.1.20. <strong>“Color4”</strong>: Cambia el color del cajón. Esto es solamente útil a efectos de previsualizar el modelo.</p> <p><strong>NO debes cambiar nada en el texto de programación a menos que sepas cómo hacerlo, ya que ello provocarías que no se generase correctamente la caja.</strong></p> <p>3.2. Una vez realizados todos los cambios que desees hacer en los parámetros y te haya aparecido la imagen en pantalla deberás pulsar la tecla “F6” para que la aplicación pueda renderizar la imagen (esto puede tardar un tiempo). Una vez que haya realizado esta operación (en el texto de la parte inferior a la imagen debe aparecer “Rendering finished” como última línea) tendrás que seleccionar en el menú “Archivo/Exportar/Exportar como STL…”. Esto hará que se abra una ventana donde podrás elegir dónde deseas guardar el archivo y darle el nombre que desees. Cuando ya dispongas del archivo STL, podrás proceder como haces habitualmente para poder generar un archivo del tipo .gcode utilizando tu software de laminado.</p> <p><strong>4. Recomendaciones de impresión</strong></p> <p>La caja apilable se puede imprimir prácticamente con cualquier material no flexible que desees, ya que el único esfuerzo mecánico que realizará es el apoyo de una sobre otra, y para ello se ha tenido en cuenta colocar los encajes prácticamente sobre las paredes laterales, por lo que será mucho más difícil que con el peso de las cajas superiores la caja se combase o incluso que llegase a partirse. (PLA, PETG, ABS, etc,).</p> <p>La altura de capa recomendada para su impresión es de 0.2mm y el relleno de un 100%, ya que las paredes normalmente no van a superar los 3 mm.</p> <p>No es necesario el uso de soportes para su impresión.<br/> Una vez impresa la caja apilable no es necesario realizar ningún trabajo de post procesado.</p> <p><strong>Nota:</strong> dependiendo de la precisión de tu impresora quizás pudiese ser necesario modificar el parámetro “Holgura” para el correcto encaje de las guías macho con las guías hembra (impresas en mi MK3 encajan perfectamente sin necesidad de cambiar nada).</p>
With this file you will be able to print Customizable stackable boxes with your 3D printer. Click on the button and save the file on your computer to work, edit or customize your design. You can also find more 3D designs for printers on Customizable stackable boxes.