Customizable Tool for Handling and Orientienting Magnets
grabcad
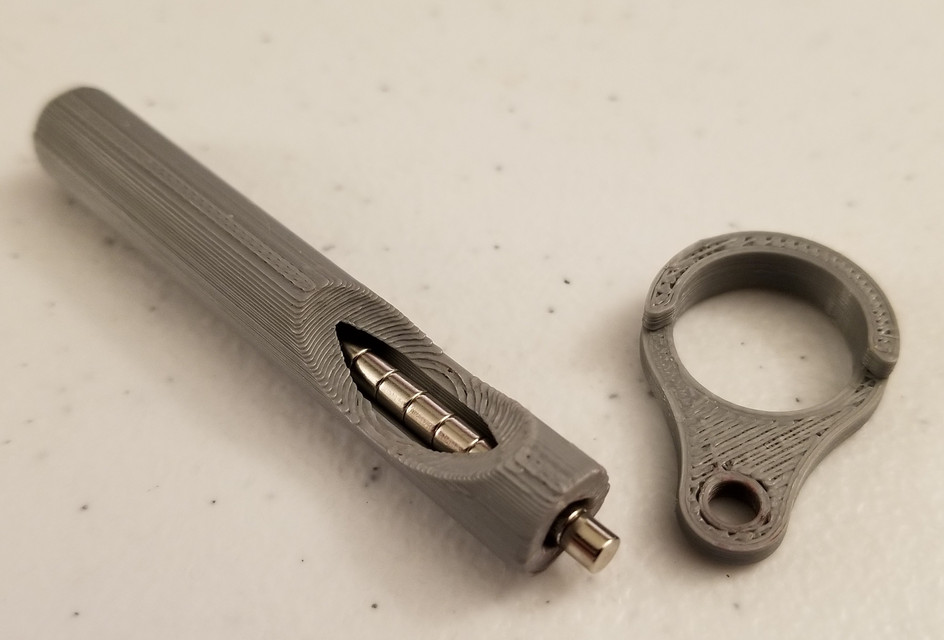
My source CAD file is “Magnet_Tool.ntop.txt”. To open it, remove .txt from file name and open then in nTopology. This was necessary because GrabCAD does not accept .ntop files. **************************************My name is Joey Fisher, and I am a PhD student in Mechanical Engineering at Penn State University. After graduating, I am interested in working either as a university professor where I will teach additive manufacturing related topics, or in industry, leveraging additive manufacturing and design for additive manufacturing and further driving adoption of the technology. The application I am submitting is a tool to solve a real-life problem I had with press fitting magnets into 3D printed parts. For a project I needed to press fit 1000 small (3mmx3mm) cylindrical neodymium magnets. The magnets are very hard to handle due to their strength and small size. In addition, the polarity of the magnets was critical to my application and the ends were not marked, requiring me to keep track of the orientation of each one myself. My goal was to create something that would make inserting the magnets faster, effectively eliminate the risk of error in the process, and make it much easier on my hands. The way the tool works is illustrated in the image gallery above, as well as the linked YouTube video below. A stick of magnets is inserted into the handle piece of the tool, and a finger is used in the opening in the side to hold the magnets and push them forward as needed. The slider piece of the tool is placed on a ferromagnetic (e.g., steel) surface, and a magnet from the handle is pushed into the hole in the slider. The slider can then be pulled away from the handle along the steel, detaching a single magnet from the stack in an easy and controlled process. The part can then be pressed onto the magnet and the process is repeated. The tool I designed and used could be redesigned for, and manufactured, using traditional manufacturing. However, additive makes the most sense from both a time and cost perspective. Because the design went through several rapid iterations to achieve the fit necessary for it to be functional, additive manufacturing was the fastest way to get to a finalized tool. Because the design is fully parameterized and mass customizable, all dimensions are driven by the user’s choice of inputs (e.g., magnet diameter, length, and quantity) in nTopology, allowing for rapid changes for any future applications that use different magnets or a different additive technology or machine to produce the tool. With traditional manufacturing techniques, different tooling/stock would be needed to produce each unique tool. Because there is not a need for more than one or two identical tools, the economics of scale that favor traditional manufacturing at large lot sizes do not apply to this application. I used nTopology for the full design of the tool because it was much faster to set up and keep track of the relationships between the inputs and the tool dimensions with the blocks in nTopology than other with CAD packages that I have access to. The use of inputs is also more intuitive in nTopology. This design for FDM is producible in other CAD packages, however if I were to optimize this tool for a resin based printer, I could use nTopology to apply surface texture for better ergonomics, as well as filling solid sections with a lattice to reduce material cost in ways not even possible in other CAD packages. Penn State has a significant number of 3D printers that span most (if not all) of the additive manufacturing processes that exist today, including an Objet 260 Connex and Uprint SE at the Learning Factory as well as Fortus machines at the Center for Innovative Materials Processing through Direct Digital Deposition (CIMP-3D) . I also have access to 30 Dremal FFF printers operated by the university’s library. However, because of the pandemic, I had to use a personal printer to produce my design. If I selected a machine from the current line of FDM systems from Stratasys, a printer from the F123 series would make the most sense for this part because of its small size and low quantity, and I would likely use Stratasys’s PLA in yellow at 0.2mm layer height. Because there is no need for higher strength or wear resistance, it would be the most cost effective and brightly colored for visibility. The design has a diamond shape tube for rapid horizontal printing with no support structures to produce smooth surfaces for the magnets to slide on.
With this file you will be able to print Customizable Tool for Handling and Orientienting Magnets with your 3D printer. Click on the button and save the file on your computer to work, edit or customize your design. You can also find more 3D designs for printers on Customizable Tool for Handling and Orientienting Magnets.