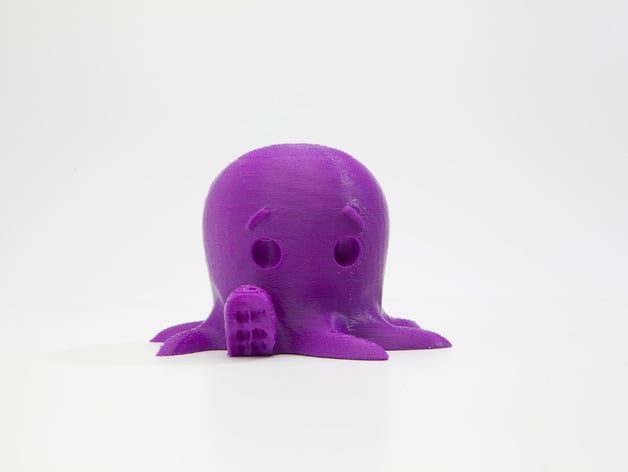
Cute Octopus Says Hello
thingiverse
'Cute Octopus Says Hello' is MakerBot's inaugural #WeekendMake series. Click on the Instructions tab for print instructions and read MakerBot's blog post to be ready for the next challenge.http://www.makerbot.com/blog/2014/07/03/makerbot-replicator-mini-introducing-weekendmake/ Enjoy! Designed by Jason Instructions Printing Instructions For MakerBot Mini ============================= If connected via WI-FI: On the Thing page, click on Thing Files to see available files. Click on the part or version you want to print to download the thing to your computer. Click on the file once downloaded. MakerBot Desktop will open and the file you selected will appear on the build plate. Click the Print button to slice your model. To send the file to your MakerBot Replicator Mini and exit the Print dialog, click Start Print. When the print file is sent to the MakerBot Replicator Mini, the Action Button will blink blue. Press the Action Button to confirm the print. The Action Button will then glow red, indicating it is heating the MakerBot Replicator Smart Extruder. When the Smart Extruder is fully heated, the MakerBot Replicator Mini will start to print your model. When your print finishes, wait for the Smart Extruder to cool, then remove the build plate from the MakerBot Replicator Mini. Remove the print from the build plate, and peel off the raft from the bottom of the print. Every object printed on your MakerBot Replicator Mini will be built on a raft. The raft acts as a base for your object and any support structures, and ensures that everything adheres well to the build plate. The raft will be easily removable once you remove your finished object from the build plate. You're almost done. Go enjoy your weekend and take your newly printed friend with you. Take a few creative photos and upload them to Thingiverse as a Make by clicking I Made One above. If connected via USB: On the Thing page, click on Thing Files to see available files. Click on the part or version you want to print to download the thing to your computer. Click on the file once downloaded. MakerBot Desktop will open and the file you selected will appear on the build plate. Click the Print button to slice your model. To send the file to your MakerBot Replicator Mini and exit the Print dialog, click Start Print. If you decide not to send the file to the MakerBot Replicator Mini, click Cancel Print. When the print file is sent to the MakerBot Replicator Mini, the Action Button will glow red, indicating it is heating the MakerBot Replicator Smart Extruder. When the Smart Extruder is fully heated, the MakerBotReplicator Mini will start to print your model. When your print finishes, wait for the Smart Extruder to cool, then remove the build plate from the MakerBot Replicator Mini. Remove the print from the build plate, and peel off the raft from the bottom of the print. Every object printed on your MakerBot Replicator Mini will be built on a raft. The raft acts as a base for your object and any support structures, and ensures that everything adheres well to the build plate. The raft will be easily removable once you remove your finished object from the build plate. You're almost done. Go enjoy your weekend and take your newly printed friend with you. Take a few creative photos and upload them to Thingiverse as a Make by clicking I Made One above.
With this file you will be able to print Cute Octopus Says Hello with your 3D printer. Click on the button and save the file on your computer to work, edit or customize your design. You can also find more 3D designs for printers on Cute Octopus Says Hello.