Cutie Bot
thingiverse
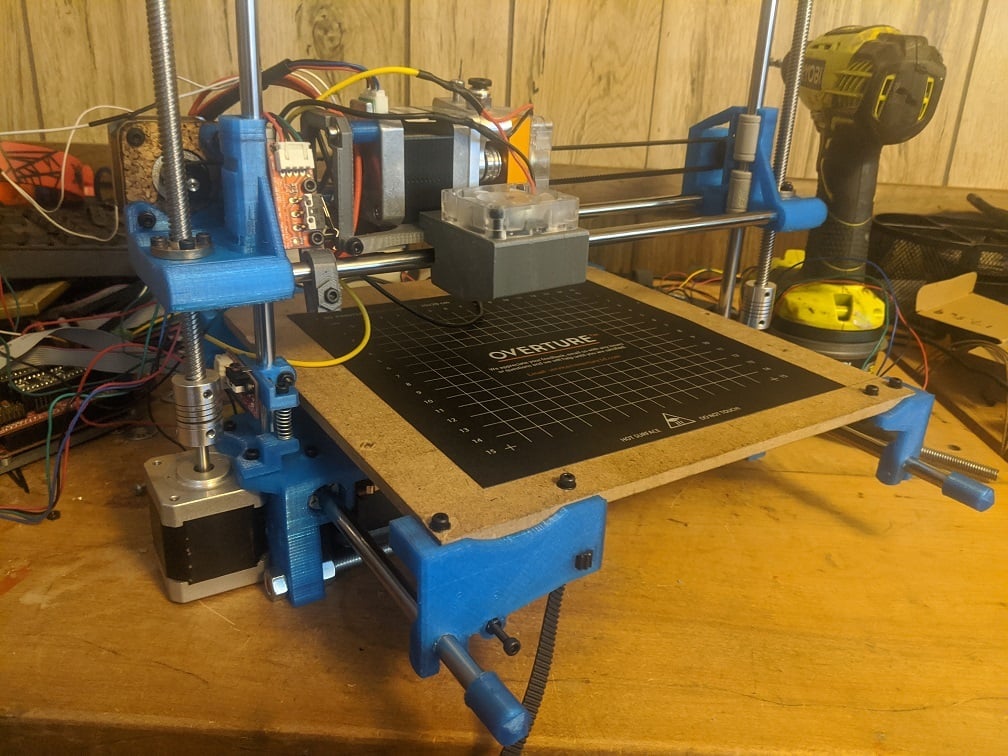
Hi Everyone, this is Reprap. Currently, I am working on in my spare time for fun. It's loosely based on the mechanics of the Printrbot, with the X axis of the Prusa Mendel. I basically took what I liked from both RepRaps and redesigned them to fit my needs and to use a 4 start 8mm leadscrew. Story behind the printer: Ever since my son was born, he has loved seeing my 3D printer go back and forth and make things. My very first printer was a Printrbot with a huge 80mm blue LED fan on the x carriage and it would fascinate him. Now that he's a little older, I wanted to design a printer that was simple yet fun, while utilizing some modern improvements to 3D printing. I am actively working on this printer so posting files as I tinker and go along. Thanks, Ryan **Notes** The Pulley on the X axis uses a 5mm screw + pulley. I will upload a pic of this as I add more files and get them printed. The Spacing between the X carriage is the same as a Prusa Mendel i2 so it's compatible with most Prusa X carriages and upgrades. Change Log: 2/8/2020 - Initial upload - Realized that the tolerance of the lm8uu's in the base was too tight and couldn't get the igus bearings in there so I increased the width of the hole, and added a set screw hole at the top incase it's too loose. Also Added holes for the end-stop to the Left Base. - Added a Adapter that will align the X carriage belt with the pulley and Gear 2/9/2020 - Uploaded the bed corners, some printers I had trouble getting the bed square in the past with other designs, so I designed these pieces to have groves to make mounting the bed simple. The two pieces on the left side also have the belt clip so the alignment will be easier because they are setup to match the belt path. - Found a bug in the front left side bed corner, the clip that attaches to the bar offsets it just barely enough that it doesn't trigger my Y endstop attached to the base. Will add a set screw so that the Y axis can be triggered and adjusted later today. I will probably make this a separate part from the plate I already uploaded. 2/10/2020 - added the front left bedclip which has the endstop screw and nut for the Y axis. - added the Z axis endstop holder, mounts to the motor and the 8mm rod, can use with or without a spring to dial in the z-axis endstop. - added the Extruder Spacers that I use for the MK8 x carraige that I use. The carriage is made by dmyers7 and can be downloaded from https://www.thingiverse.com/thing:580830 - added the tips I use to protect the sharp ends of my 8mm rods. - included the Original Printerbot's Y-axis bearing guide to honor my original first printer. If this goes against any rules to include it here I will design an alternative. - It's pretty crazy I designed and built this in 3 days, going to start plugging in the electronics this evening after work. And I will start looking into designing some cool attachments like a LCD holder and the electronics box. 2/12/2020 - Removed the two separate base pieces and uploaded a base that fits the y axis bearings better. 2/13/2020 - I got the printer fully assembled and it works great. I uploaded the sketchup files and a plate of the core parts if anyone is interested. I also uploaded the sketchup of a Reprap Discount Full Graphical LCD Mount that works with this printer also. I didn't put a x carriage in the core plate because it will accept any prusa mendel Mk2 style X carriage so feel free to pick your own and use the adapter in the stl list :). Marking it as no longer work-in-progress as this is now Version 1 of the Cutie Bot. My son loves seeing the printer he helped me build light up. 2/17/2020 Uploaded a plate for the x-Carriage for a MK8 geared extruder. My MK8 is 80mm wide, the original design was too long so I modified it and made it fit just right.
With this file you will be able to print Cutie Bot with your 3D printer. Click on the button and save the file on your computer to work, edit or customize your design. You can also find more 3D designs for printers on Cutie Bot.