D_36 - Delta Printer Upgrade Kit
thingiverse
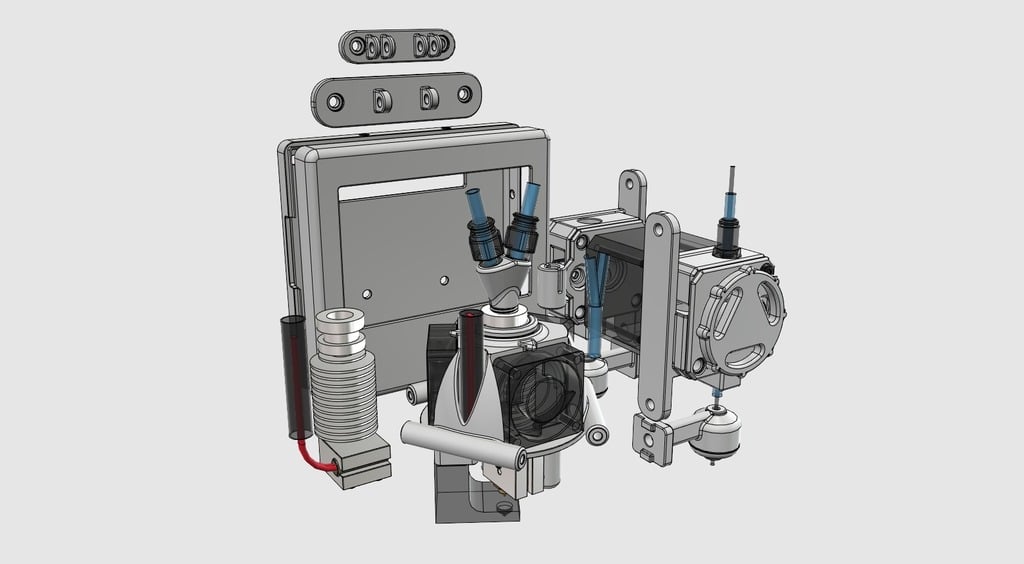
D_36 - Delta Printer Upgrade Kit This thing is intended to be a one-stop upgrade kit for your Delta printer. As published all parts, with the exception of the Effector, will fit any printer that uses 2020 extrusions in it's construction. The Effector is of course only useful for those with Delta printers. As published the Effector is sized for the Ancubic Kossel Linear Plus but should be easy to modify for any printer that uses a similar connection system for the Effector Rods. For now I'm keeping the descriptions brief, the included files should be self-explanatory, but I'll add further details as I write them. A description of each file is to be found at the end of this text Effector: -Intended for use with an E3D_J6 hot end, or clone -Will also work with a Volcano Hot End - highly recommended! -Very light, solid, and robust - good for print quality -Easy and fast to print - the design will tolerate fast / low quality settings but I would advise infill of at least 40% -Print support not required - ideally 'build plate only' should be set -Built in support for keeping those wires tidy -Requires no new parts - an E3D_J6 and at least two 30mm fans needed -All parts intended to press-fit in to place -E3D_J6 firmly held in place using snap-in collets - easy construction and maintenance, also protection against damage from print head crashes -Included dual-nozzle cooling duct with adjustable length - Volcano compatible duct is 8mm longer than standard -8mm Riser block for Anycubic Z_Probe when using a Volcano - you will need to make would own arrangesments for other printers NB: If you intend to use this Effector with another model of Delta Printer that should be no problem with two important considerations: -Your printer uses a similar / compatible method for connecting the Effector Rods to the Effector itself -Check the distance between the current Effector Rod mounts for your printer. You may need to alter that distance on the supplied version - select, and a press/pull on the ends with your favorite 3D software (123D Design suggested) -A full re-calibration will be needed Dual Filament System: -Fundamentally a Y-Adapter to fit the Hot End - allows two filament colours via one nozzle -It requires two M6 Bowden Couplers and a length of Bowden Tube - high temp ideal -The adapter is intended to be easy to print and construct - no support required -To reduce sticking it is designed to be lined with Bowden Tube: i) A length of tube long enough to fully seat in the Hot End (very important!) that will fit all the way in to the Y-Adapter ii) The tube needs to be sliced vertically for the Y-Adapter end such that the two 'arms' fit in each side iii) A printable tool is provided to help make an accurate cut iv) The Y-Adapter is designed for the shortest and straightest path in to the Hot End as possible v) The Y-Adapter is also designed to keep the cut halves of Bowden Tube locked in place when properly fitted vi) Finally there is also a good deal of adjustment on the screw-fitting for the Y-Adapter so reducing the need for an absolutely accurate length of Bowden tube vii) I would suggest using 'high temperature' Bowden Tube as it tends to be a bit stiffer (a good thing) and will allow Nylon to be printed viii) The necessary set up to help get dual extrusion working can be fount in CURA.zip Extruder: -A high performance, robust, and reliable design -Easy to print - tolerant of lower quality settings although I would suggest infill of at least 40% -Easy to construct with minimal extra parts required - a drive gear, a 'skateboard' bearing, a spring, and screws to hold it together -Bowden Tube lined for added reliability -Supports flexible filaments -Has support for filament run-out sensing using a 6x6x7-12mm Tact Switch - optional, does need careful set up -Mirrored version supplied NB: Assuming you use the same type of drive gear as my me, advised if not required, you will need to be sure your E_Steps are set to 176. For best results I would strongly suggest looking up how to properly calibrate this for your printer Filament Guide / Oiler -Intended to be fitted on the input side of your extruder -Fill with cotton wool and soak with WD-40, or similar -Run the filament through that on the way to the extruder -Drastically reduces the chance of a blockage -Easy to recharge with oil and fresh cotton wool - not required often -Also a useful filament guide RepRapDiscount Full Graphic Smart Controller Case and 2020 Mount: -An easy upgrade for most printers -Easy to print and construct - no print support required, options for mounting position -The hinged mount is robust and should fit 2020 extrusions without issue -Some nuts and bolts required, T-Nuts for the 2020 extrusion mount -Firmware editing required, but only one line of code needs uncommenting - google is your friend Included files: -D_36.stl: Example file for the Thingyverse viewer -D_36.123dx: Autodesk 123D file containing all the parts: i) Load in to Autodesk 123D (free download) and export the parts you want as .stl files for slicing ii) .123dx files can also be imported in to Fusion360, also free for personal use iii) All parts, but the Effector, are compatible with any printer that uses 2020 Extrusions iv) The effector is sized to works as-is with the Anycubic Kossel Plus. It should also work with any other Delta-type printer as long as it uses a compatible Effector Rod attachment. Do be sure to adjust the Effector Rod connection distance to match your printer! -Marlin_1.1.9_DE.zip: My custom Marlin configuration for the Anycubic Kossel Linear Plus with support for a second filament extruder and my Hot End Y-Adapter i) If you have a different printer this configuration may still be useful for baseline changes - be very careful to check all the code for printer-specifics, especially those under the Delta Settings heading ii) Do note I'm currently running TMC2208 stepper drivers in stand_alone mode. The relevant configuration.h lines will need to be changed, along with checking the others, to reflect your system. You will also need to install the TMC2208 (or equivalent) library for this configuration to compile iii) I have stuck with Marlin 1.1.x rather than Marlin 2.0 as it seems to produce better print quality with the Trigorilla Driver Board. A shame as Marlin 2.0 is nicer to use iv) This is a very good Marlin 1.1.9 configuration guide: https://www.youtube.com/watch?v=GF6ZGKOuzhY v) IMPORTANT: Marlin 1.1.x and 2.0 still don't fully support more than one extruder attached to the Trigorilla Board. As a result my configurations contain a custom pins_TRIGORILLA_13.h, along with some changes to Configuration.h, to get this to work. I have yet to work out how to get full TMC Driver support on E1. In my opinion not the Marlin Devs fault - official documentation for the Trigorilla Board seems to be absent! -Marlin_1.1.9_DE_GD.zip: The same Marlin 1.1.9 set up but with the addition of RepRap Discount Full Graphic Smart Controller support. To be frank this upgrade doesn't give you any useful extra functionality but the display is prettier i) Print out the included RepRapDiscount 128x64 Full Graphic Smart Controller mount ii) Remove the RepRapDiscount 2004 Smart Controller iii) Replace with your newly assembled upgrade iv) Load up the relevant firmware and away you go - be sure to make any required changes to reflect your set up first! -Klipper_Config.zip: Contains my initial attempt at a Klipper printer.cfg file for the Anycubic Kossel Linear Plus with dual extruder support i) Klipper printer.cfg files MUST be edited to reflect the settings for the printer they will be used with. DO NOT use as-is!!! ii) You should be able to get the relevant configuration settings from your current, properly calibrated, set up iii) Did I mention checking this configuration with EXTREME CARE before you even consider using it with your printer? -CURA.zip: Contains the G_Code specifics to get dual filament extrusion working i) IMPORTANT: Tuning of the specific values will almost certainly be needed to get this running reliably with your printer. ii) As it's "only" extra G_Code the information should be transferable to other slicers iii) While conceptually simple dual extrusion via a single nozzle is an utter b*stard to get working properly, both the Y-Adapter and the G_Code. I hope my solution gives you a leg up but don't expect it to work out of the box iv) I would heartily recommend a good look around Thingyverse, followed by YouTube and Google, to get a feel for the issues and how to set this up successfully. -Exp_10: As a bonus I thought I'd do an Effector for those who have 40mm fans. This one is optomised for for the Anycubic Kossel as the cooling duct is integrated with a mount for Anycubic's Z_Probe, but still an option for other printers. It's both standard E3D_J6 and Volcano compatible. -Two Colour Test.zip: A pair of .stl files that together should prove to be a thorough test of your setup without wasting too much filament in the process. PS For anyone considering it I'd say the Volcano is one of the best upgrades I've made for my printer: -High print speeds are more reliable -Unless you really need fine detail a 0.6mm nozzle is in my opinion a much better compromise than a 0.4mm one, but you can fit anything from 0.4mm up to 1.2mm and watch that filament reel spin! -I've heard the Volcano can reduce print quality but I've had no such issues.
With this file you will be able to print D_36 - Delta Printer Upgrade Kit with your 3D printer. Click on the button and save the file on your computer to work, edit or customize your design. You can also find more 3D designs for printers on D_36 - Delta Printer Upgrade Kit.