D9 Cii re-inspired part cooler
prusaprinters
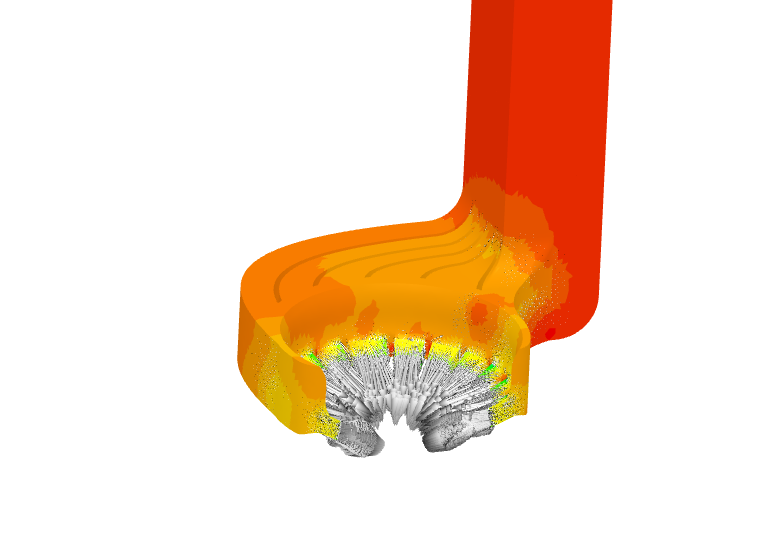
<p>This is a made from scratch redesign using measurements for where the nozzle and screws are at from the 'Cii inspired cooler for Duplicator 9' part cooler by panylund (thing:3127625). It is a re-inspired model :). I originally made a remix of his thing but wanted to do a proper design using fusion360 and change some other things more easily.</p> <p>This uses a 5015 fan and it works with the MK1 and MK2 Duplicator 9 (need re-verification for MK2 by someone with an MK2 with the latest revision). If you have an original MK1 with an MK2 upgrade, This will likely not work because it comes with an adapter for the newer mechanical probe that puts it in the way of the cooler. A brand new purchased MK2 model puts the probe in the same spot as the MK1 so it works with that model. This will not work with the newer MK3.</p> <p>This works with...<br/> Duplicator 9 MK1<br/> Duplicator 9 MK2 (need re-verfication from someone with an MK2 after latest change)</p> <p>Does not work with...<br/> Duplicator 9 MK1 upgraded to MK2<br/> Duplicator 9 MK3</p> <p>Changes over panylund's original design...</p> <ul> <li>Moved the intake duct over to not be in the way of the screw on the mounting plate. (my older simple remix had that fixed)</li> <li>The rounded design near the tips up front are now the same size on both sides.</li> <li>Moved input duct out and forward to not be in the way of the mounting plate or the screw for the mounting plate.</li> <li>Tighter input duct so that the fan stays in better. I never had an issue with it coming out but was always concerned.</li> <li>Plate added right behind the nozzle to block the heatbreak fan from pushing air out and toward the heatblock. With the Cii inspired coolers, the downward air from the big hole in the red plate goes out that big hole and some of it goes toward the front toward the heatblock. That was fighting the nozzle/heatblock heater.</li> <li><p>I used SimScale to simulate airflow a bunch of times to optimize the internal design so that the airflow is more even on the output end of the cooler. You will likely need to do a PID tune because the focused airflow is at the print area now instead of spread all around like the original Cii D9 coolers. I also adjusted Cura to start cooling at 60% at layer 2 and then scale it up to 90% by layer 6. The increased focused cooling can cause the nozzle temp to go down too much too quickly when it is first turned on.</p> <p>CHANGELOG<br/> 2020-07-18 (Version 2)</p> </li> <li><p>Taller air chamber</p> </li> <li>Redesigned output to better direct air</li> <li><p>Moved intake over to not be in the way of the mounting plate or it's screw so that the internal chambers did not have to be partially obstructed from airflow. 2020-07-09 (Version 1)</p> </li> <li><p>Initial release</p> <h3>Print Settings</h3> </li> </ul> <p><strong>Printer Brand:</strong></p> <p>Wanhao</p> <p><p class="detail-setting printer"><strong>Printer: </strong> <div><p>Duplicator9</p></div><strong>Rafts:</strong></p> <p>No</p> <p><p class="detail-setting supports"><strong>Supports: </strong> <div><p>Yes</p></div><strong>Resolution:</strong></p> <p>0.2 mm</p> <p><p class="detail-setting infill"><strong>Infill: </strong> <div><p>20%</p></div></p> <p><strong>Notes:</strong></p> <p>You must use Support touching buildplate only. Support inside the air tunnels would be a problem. Bridging works well for this so support is not needed internally.</p> </p></p></p> Category: 3D Printer Parts
With this file you will be able to print D9 Cii re-inspired part cooler with your 3D printer. Click on the button and save the file on your computer to work, edit or customize your design. You can also find more 3D designs for printers on D9 Cii re-inspired part cooler.