Da Vinci 1.0 Pro Replacement Extruder
thingiverse
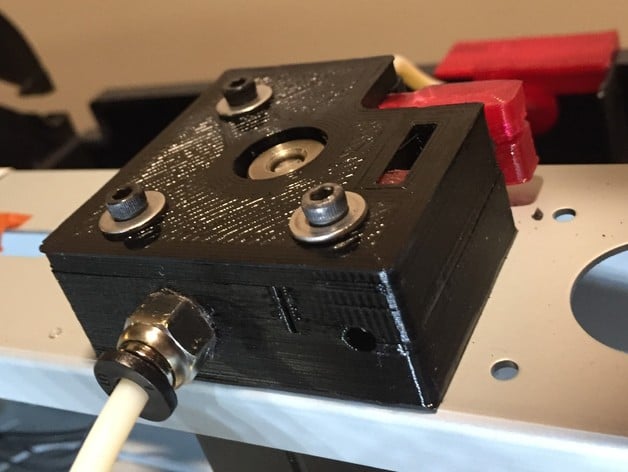
23 January 2017 Update: Increased the diameter of the large hole on the Extruder Top (Version v1). This facilitates drive gear cleaning and debris cleanout. Reduce the PTFE connector hole diameter to 9mm to allow for better tap engagement. 22 November 2017 This is a complete replacement of the Bowden Extruder for the XYZprinting Da Vinci 1.0 Pro printer with the exception of the Stepper Motor which is retained in its entirety. Over time the original extruder weakened. The idler pulley loosened and became very noisy in operation. Finally, materials such as PTEG that require significant nozzle pressure to operate correctly began slipping between the idler pulley and the extruder gear causing the print to fail or under extrude. The Da Vinci extruder assembly is also overly complicated and contains circuitry to detect the presence of filament ahead of the gear/idler pulley and a feedback circuit to presumably send filament movement back to the processor. Disconnecting both of these features has no apparent effect on the normal operation of the printer however during Load/Unload operations the printer will no longer detect the installation/removal of filament and the operator must manually signal the removal of the filament by pressing ENTER to the OK to Remove Filament on the front panel. Print Settings Printer: XYZprinting Da Vinci 1.0 Pro Rafts: No Supports: No Resolution: .25mm Infill: 30% Notes: The extruder idler is under considerable constant pressure. Accordingly I recommend stronger materials such as ABS or PTEG rather than PLA. Post-Printing Gain Access to Extruder Assembly Remove and retain the following items: Both Side Covers Top Door Front Panel Top Aft Plastic Frame Remove Extruder and retain or discard at your option: Unload Filament, Disconnect PTFE Tube from Connector on the aft printer frame, Remove small inside extruder cover, Remove Filament and Motion PCB, Remove Plastic PCB Mount, Remove Idler Tension Spring, Remove Idler Assembly, Remove 3 Screws holding the Extruder Stepper Motor to the frame, Remove Extruder Metal Flange. Removed and Retired OEM Extruder Parts Assemble Extruder Block Install PTFE Connector into the hole provided in the front of the lower Extruder Bottom, Install Idler Bearing between two Lever halves, Install Bearing and Lever assembly into lower Extruder Bottom, Position Spring in Extruder Bottom groove, Insert M3x20 Spring Adjuster Screw and Hex nut into the Spring Adjuster Body, Install Spring Adjuster Cap into lower Extruder Bottom groove between the Spring and the end of the groove with the flange up, Install the Extruder Top onto the Extender Bottom positioning the Spring Adjuster Cap flange into the Extruder Top slot, Insert 3 M3x30 Screws through the Extruder Top and into the Extruder Bottom, Install a new Drive Gear on the Stepper Motor Shaft teeth side down and tighten set screw as required. The Stepper Motor shaft should be recessed approximately 0.9mm from the top of the Extruder Gear, Position the Stepper Motor assembly through the hole in the aft printer frame and hold in place, Mount the assembled Extruder to the stepper motor by hand tightening each screw in turn. Tighten with hex drive as required. Insure the Extruder Bottom is flush with the frame. If necessary remove additional plastic from the recessed flange boss on the underneath of the Extruder Bottom.NOTE:Do not over torque the screws. Doing so may strip the Stepper Motor threads! Test feed a short filament from back to front. Adjust Gear position on the Stepper Motor shaft so that the filament feeds smoothly through the Extruder Bottom into the center of the Gear grove. The will require temporary removal of the Extruder Assembly to gain access to the Gear set screw.. Connect the PTFE tube removed in the steps above into the Connector installed above. Extruder Filament Drive Gear Reassemble Printer Install Aft Printer plastic Top Frame Install Front Panel Cover, Install Side Covers, Install Top Door. NOTE: I have left the inside Extruder Cover off because the upped fasteners attach to the PCB Mount which has been removed. If it is desirable to install this cover, locally fabricate a mounting bracket and install cover to that bracket. Test Insert Filament into the small aft hole in the lower Extruder Body until it touches the Gear, Select Load Filament on the printer front panel, Printer should grasp the filament and slowly pull it into the PTFE tube, Once the Hot End reaches the temperature set for loading filament, the Stepper Motor will advance the filament and extrude the normal amount, Confirm the filament has been loaded on the front panel. How I Designed This Modifications to an Existing Design This Bowden Extruder is based on a design by DWONH. The original design split the Extruder Body in half horizontally. This allowed both halves to be printed without support. I changed the design to incorporate the filament channel and the Bowden Tube Connector hole in the bottom body. This allow a more precise line bore of the filament path and a more secure attachment of the Bowden Tube Connector. The Extruder Body exterior was resized to fit onto the Da Vinci 1.0 Pro top aft frame with the covers installed. The input filament hole was enlarged to optionally allow insertion of a PTFE feed tube that routes the filament from the spool to the Extruder. The Lever Halves were reworked to more precisely fit the Idler Spring and Idler Bearing. Interior geometry was reworked in several places to give more room for the Idler and Lever. Custom Section Bill of materials 3 M3x30 Screws 3 M3 Washers 1 M3 Hex Nut 1 M3x20 Screw 1 Compression Spring, Steel, Metric, 9.6 mm OD, 1.6 mm Wire Size, 12.6 mm Compressed Length, 21.5 mm Free Length, 211.82 N Load Capacity http://www.amazon.com/gp/product/B005S4F93Q 1 Double Sealed Precision Ball Bearing (688ZZ) 8 x16 x5 http://www.amazon.com/gp/product/B01FE2EVLW 1 MK7 Stainless Steel Teeth Extruder Gear With 5mm Bore & 40 Teeth http://www.amazon.com/gp/product/B016XTZ5AQ 1 PC4-M10 Male Straight Pneumatic PEFE Tube Push Fitting http://www.amazon.com/gp/product/B01IB81IHG
With this file you will be able to print Da Vinci 1.0 Pro Replacement Extruder with your 3D printer. Click on the button and save the file on your computer to work, edit or customize your design. You can also find more 3D designs for printers on Da Vinci 1.0 Pro Replacement Extruder.