Dave-mod-Tom-Tri-Track dual servo robot chassis
thingiverse
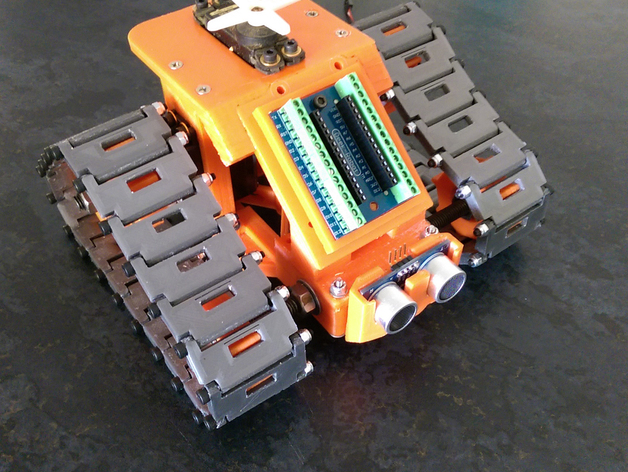
I stretched out the original chassis of Krux's design from thingiverse.com/thing:19170 to tighten up the tracks. Combining the three parts into one, I realized the original idler wheels were too loose on a standard 608 bearing, so I shrunk the diameter of the hole to a more secure fit. The servo mounts were extended upward to meet the new top plate, which I also created to accept a servo for future turret/head/upper body projects. A recessed area in the top plate can receive the front plate, held firmly by both glued and screwed nano and uno mounting holes made by me. Acetone adhesives stuck incredibly well on my printed ABS materials. Using a Deek-Robot nano terminal adapter v1.0 from e-bay, an Arduino nano screw terminal breakout board was connected seamlessly to facilitate control. Also mounted onto the front plate was an Arduino Uno bumper plate that already included pre-drilled holes for ease of attachment. Printing Settings were carefully chosen to bring out high quality results. Printer: Rostock Max v2 Rafts: No Resolution: 0.15 Infill: 20% Support is indeed essential for the top plate and front plate; both need prints in inverted settings with added support throughout except maybe not absolutely needed, as it seems some sonar plate users still used those. Printing speed achieved an optimal result around 40 to 50 mm/sec depending on part complexity while running ABS filaments at high temperatures. The printer is actually a Rostock Max v2 with incredible build quality that handled large parts quite nicely for any skilled maker. Post-Printing Process After completing prints, users should carefully bond the front plate and rear plate using some liquid acrylic (abs adhesive solution available in online stores) - they both also share common nano terminal ports which provide ample space and good mounting points if required to mount it securely by simply fastening through appropriate hardware pieces then connecting electronic circuits later if needed.
With this file you will be able to print Dave-mod-Tom-Tri-Track dual servo robot chassis with your 3D printer. Click on the button and save the file on your computer to work, edit or customize your design. You can also find more 3D designs for printers on Dave-mod-Tom-Tri-Track dual servo robot chassis.