Davinci MiniMaker Complete Overhaul
thingiverse
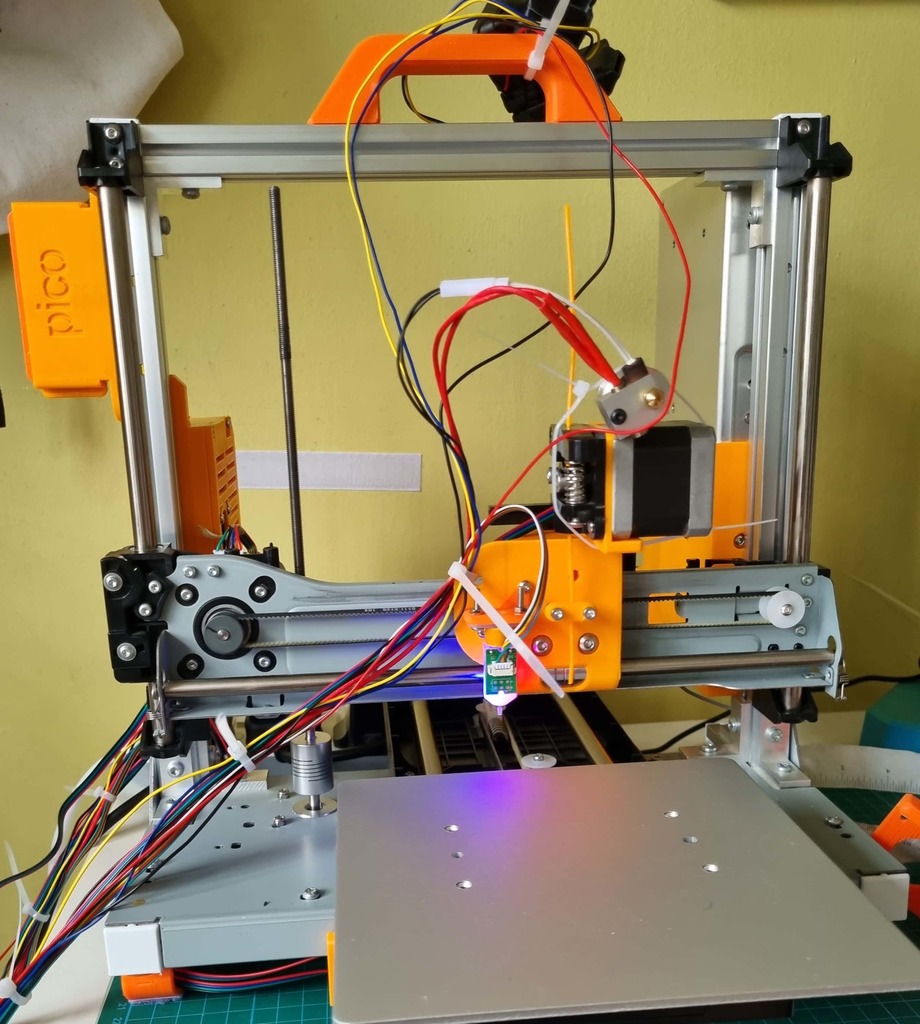
My first printer was a Davinci MiniMaker, received for free as a birthday present. However, within 1 month, I was sorely disappointed with the proprietary filament as well as the limited stock firmware (that you were forced to use), and so within 2 months I bought a new Ender 3 to use instead! However, I aimed to eventually replace all proprietary parts from this printer and enhance its functionality. This overhaul intends to accomplish the following: -Redesigned hotend mount to allow for use of more common hotends - in this case a stock Creality MK8 hotend -Direct drive -Part cooling fan -New PSU -Small heated bed -New motherboard + Raspberry Pi to use Klipper WARNING: Project requires some knowledge of soldering as well as handling mains electricity, as a PSU will be set up. -130821- DaVinci Overhaul project is almost complete. Electronics work and movement systems work well. I exchanged the Z axis motor for a more standard NEMA 17 Stepper motor. To use the original leadscrew, a 5mm to 5mm coupler is required. Take note that to use the original DaVinci motors, the wires are swapped, you will need to swap the positions of the inner/outer 2 wires for the motors to work properly. All endstops have been replaced in favour of a BLtouch for Z and sensorless homing for X and Y. The printer runs on Klipper. As of now, I am awaiting a new Creality hotend as well as the heated bed, and 165mm glass surface before printing can commence. However, movement systems work well. HARDWARE REQUIREMENTS Electronics: NEMA 17 Motor - replacement z-axis motor Meanwell LRS-350-24 PSU Power Socket Inlet for PSU Plug for PSU to connect to mains SKR MINI E3 V2.0 Raspberry Pi Zero W (preferably with headers) 4 x wire to connect Raspberry Pi GPIO to SKR MINI E3 V2.0 BLtouch/clone 24V Hotend Fans (Up to user preference. Use the fans you would use for the cooling fan duct you normally use.) 24V Ender 3 Hotend 24V Motherboard Fan (4020) 4-to-6 pin Stepper Motor wires (x4) 12 AWG Wire (connects PSU to Motherboard) Custom Heated Bed (sourced from KEENOVO for me. The schematics included in the Thing files were made with a 1cm radius safety margin away from the plastic mount points, and 1.5cm distance away from the edge of the buildplate) Other: 2xLM8UU Linear Bearing 5mm-to-5mm coupler M3, M4, M5 Screws and nuts (no specific number yet) Glass Bed Clips 165mm Glass Bed Nylon Zip-Ties (3.5mm width) 8mm Diameter spring (Stock Ender 3 bed leveling spring works well) OTHER LINKS: These are Things I have used and listed as 'remix' source files, but did not include them in the STLs as they remain unchanged from their original posts. https://www.thingiverse.com/thing:4012555 https://www.thingiverse.com/thing:4338350 https://www.thingiverse.com/thing:4619895 Tutorial on how to connect Raspberry Pi to the SKR motherboard using TX and RX pins (method used here) https://www.youtube.com/watch?v=AtW3GqkKUz8
With this file you will be able to print Davinci MiniMaker Complete Overhaul with your 3D printer. Click on the button and save the file on your computer to work, edit or customize your design. You can also find more 3D designs for printers on Davinci MiniMaker Complete Overhaul.