Davinci Pro 1.0 E3D V6 carriage
thingiverse
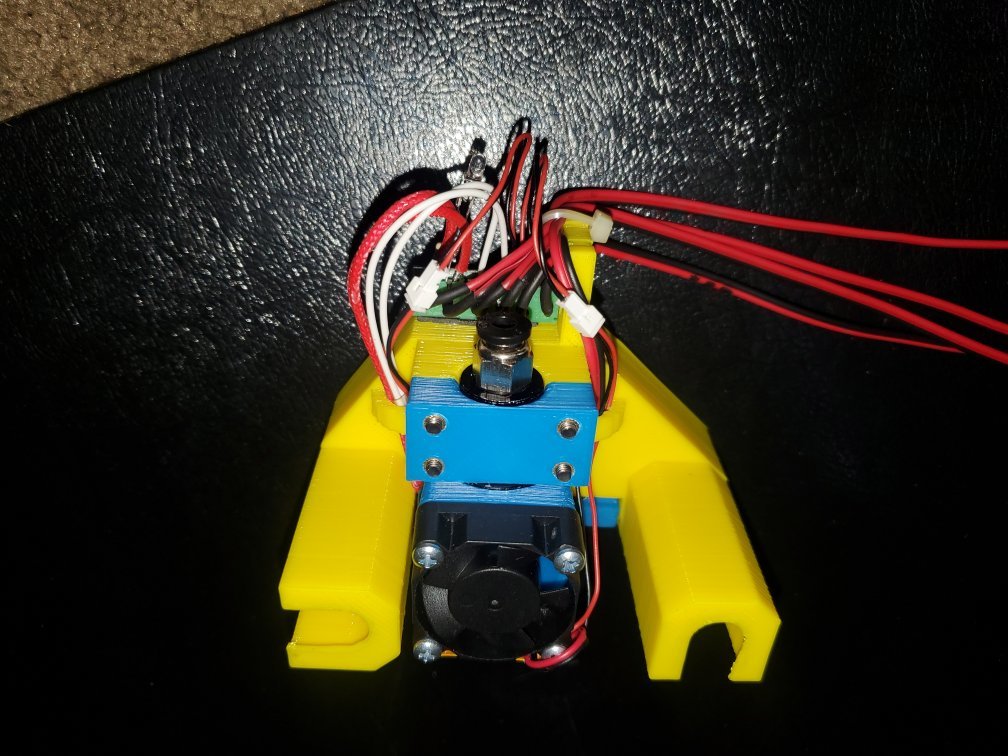
My E3D V6 hot end carriage for my Davinci Pro 1.0 I have an old Davinci Pro 1.0. I bought it when they first came out way back in 2015. I pre-ordered it and got a discount. It has been a good printer over the years and of course I have done some mods to it. I have been using Bruce Walker’s drop in cartridge mount for a E3D V6 hot end for years now. Thing 1328848. That was one of the first mods I did, right after the rear spool holder. My printer is getting old now and the carriage that the cartridge slides into is getting kind of worn and sloppy. It just doesn’t hold the cartridge nice n tight like it used to. I want to replace the carriage and I still want to use the E3D V6. I looked on Thingiverse and downloaded a few carriages. I printed a couple but I wasn’t real happy with any of them so I decided to create my own. I used some of the downloaded carriages as a template to create my carriage. Even though my design is kind of an open U shaped design it is pretty strong and stable. It’s beefy. It uses 4 LM8UU linear bearings. After several revisions I think it’s ready. I ended up using the E3D V6 clamp from thing 594392. My clamp only used 2 screws, his uses 4 and it hangs down a touch lower so it touches the top of the E3D V6, kind of like an added support. I added little pockets to the four holes so I can use the 3mm brass inserts. I liked it so I borrowed (stole) it. Thank you andy004. Since I print mostly ABS and occasionally PETG on my Davinci Pro I was not concerned with a layer fan so I did not incorporate one into my design. Kind of selfish, sorry. I have an delta printer that I use for PLA. Since it is an open design carriage if you really want a layer fan I think a clamp on fan like thing 2599274 might work. I haven’t tried it so I don’t know. Space is a little tight there. It would be nice if there was room for a 3 fan shroud like for a Delta effecter, but there’s not. I didn’t want to kill myself over something that I wasn’t going to use anyway so I left it at that. My linear bearing housings are both open so I can remove and re-install my carriage in the printer relatively easy. One faces forward and the other one faces down. The carriage slips on and off over the 4 linear bearings. The 4 linear bearings stay on their shafts and the carriage slides off of them. Of course you should double check your z height clearance after you do this. I have printed a few things now and the bearings seem to stay in place. I was a little concerned about the downward facing housing lifting itself up but that hasn’t been the case. And speaking of the linear bearing housings, the way they print, their orientation in the printer, standing up, I added my own little tiny supports to the bottom front of the bearing keepers/spacers. You’ll see. They are little tiny triangles trying to add a little support. I still printed out some hairs and droops and I had to clean it up a little but overall I’m happy with it. But it definitely requires some post print clean up in this area. Just try to make all 8 bearing pocket corners look the same in each housing. If you have to clean out the holes, as I did, use a 1/8” drill bit for the smaller 3mm holes and use a 7/32” drill bit for the larger part for the socket head. Be careful that you don’t actually drill into the part, just clean out the crap. I added brass nut insert pockets to the belt clamp and to the E3D clamp. So you can install brass nut inserts if you have them or pass through and use an external nut. To clamp the E3D V6 in it’s mount you will need (4) 3mm socket heads screws at 25mm’s long if you are using external nuts, 20mm’s long if you use the brass nut inserts. The same for the belt clamp. The belt clamp is the reason I added the brass nut inserts. It is kind of hard to try to start a nut under the carriage like that. You will need the long side of an allen wrench to reach the socket head screws in their pockets. They are WAAAAAY down there. I have a mounting tab on top for the cable chain and two ¼ circles for wire ties and stuff. I printed this in ABS so I can use super glue to glue the optical sensor tab on. I used industrial strength double sided tape for now. The Davinci Pro has a little board in the original carriage. I removed the board and cable and wrapped up the cable and mounted the remote board in the back of the Pro near the main board. Then I just ran my own wires from the little board through the cable chain and to the hot end for the heater and sensor. I added my own wires for the E3D fan, (future) layer fan, and LED’s. I don’t use the auto load and unload functions so I don’t need the filament sensor. I suppose I could shove a piece of filament through the sensor and just leave it there if I have to but so far I haven’t seen the need. . Overall it’s a fairly easy print. Few overhangs. There are 4 parts. The main carriage. An E3D V6 clamp, belt clamp, and optical tab all together on a common brim. A fan shroud for a 30mm fan. A cable chain mount extender. My mounting tab was too low and the cable chain would hit the belt on the side so I created this little extender to raise up the mounting point by 30mm’s. That did the trick. Now the cable chain is centered in the opening over the side belt. I printed this in ABS .2 layer at 50% infill. It took me over 7 hours to print the carriage at 24mm’s/sec. https://www.youtube.com/watch?v=9p0AZXNWQNM I am working on a slight revision. I added a T slot for the x axis optical sensor I got rid of the screwed in belt clamp and I made a slide in belt clamp. I reversed the screw holes for the E3D clamp so I can unscrew it from the front now. Now the brass inserts go into the main body instead of into the clamp. I'm still going - There may be more...
With this file you will be able to print Davinci Pro 1.0 E3D V6 carriage with your 3D printer. Click on the button and save the file on your computer to work, edit or customize your design. You can also find more 3D designs for printers on Davinci Pro 1.0 E3D V6 carriage.