Davis VantageVue Aspirated Solar Radiation Shield
thingiverse
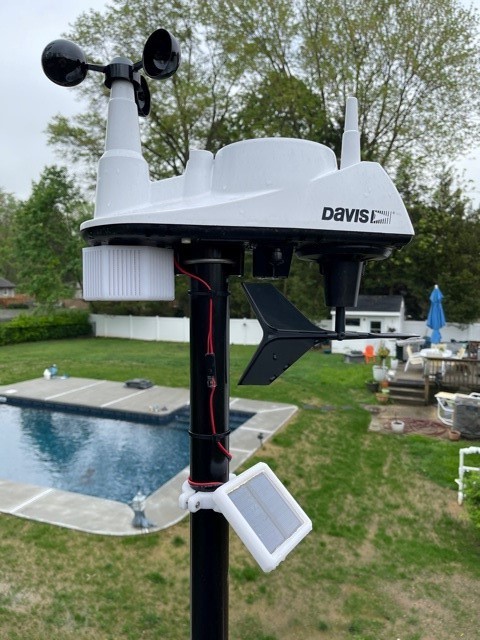
An aspirated radiation shield uses a fan to circulate fresh air over the temperature and humidity sensor during sunny conditions to mitigate the effects of sunlight heating the air within the shield. This project consists of two parts: the radiation shield with fan and the solar panel to power it. This project is designed for a Davis VantageVue sensor suite mounted on a 1-5/8" pole. ###Parts Needed You will need some additional parts, listed below: * Fan - 25mm 5V Fan https://www.amazon.com/gp/product/B08D8VNLHD/ref=ppx_yo_dt_b_search_asin_image?ie=UTF8&psc=1 * Solar panels - 68mmx37mm / 2.67"x1.45" 5V Solar Cells https://www.amazon.com/gp/product/B0736W4HK1/ref=ppx_yo_dt_b_search_asin_image?ie=UTF8&psc=1 * Outdoor Silicone Sealant/caulk https://www.amazon.com/DAP-M90015-10-1OZ-Wind-Seal/dp/B003YHEB4W/ref=sr_1_9?dchild=1&keywords=silicone+caulk+outdoor&qid=1625113550&s=hi&sr=1-9 * Plexi-glass, lexan or glass sheet 2mm/.080in thick * Wire - 22AWG about 1ft/33cm * Resistor 5Ohm, 0.5watt * Solder and Heat-shrink tubing * M3x12mm bolts and nuts - 4X * M4x14mm bolts and nuts - 2x * Zip ties - 2x * Wire Connector - Recommended but optional https://www.amazon.com/gp/product/B081JG4KR5/ref=ppx_yo_dt_b_search_asin_image?ie=UTF8&psc=1 ###Printing and Assembly Instructions All parts should be printed in a material that can withstand the abuse it is likely to see being outdoors 24/7. I can make no suggestion as to what is the best material to use in your environment. I printed mine in white PETG but I do not expect it to last forever. All parts can be printed without support except for the radiation shield. Whichever material you choose, it should be white as it is the best color for reflecting solar radiation, and that is exactly what we are trying to do. The radiation shield should only need support under the side vent. The fan can be mounted with the screws supplied with the fan by inserting the screws through the access holes on the shield and using a nut on the inside. The fan should blow inwards, towards the sensor, sucking in air from the vent that points downward. Solder enough wire on the fan leads as needed to reach the desired solar panel mounting location. The fan wire can be routed through the small hole at the end nearest the pole. The shield is mounted using the two screws that hold the original shield in place. Solar panel assembly animation - https://youtu.be/qUbgcXARDko Once you have printed all of the solar panel parts, solder two 5v solar cells in parallel(+ to + and - to -). Pay attention to how they will sit in the base part and make sure your wires will fall into the wire grooves. Solder one leg of the 5Ohm resistor to one of the (+) pads on the solar cells. Attach the red wire to the other leg of the resistor and the black wire to (-) pad on the solar cells. If you are using the connectors I suggested above, you can feed the wire through the hole near the pole mount and attach a connector. If you are not using connectors, be sure to feed the wire from the shield through the access hole near the pole mount before you solder it to the solar panels! Also note, the access hole goes through both the base part and the mount part so it is best to have them assembled using 4x M3x12 bolts and nuts before feeding the wire through. Once you have the wire fed through the hole and everything is tucked in, you can use a dot of adhesive to hold them centered in place to make the rest of the assembly a little easier. next, cut a piece of lexan to a 77mmx83mm rectangle and place it on top of the solar panels. Put a bead of sealant on the inside lip of the lid ring and place it on top, wipe off any excess on the glass. Fill the gap between the base and the lid ring with sealant and allow it to cure (be sure to position the part so it is level while it cures.) Fill the wire hole with sealant. Fill the four screw access holes in the shield vent with sealant(careful, not too much!) Mount the solar panel to the pole, once it is fully cured, about a foot below the sensor suite. Be sure it is facing the south sky if you live in the northern hemisphere or the north sky if you live in the southern hemisphere(your wx station should already be oriented north-south so this should be easy). I stuffed my wire connectors with silicone based dielectric grease paste to prevent water ingress and corrosion. Zip tie the wire to the pole and let it whirrrrrrrrr! ##Notes for improvement * In hindsight, I'm not particularly keen on the solar panel being assembled entirely with sealant. It should work fine under most circumstances however, if the plastic starts to warp at some point, it won't likely last much longer. You can add some small plastic screws around the sides of the ring lid to attach it to the base a little better. * The fan I listed is not waterproof. Under most conditions, it shouldn't get too wet but it is out there in all the elements all year so I am not too sure how long it will last. I tried to find 25mm waterproof fans that run on 5v but didn't have much luck. If you can find a fan that fits the bill, please share in the comments. * If it is worth the work for you, you can drill holes in the mounting pole to hide the wire inside the pole for a cleaner look. * The fan really requires full direct sunshine to operate properly, that darn hindsight is telling me this may work better with three or even four solar cells instead of two. My thinking was that it's sole purpose is to run when the unit is in full direct sunlight so two would be sufficient.
With this file you will be able to print Davis VantageVue Aspirated Solar Radiation Shield with your 3D printer. Click on the button and save the file on your computer to work, edit or customize your design. You can also find more 3D designs for printers on Davis VantageVue Aspirated Solar Radiation Shield.