DC-01 (H-BOT Style Printer)
prusaprinters
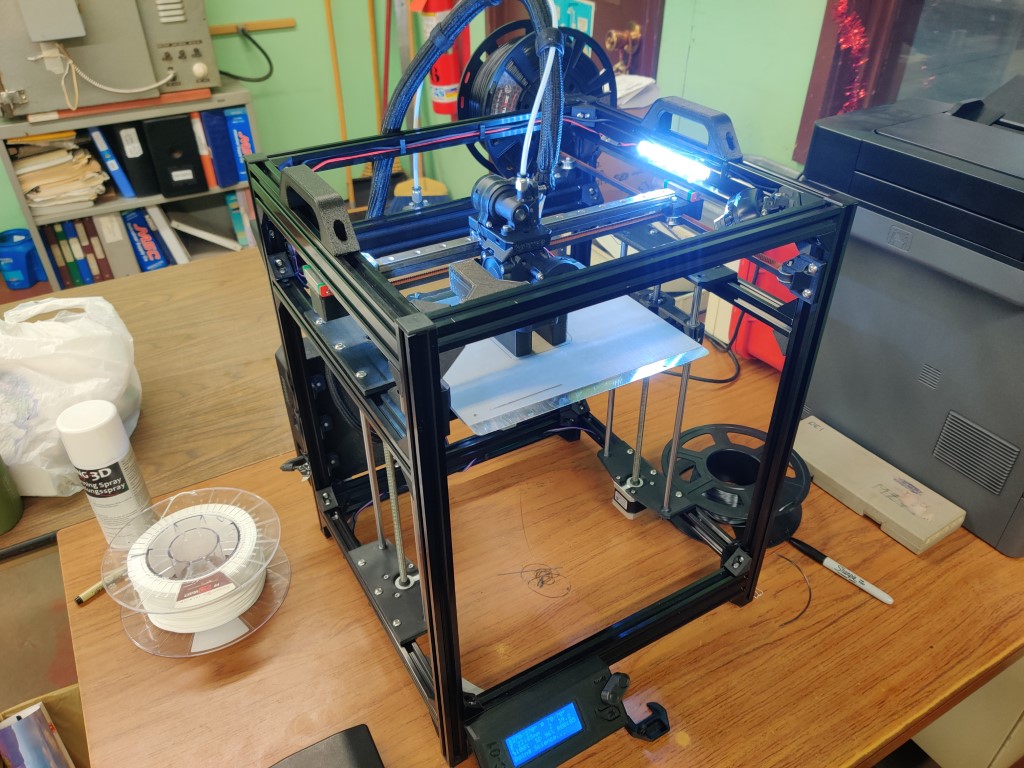
<p>1.4.2022 UPDATE:</p><p>I've converted the HBOT to linear rails and so far it is running smoothly. I'm able to push it to 200mm/sec print speeds and 3000mm/sec/sec acceleration. I've had travel speeds up to 500mm/sec. I'm not necessarily looking for highspeed prints but, more so quality. I am however dealing with a binding issue with the Z-axis, which I solved and just need to resolve it.</p><p> </p><p>9.2.2021 UPDATE:</p><p>Just uploaded my design to PrusaPrinters as I've been working on this design for a bit now. The last thing I need is the bed tray being machined which is in the works.</p><p> </p><p>8.24.2021 UPDATE:<br/>I've almost got all the parts I need to finish my build. I need to have my bed tray machined yet and I need to purchase another Heated Bed. I've updated the model with the Orbiter Ver. 1.5 as I purchased another one (I don't want to take the one I'm using on my Bear off as it works soooo good). I've also updated the filament sensor to use the Prusa MK3+ sensor as I have two of them. I've posted it to my Thingiverse as a remix which you can find here:</p><p><a href="https://www.thingiverse.com/thing:4940352">https://www.thingiverse.com/thing:4940352</a></p><p>Things are starting to come together soon and I'm excited to try my H-Bot design out.</p><p>8.5.2021 UPDATE:<br/>I've gotten the frame assembled and motion system in place. So far it looks like it is working but, I won't know for sure until I hook up some electronics to test the X and Y. If it seems like there is to much twisting with the H-Bot setup I'll probably convert it to a CoreXY. Hopefully I'll get some testing in here soon. I'm still printing off a few pieces (electronics case and PSU cover).</p><p>7.30.2021 UPDATE:<br/>I've made a few updates. Changed a few positions as well and optimized my Z-Height as much as I could and have reached a build volume of 250x210x280. I've added a mount for the BTT Smart Filament Sensor (Which I'm testing on my current Bear with great results).</p><p>7.21.2021 UPDATE:<br/>I've a rudimentary case mocked up with the requirements I wanted and possible room for expansion in the case. I've also mocked the location I want for the PSU as well.<br/>I've also update the extruder to the Orbiter setup that I'm currently running on my Bear clone. I purchased some more parts that I will need to start the build and I will be taking photos of the progress and will update soon with those.</p><p>7.14.2021 UPDATE:<br/>I've finished designing the bed carriage and will be designing a case for the electronics. For the design I will be designing a case to house a SKR 1.4 Turbo, a Raspberry Pi 3 or 4 (I currently have a 3+), a couple of buck converters (fans, Pi's power, LEDS, etc), and possibly a Mosfet or Relay mount for future use (for an eventual upgrade to a high power bed). This will be a ongoing project over the next few months and have time to work on the design. I have my aluminum extrusion for the build and will be building the frame soon and will start printing parts.</p><p>For the last couple of years I've been wanting to design my own printer but, I wanted it to be simple, yet reliable.</p><p>This is my concept of a H-Bot style printer as the printer I work with at my company uses this motion system and it is clean, reliable, and has a less confusing belt path.</p><p>I designed it around parts that I already have but, it is completely scalable to whatever size you want it to be.</p><p>The build area is 250x210x270 (using Prusa Z-Motors and MK52 Build-Plate).<br/>I used 8mm linear rods as they're fairly cheap as well as LM8UU bearings and T8x8 Lead screws for Z movement. For the extruder, I decided to go with the BearExxa. It is an excellent extruder and is super reliable (thanks Greg!) I will probably be changing this as I have an Orbiter extruder on order and waiting for it to come in.</p><p>For now this is a place holder for my design and to see what kind of interest there is in my design and for feedback.</p><p>I will update the page with progress and build photos as they come.</p><h3>Print Settings</h3><p><strong>Printer:</strong></p><p>Prusa Bear Clone</p><p><strong>Rafts:</strong></p><p>No</p><p><strong>Supports:</strong></p><p>Yes</p><p><strong>Resolution:</strong></p><p>0.4mm</p><p><strong>Infill:</strong></p><p>20%</p><p><strong>Filament:</strong> Priline Polycarbonate Carbon Fiber<br/><strong>Notes:</strong></p><p>All parts have been printed in Priline CarbonFiber PC as I have a few rolls as this has been my go to filament for parts that need strength, heat resistance, and the price isn't out of this world expensive.</p><p>Parts have been printed with 4 perimeters, 3 top/bottom layers, with 20% infill. I'm using a 0.6mm nozzle with a line width of 0.686mm</p><p>Category: 3D Printers</p>
With this file you will be able to print DC-01 (H-BOT Style Printer) with your 3D printer. Click on the button and save the file on your computer to work, edit or customize your design. You can also find more 3D designs for printers on DC-01 (H-BOT Style Printer).