DC Motor Controller Box
thingiverse
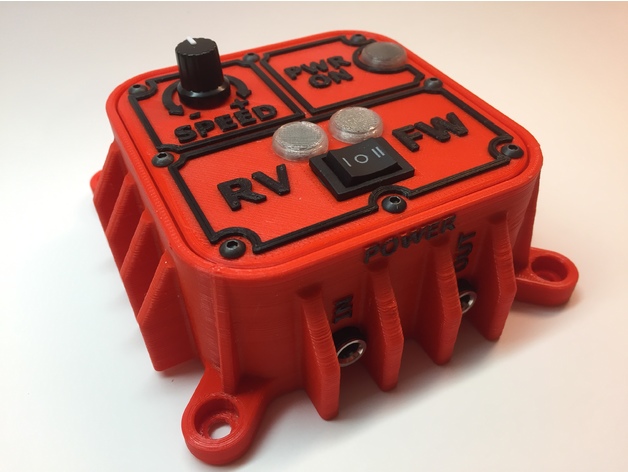
DC Motor Controller Box This is a box to house a DC motor controller to control speed and direction of a DC motor. The controller bolts on the bottom of the box with four M3 x 6mm long screws. The lid bolts onto the top of the box with eight M3 x 6mm long screws. I used heat-set brass thread inserts for the mounting threads. On the controller there is a yellow light for “on” and two red lights for “forward” and “reverse”. I designed tubes that transfer light from the leds thru cover lenses so that they are visible from the outside of the box. A rocker switch sets; forward, reverse, or off. And a potentiometer controls the motor speed. I used panel mount female DC panel mount barrel jack for the external power connections from the power supply and to the motor. Assembly Instructions: Once all the components are printed out use super glue to attach the led tubes to the cover plate. Then glue the lenses to the tubes. Next use a soldering iron to install the heat-set inserts into the empty holes in the housing, there are 12 holes in total. Take the knob and the nut off the potentiometer to install it into the cover. Disconnect the wires from the rocker switch and install it on the cover plate and then rewire the switch back to the controller. Solder wires onto the DC barrel jacks and then install the jacks in the housing. Install the controller in the housing using four M3 screws. Connect the wires from the DC barrel jacks to the controller. Be sure you connect the power correctly from the inlet jack to the controller because if these are wrong you will fry the controller. The outlet power phases to the motor don’t matter. Install the cover plate on the box and the controller is complete. Required Components: Motor Controller PN: A16090700UX0248 Manufacture: Uxcell Voltage: 10-30vdc/ 3amp You can find it on Uxcells site or I got mine on amazon for $10: https://amzn.to/2E5YtVt orhttp://www.uxcell.com/1030v-120w-pwm-motor-speed-regulator-controller-forward-reverse-switch-p-1020549.html DC GearMotor (optional) Any motor under 3amps will work but I used this one PN: A16051100UX0484 Manufacture: Uxcell Voltage: 24vdc/ 1amp RPM: 200 (20-1000 available same gearmotor) You can find it on Uxcells site or I got mine on amazon for $14: https://amzn.to/2Sgtucq orhttp://www.uxcell.com/24v-200rpm-speed-6mm-shaft-dia-cylindrical-shape-geared-motor-tjp37rg249i-p-971392.html Panel Mount DC Barrel Jack Size: 2.1mm x 5.5mm Panel Hole Size: 7.8mm Qty: 3 I purchased mine from e-bay, they were like 10 for $1, but they also have them on amazon. https://amzn.to/2QnzB1t Just make sure you get the two pin concentric style, the three pin style won’t fit. Thread Inserts M3x.5mm thread, 5.6mm od x 3.8mm lg. brass QTY: 12 You can find the threaded inserts on Amazon:https://amzn.to/2P7NMCV Power Supply You will need a power supply. Any power supply from 10-30vdc will work just make sure it has a 5.5mm x 2.1mm barrel connector. I purchased a 24vdc x 3 amp power supply for $12 on Amazon.https://amzn.to/2QvaHgg Double Male Adapter Cable You will need a cable with 2.1mm x 5.5 male plugs on both ends for connecting the controller to the motor cap housing. I found five of them on e-bay for $3. Required hardware: M3 X .5 X SOCKET HEAD CAP SCREW 6M LG. – 4X M3 X .5 X BUTTON HEAD CAP SCREW 6M LG. – 8X https://youtu.be/7sirsHA1HLo Print Settings Printer: Monoprice Select Mini Rafts: No Supports: No Notes: No supports are required! I used a second color on the cover. If you wish to do so the cover thickness is .1" (2.54mm), and the letters are .4" (2mm) high. For a better result when printing the led tubes turn the heat down slightly since they are so small.
With this file you will be able to print DC Motor Controller Box with your 3D printer. Click on the button and save the file on your computer to work, edit or customize your design. You can also find more 3D designs for printers on DC Motor Controller Box.