Decade Resistor Box
prusaprinters
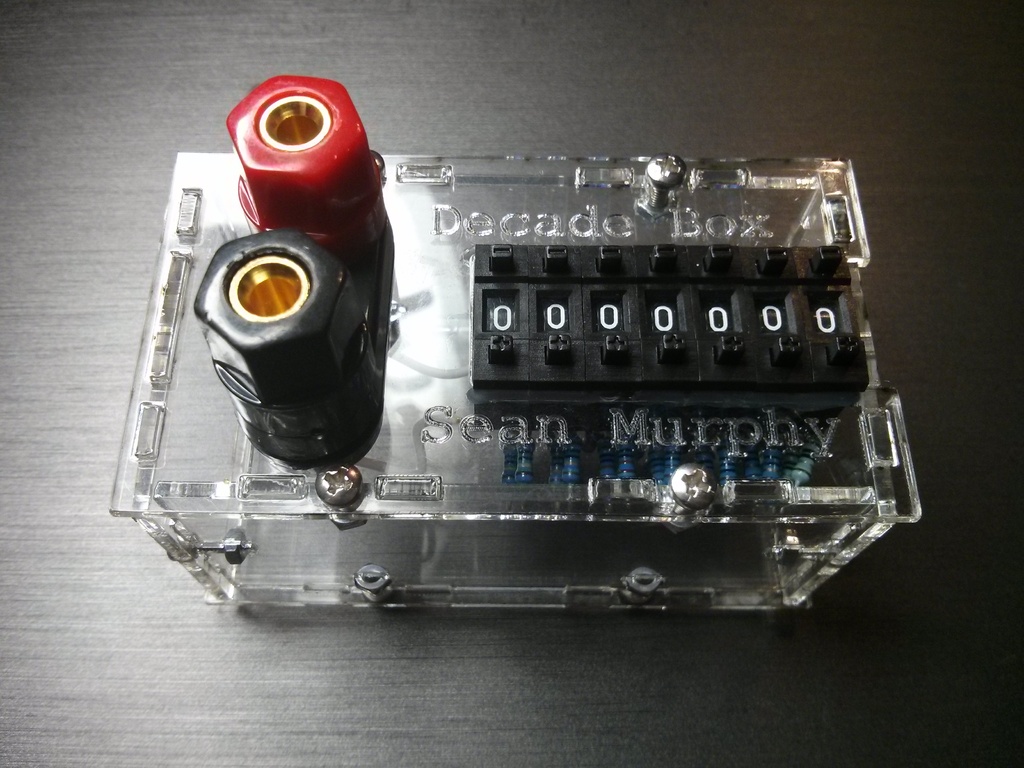
<p>Decade variable resistor 0 - 10Mohm* in increments of 1ohm with a laser cut enclosure using moderately cheap and easily sourceable components.</p> <p>Total cost for the parts orders looks to be just under $40 plus acrylic ($10 for a 24"x18" at Lowe's), but this doesn't take into account the fact that, e.g, while you are ordering 100 bolts, you are only using 12. Real cost is probably closer to $15. The soldering is rather tightly packed, so proceed at your own risk.</p> <p>A word of warning: I designed this mostly for myself, so don't assume that everything will be perfect. I may also refine a couple things in the coming weeks.</p> <p>A note about resistor tolerances: I'm using 1% resistors. I wanted something better than the really cheap and common 5% resistors, but much better than 1% costs too much. Also, the switches themselves add resistance and some variance. The tolerances don't add like some people worry for setups like this - any resistance I can dial in will be within 1% of the number on the switches - in theory. The switches add a couple ohms (1.5ish) to the box overall, so the low values will be more imperfect than the high values. Also, it's best practice that once you tune a circuit with a box like this, you remove the box then measure the resistance instead of relying on the readout.</p> <p>If you just want a decade resistor instead of taking the time to do it this way, Sparkfun <a href="https://www.sparkfun.com/products/13006">has a kit</a> for $30 that'll go from 0-1M with 10ohm increments. I like mine better.</p> <p>*Yes, I'm lying to you. It actually only goes up to 9,999,999 ohms.</p> <h3>Instructions</h3> <h3>Parts:</h3> <ul> <li>2mm acrylic (~100x220mm)</li> <li>M2.5 by 8mm <a href="https://www.amazonsupply.com/dp/B000FN3QGC/ref=ya_vo_0_1">machine screws</a> x12</li> <li>M2.5 <a href="https://www.amazonsupply.com/dp/B009EFLIWG/ref=ya_vo_0_2">hex nuts</a> x12</li> <li><a href="http://www.ebay.com/itm/310787824072?_trksid=p2059210.m2749.l2649&ssPageName=STRK%3AMEBIDX%3AIT">10-digit decimal switches</a> x7</li> <li><a href="http://www.amazon.com/gp/product/B00D6AICR4/ref=oh_aui_detailpage_o00_s01?ie=UTF8&psc=1">Dual banana plug jack</a> x1</li> <li><a href="http://www.digikey.com/short/74cm8j">1% resistors</a> 9 each of 1, 10, 100, 1k, 10k, 100k, 1M</li> </ul> <hr/> <h3>Assembly:</h3> <ol> <li>Order the parts. I've provided links to my sources, but there are probably other suppliers that'll work just as well, but if your parts are a different size, they probably won't fit my designs.</li> <li>Solder 9 resistors to each decimal switch <a href="http://www.eevblog.com/forum/projects/diy-cheap-resistor-decade-substitution-box/">like this</a>. For the one's switch, be careful about where the resistors are as this switch is butted against the box's right side wall.* Check proper function of all 7 blobs.</li> <li>Solder all 7 switch/resistor blobs together.</li> <li>Cut the box from 2mm acrylic (or wood?). The t-slots are a little picky, so something other than 2mm would take a redesign. I suggest a test cut in cardstock to check the fit of everything.</li> <li>Mount the banana plug jack to the top panel, and insert the decade switch block into the panel. Secure with a line of hot glue on the underside.</li> <li>Solder the input and the output of the decade resistor chain to the banana plug jack.</li> <li>Loosely assemble the side panels.</li> <li>Assemble the top panel and bottom panel on to the side panel assembly.</li> <li>After everything fits, tighten all screws.</li> <li>Rejoice!</li> </ol> <hr/> <p>*Something that I would possibly suggest changing with my design is that instead of having the banana plugs to the left of the switches, assemble the box with the banana plugs to the right of the switches. This should take care of the problem with the resistors getting in the way on the one's switch.</p> <hr/> <h3>Files:</h3> <p>The SVG file is the one to cut. It has all 6 panels together. Units should be mm.</p> <p>The DXFs are face exports from Autodesk Inventor. Inkscape doesn't like them for some reason, and if anyone can manage to successfully export DXFs from Inventor and get them to open in Inkscape, PLEASE let me know. I can't get straight lines to show up - only curves.</p> <p>The IPTs are the Inventor files. I have the 2013 student version. The t-slots are a custom iFeature, so if that didn't export properly enough for you to edit the parts, let me know.</p> Category: Electronics
With this file you will be able to print Decade Resistor Box with your 3D printer. Click on the button and save the file on your computer to work, edit or customize your design. You can also find more 3D designs for printers on Decade Resistor Box.