Decora 4 on/off wall switch with LEDs
thingiverse
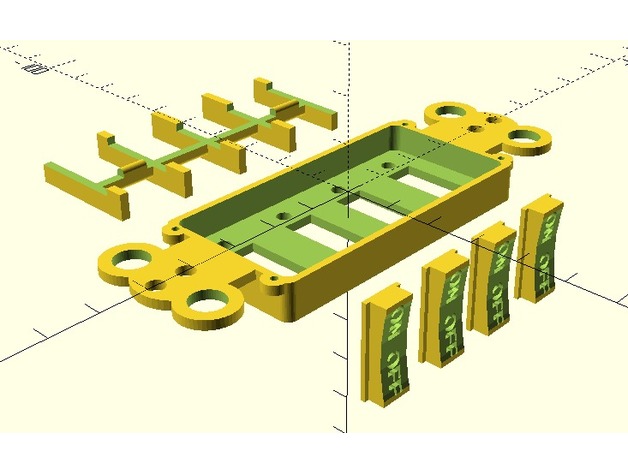
This is an alternate design remix of my existing 8 button switch. The circuit board for this model will also work with the 8 button wall switch I previously designed. This design features a decora style 4 button on/off rocker switch with indicator LEDs for each row of buttons. It's a project I've been working on to create a MySensors switch controller. You can find more information and see the prototype at https://forum.mysensors.org/topic/4317/us-decora-style-wall-switch. The crossbar brace assembly serves as a pivot for the rocker switches, preventing simultaneous pressing of both on and off buttons. This feature is not necessary but enhances the overall feel of the switch. The switch plate mounts a 3cm x 7cm prototype or circuit board, similar to the one available at https://console5.com/store/perforated-board-3cm-x-7cm.html. The circuit board is secured using 2mm x 5mm self-tapping screws, while the switches used are 6mm x 6mm tactile switches with a height of 4.3mm to 5mm (available at http://www.robotshop.com/en/sfe-mini-push-button-switch.html). The indicator LED holes accommodate standard 3mm LEDs but can be enlarged for larger LEDs if needed. For more details on creating these switches, check out my other posted designs or visit my website at https://dan.bemowski.info/2017/06/11/my-start-into-open-source-hardware/. Print Settings: Printer: Anet A8 Rafts: Yes Supports: Yes Infill: 100% Notes: I used Cura to print this, and Support Type was set to Everywhere to prevent stringing. Design Inspiration: The design of the buttons is based on X10's XPT line of switches. However, my version includes LED indicators not found in the original X10 designs. Electronics Overview: This project consists of three boards: the computer board, power supply board, and a radio module. The setup is designed to be slim and fit inside a standard single gang wall box. The main board is based on an Arduino Pro Mini running at 3.3v. It includes an nRF24L01+ radio module for communication with the MySensors gateway. The power supply board converts 120/240 volts to 5 volts using the HLK-PM01 module, ensuring safety features such as a standard 1 amp mini fuse, MOV, and thermal cutoff fuse. Conclusion: Though this design is tailored for my MySensors automation setup, it can be adapted to various configurations. Check out my forum topic on this switch (https://forum.mysensors.org/topic/4317/us-decora-style-wall-switch) to see the original prototype built before I got my 3D printer. I'd love to hear about others using this design and how they've implemented it in their projects. Post a comment and share your creations with me!
With this file you will be able to print Decora 4 on/off wall switch with LEDs with your 3D printer. Click on the button and save the file on your computer to work, edit or customize your design. You can also find more 3D designs for printers on Decora 4 on/off wall switch with LEDs.