Dedicated Compact Rotary Axis Laser Engraver
thingiverse
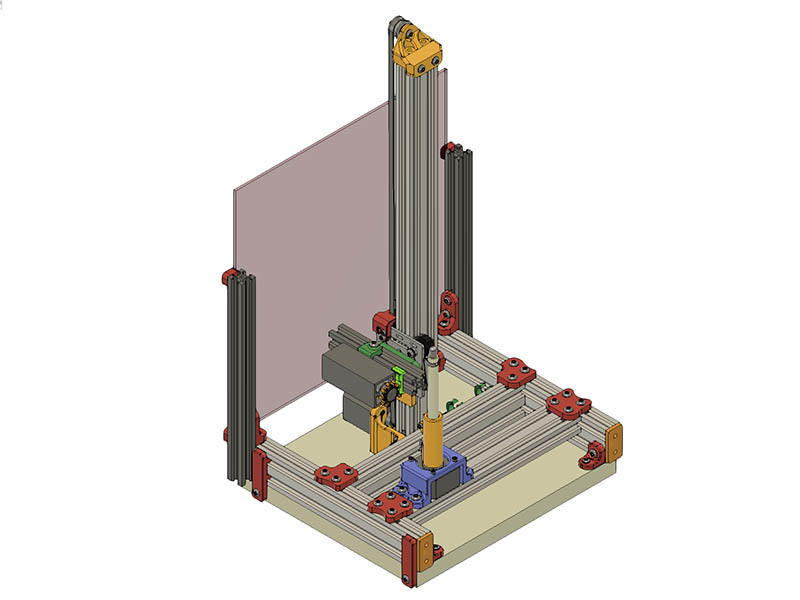
Video of engraving pi to 100 decimal places wrapped around a Bamboo Pen: https://youtu.be/ObtNYFsVEy4 Short video of this engraving a Bamboo pen, https://youtu.be/ybpt1YFTOgo Longer video engraving a Compass Rose on a Bamboo pen, https://youtu.be/4-f0wv0oQlA This project evolved from my Horizontal Cantilever or Vertical Diode Laser Engraver build https://www.thingiverse.com/thing:4934772. This has less hardware, a simpler build & more compact than the other engraver. I am using all 2040 V-Slot for this build, 4 - 2040x250mm lengths for the base parts connected with 3D printed brackets. You could also use standard corner, inside Hidden Corner brackets or L brackets. The Carriage X axis is 2040x500mm and carriage assembly is the same as the previous build listed above. I am attaching the turntable directly to a separate 2040 V-Slot with 4 T-nuts and parallel to other 2040. Using a separate 2040 allows you to use a wider turntable if needed. This makes it all one assembly rather than having the turntable separate. I am including a pen holder that fits the bamboo pens you can find on Amazon or a China site. You could also use a drill chuck or a lathe chuck and create your own mounting bracket to the motor. There is also a modification to my self-centering turntable included (https://www.thingiverse.com/thing:4958047). There are 2 V-Slot 2040 mounting options for the turntable. Simplest option is **MotMnt_25mmHt_Top2040.stl** which has 25mm clearance for a pancake nema 17 motor. There are 3 different sizes that should allow you to mount most any motor. You can mount the **Spindle_BambooPen_V2.stl**, **Spindle_Dowel_31_75mmDia_V1_1.stl**, **Spindle_Dowel_9_9mmDia_V2.stl**, **Spindle_ToothPick2_3mmDia_V2.stl**, **Spindle_DrillChuck_1_4Inch_M5.stl* directly to this. The most versatile option is to use the Self Centering Turntable, but this does not work very well for smaller objects. I modified my previous design of this (https://www.thingiverse.com/thing:4958047) so it mounts to the V-Slot 2040. With this option you can swap out spindles, by just loosening the M3 hardware holding it to the turntable motor. If you use a motor that is deeper than a pancake motor for this design, you will have to use longer screws than the M5x40mm ones & print longer standoffs. This turntable handles objects up to 4" (103mm) in diameter. The build log of this design can be found here: https://openbuilds.com/builds/dedicated-compact-rotary-axis-laser-engraver.10204/ I have included the STL files, a STEP & Sketchup file of the assemblies as well as a BOM. There is also a build guide of the turntable assembly. Cost of the Mechanical part of this build should be $100 or less. The electrical part of the build will probably be another $100. To setup rotary axis with Lightburn & a GRBL controller board, here are the settings I used with a DRV8825 driver. The linear axis has to be the X-axis, but the rotary axis can be either Y or Z. Most people will probably use Y axis, so I will show that as an example. I tried uploading a zip file of all the files, but Thingiverse would not do it. You can find the zip file from the build log location listed below if you do not want to download all the individual files. You can also pull most of the STL files from the step file if you import that into fusion 360. There is also a Step file & SketchUp file of the assemblies of the engraver & Self Centering Turntable to show you how it all goes together. The Bill of Materials is in the file **RotaryAxis_LE_BOM_V1.1.xlsx** There are 3 Lightburn test files in the file **LightBurnTestFiles.zip** In the assembly file, you will see a couple of different options for attaching your machine to a base board & also an optional method for adding a piece of 12" laser safety glass. The BOM shows what I counted to be the number of parts for the build. I would get extra M5x12mm Socket Button Head screws & T-Nuts in case you add more optional parts to the machine. The build log of this design can be found here: https://openbuilds.com/builds/dedicated-compact-rotary-axis-laser-engraver.10204/ and some of your possible questions might be answered there. Cost of the Mechanical part of this build should be $100 or less. The electrical part of the build will probably be another $100. For the firmware settings with DRV8825 driver set either of these depending on whether you are using Y or Z for rotary axis $101 = 64 ;DRV8825 & 1.8-degree Nema 17 1/32 step $101 = 128 ;DRV8825 & 0.9-degree Nema 17 1/32 step $101 = 32 ;A4988& 1.8-degree Nema 17 1/16 step In the Lightburn Rotary Setup, set 100.00 mm per rotation. From my testing, that number should not change. You might also have to change the axis direction for the rotary axis, but probably not the X-axis. $3 = 0 ;No reversing directions $3 = 1 ; Reverse X direction only $3 = 2 ; Reverse Y direction only (Rotary axis) $3 = 3 ; Reverse X & Y direction $3 = 4 ; Reverse Z direction (Rotary axis) $3 = 5 ; Reverse X & Z direction There are a lot of files here, so I may have missed something in the upload. **Warning:** Be sure to get some good laser safety glasses that protect your eyes against the wave length laser you are using. I found the electronics the most difficult part of this build because of the laser connections. Be sure to understand how to connect your particular laser before attempting this project because you could easily destroy your laser.
With this file you will be able to print Dedicated Compact Rotary Axis Laser Engraver with your 3D printer. Click on the button and save the file on your computer to work, edit or customize your design. You can also find more 3D designs for printers on Dedicated Compact Rotary Axis Laser Engraver.