Deeper Sonar boat mount bracket extension
thingiverse
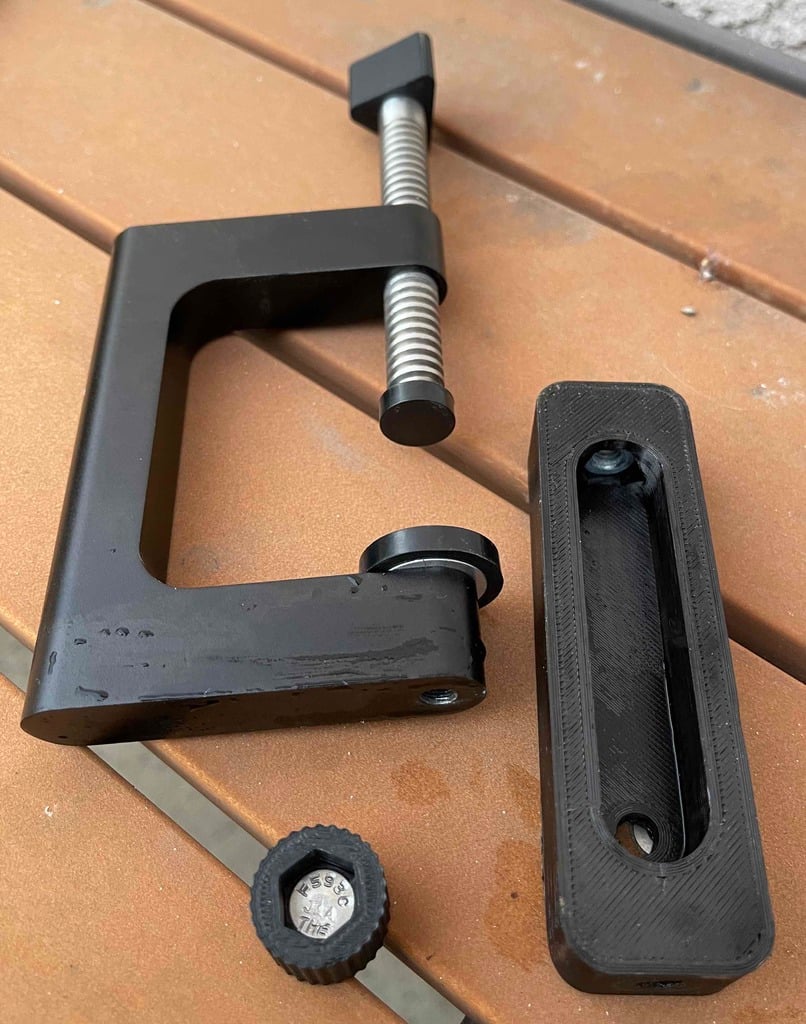
I purchased a boat mount from Deeper Sonar to go with the portable fish finder I bought from them. The boat mount inside, but is too short for the pontoon boats that we rent when fishing. There are two parts to the extension: a bracket clamp and an extension rod. The Deeper Sonar mount has a flexible rod that attaches to the clamp using a 1/4 inch screw and attaches to the fish finder holder using an M5 screw. I created a 6 inch extension that uses an M5 screw and M5 nut or M5 insert. The insert is installed using a soldering iron to melt it into the rod. The flexible rod screws into the clamp in line with the clamp screw. This makes the flexible rod parallel to the water, so it needs to be bent down toward the water. The clamp bracket allows the flexible rod to be attached on the top or bottom of the clamp, pointing toward (or away from) the water. The bracket is held on with a 1/4 inch screw inside a knob. The knob can be removed and the flexible rod inserted. The bracket has two 1/4 inch nuts inserted on each end. The extensions are reasonably strong. During one of my fishing trips I forgot to remove the fish finder from the water when we were returning the boat to the rental dock. I also had removed the knob that holds the bracket on the clamp. I had attached the fish finder to the boat using 30 lb. test fly fishing line. During the trip back to the dock, the boat was operated at full speed and pulled the bracket off the clamp. when we got to the dock I noticed that the bracket was not attached to the clamp and the bracket, flexible rod, two stacked extensions, and the fish finder holder were hanging from the boat by the line. To build the bracket you will need two 1/4 inch coarse thread (20 count) nuts and a 1/4 inch coarse thread hex head bolt, either 1/2 or 3/4 inch long. The nuts are inserted into either end of the bracket in the hexagonal holes. The screw is inserted into the knob. To build the extension you will need an M5 x 12 mm screw and either an M5 nut or M5 heat insert for each extension. I suspect the heat inserts are stronger than the embedded nut, but I have not tested them. The extensions involved in the incident noted above used the inserts. The screw is inserted into one end of the extension, through the hole. The rectangular insert can then be placed (or even glued) to fill the hole, trapping the screw in place. If you are using an M5 nut, then it inserts in the other end and the rectangular insert locks it in place. Otherwise, there is a hole to put the insert into and a hot soldering iron is used to melt the insert into the end. Note: I would recommend using stainless steel screws and nuts, or hardware with an anticorrosive finish.
With this file you will be able to print Deeper Sonar boat mount bracket extension with your 3D printer. Click on the button and save the file on your computer to work, edit or customize your design. You can also find more 3D designs for printers on Deeper Sonar boat mount bracket extension.