Dehydrator or Biltong Box - IKEA Samla Box
thingiverse
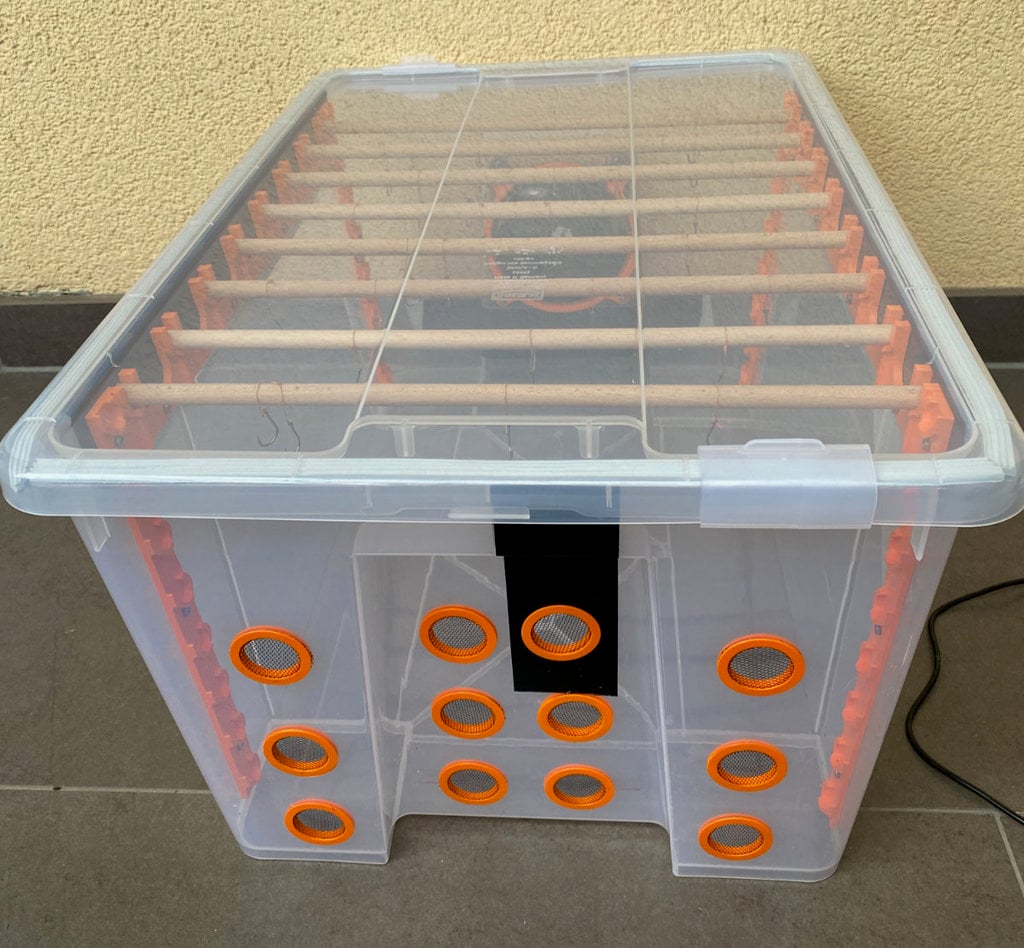
This converts the IKEA Samla Box with dimensions 56 x 39 x 28 cm (22 x 15 ¼ x 11 ") into a food dehydrator. Food can be either dried while hung from hooks (see "Biltong Box") or while resting on silicon mats (e.g. when drying foraged mushrooms). Features: ==================== - 1 W power in operation - protected against insects - capacity of ~5 kg (10 lbs) meat Required Material: ==================== - ~100 g filament - 24x M3*8 bolts and M3 nuts - flexible fly screen - glue (preferably epoxy) - 120 x 120 mm PC fan - 1 cm diameter rods (length ~39 cm or 15 ¼") - fishing hooks and braided fishing line (or a different way to hang meat) - Samla Box, including lid and clips - optional: seal strip Required Equipment: ==================== - 40 mm or 1-1/2" hole saw - a method to cut a ~121 mm hole for the fan Instructions: ==================== 1. Purchase material/equipment. 2. Print - fan_insert_inner - fan_insert_outer - 2x horizontal_bar_1 - 2x horizontal_bar_2 - 2x vertical_bar_1 - 2x vertical_bar_2 - 9x 40mm_air_intake_inner or 9x 1-1:2in_air_intake_inner (depending on your hole saw's size) - 9x 40mm_air_intake_outer or 9x 1-1:2in_air_intake_outer (depending on your hole saw's size) 3. Cut holes (see images for reference): - 1 hole for the fan, diameter ~121 mm; the lower edge of the hole should be ~7 cm from the edge of the box (simply hold your PC fan and make sure the hole will match where your fan fits) - 9 holes, diameter either 40 mm or 1-1/2" for the air intake, on the opposite side from the fan hole - Check that your printed hole inserts fit: You should be able to insert them without flexing them and they should then stay in place from friction (not terribly important, but makes the next step easier); you may need to use a rasp on the holes to get a perfect fit and clean them up. 4. Cut fly screen to size: For this, put the fly screen between an inner and outer hole insert and push them together. Now cut around the outside. 5. Glue fly screen and hole inserts into position: For this, hold the fly screen over the holes and insert the outer hole inserts - this should affix everything temporarily. Now apply glue onto the outer diameter of the tube like protrusion of the inner hole insert. Push inner and outer hole insert together now and check that the fly screen covers the holes entirely. (Note: This is hard to describe and the most fiddlesome portion of the build. Look at the reference pictures, this should make clear what is meant. Using magnets may help to keep everything in place while the glue is drying, especially for the fan hole.) 6. Affix horizontal bars. For this, place the 3D printed horizontal bars as shown in the reference pictures. Make sure they are supported by the lip of the box. Drill 3 mm holes in the appropriate locations. 7. Affix USB fan. Make sure the fan is oriented in a way to draw air out of the box. 8. Cut 1 cm diameter rods to a length that fits into the slots in the horizontal bars; make sure the lid closes properly, when rods are inserted. For hanging meat, I ground the barb of fishing hooks off and used some braided fishing line (see pictures). At this point, the Biltong Box is complete. If you do not require the other mode of drying, stop here. 9. Affix vertical bars. For this, place the 3D printed vertical bars as shown in the reference pictures. Make sure they are supported by the bottom of the box. Drill 3 mm holes in the appropriate locations. 10. Cut 1 cm diameter rods to a length that fit into the slots in the vertical bars; as the box tapers, the length of the rods will vary. 11. Affix your silicon drying mats to the rods. The mats should be under slight tension, when in place. I used braided fishing line which I tied to the rods using a thrown constrictor knot (https://www.youtube.com/watch?v=ZVZh61qyicY) and used a whip stitch (see pictures). 12. Optional: Glue seal strip on the upper ledge of the box (see pictures). FAQ: ==================== Q1) I don't get the instructions! A1) Look at the pictures. It's not rocket surgery! Q2) What's the duct tape for in the pictures? A2) The Samla box is made from polypropylene which is prone to breaking, when impacted. I wasn't careful enough and broke it in multiple places during the build. If you're careful, you won't need duct tape. Q3) What's the best way to cut the hole for the fan? A3) A dremel tool is ideal. If you don't have that, use a heated wire/knife. Q4) 3D printed parts aren't food save! A4) Not a problem here: First, the food will never come in contact with the 3D printed parts. Second, the dry conditions during operation will prevent mold or bacterial growth (that is the entire point of drying as food preservation method). Third, just keep it sanitary! Q5) The pictures show 12 air intake holes, the text says 9 - what gives? A5) The surface area for air intake is the same, I merely increased the diameter of the air intake holes because the glueing process is quite annoying. Q6) Can I use the box as only a dehydrator? What about using it only as Biltong box? A6) Of course! The build is modular in a way that horizontal and vertical bars don't require each other.
With this file you will be able to print Dehydrator or Biltong Box - IKEA Samla Box with your 3D printer. Click on the button and save the file on your computer to work, edit or customize your design. You can also find more 3D designs for printers on Dehydrator or Biltong Box - IKEA Samla Box.