Delphi Delta: XL Printer made from 16mm or 5/8" Aluminium Tubes
thingiverse
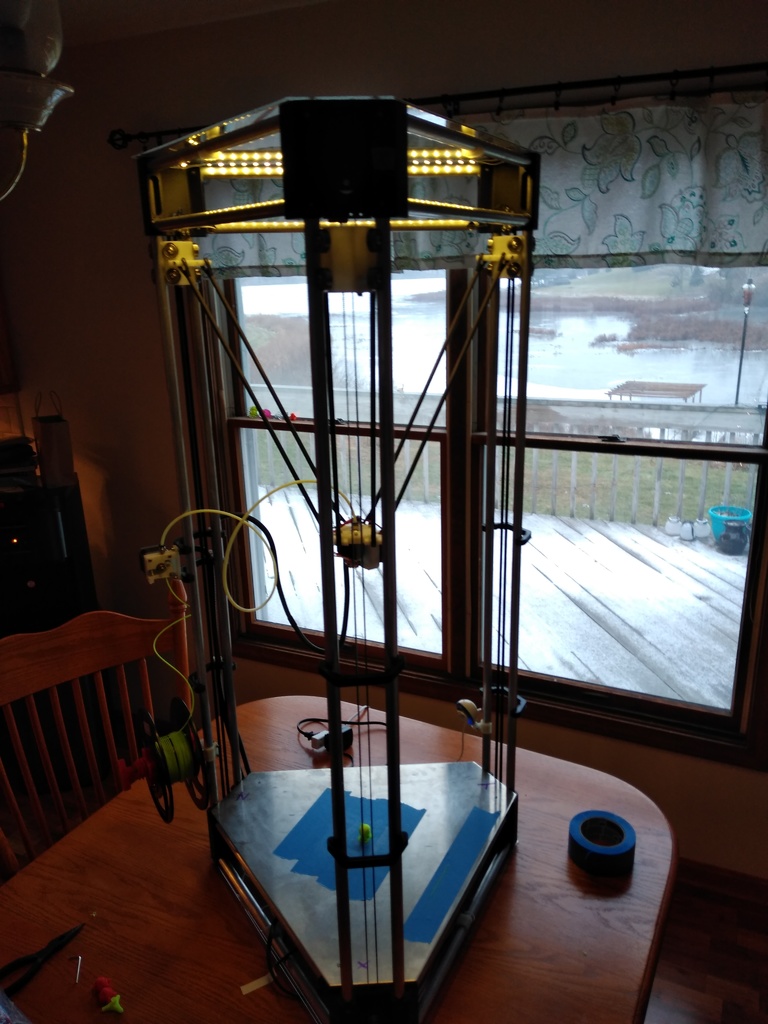
<b>UPDATE</b> 1. I swapped out fully threaded M3 screws on the ball joints with partially threaded ones. they give the carriages a much tighter fit as the treading was wearing down the PLA and it became sloppier since the initial build. 2. I also added 3 cross braces to stiffen up the frame and it seems to be working well. Pictures coming soon. 3. I'm going to try to find some https://www.3d-easy.xyz/ in the US and try it on several of my printers. Seems like a cool product. <b>UPDATE</b> Added a couple of STL files: 1. added a cross member support for the print bed. It prevents sagging and helps with the leveling. 2. added a power switch, so I don't have to unplug it all the time. ____________________________ My daughter liked the delta style printer from school. I didn't really need another printer, so I was not going to spend big bucks on it. Basically I used most stuff that I had purchased as spares for my other two 3D printers. Print Volume: 380 mm x 500 mm I already had: 4 x NEMA 17 Stepper motors ($28) 1 x RAMPS 1.4 ($3) 1 x Mega 2560 ($3.50) 4 x Stepper drivers ($3.20) 3 x micro switch endstops (left over from CTC printer) 1 x 12V Power supply (left over from a 24V upgrade) ($18) 1 x Raspberry Pi (I dunno why I bought it... besides it being a good deal) ($28) 1 x super old Creative Webcam (free) 3 x 20 tooth pulleys (left over from HEVO build) 3 x 20 tooth shaft gears (left over from HEVO build) 1 x hotend ($4.50) 1 x gear and extruder bearing from old CTC printer (free) 3 x LED light strip with self stick ($3) 12 x 17.5" x 5/8" aluminium tubing I acquired an previous purchase (free) 6 x 46" x 5/8" aluminium tubing I acquired an previous purchase (free) left over M3 screws ($5) some self tapping machine screws ($3) lots of PLA from <a href="http://zyltech.com/pla/">Zyltech</a> (shameless plug... maybe they will send me some) ($12) <b>Total of reused items: $111.20</b> I bought: 1 x Aluminum plate for the bed ($10) 2 x Plexiglas pieces for bottom and top (bottom used for electronics mount ($26) 100 x 608ZZ skateboard bearings ( you only need 24, but 100 was the same price as 30) ($18) 10m of GT2 belt ($13) some wire to extend the hotend cables and fans ($6) some painter tape (bed is not heated...possible future upgrade) ($6) some 1/4" wire loom (I don't give up secrets that much, but <a href="http://familyfarmandhome.com/">Family Farm and Home</a> priced loom is much cheaper than automotive stores) ($3.50) 6 x carbon fiber arrows on clearance ($15) <b>Total of new purchased items: $97.50</b> Obviously some of these things are nice to have. You could cut the cost by getting rid of the RPI and octoprint and also not having plexiglass on the top. Also you could steal some old skateboard bearings from your kid or sibling although it may make it hard for them to ride their skateboard. The LED's are nice to have, but I regret not putting them on a printer initially (webcam needs light). <b>PRINTING NOTES:</b> * The carriages need to be printed with supports touching build plate only. The supports for non-build plate items are in the design, so do *NOT* flip the design. After the print is done remove all supports including the ones in the design. (45deg angles under the overhangs). Also use a drill and a M5 Tap to tap the holes in the carriage. M5 screws will hold the bearings in place. * Infill is generally 35% * I use 220C for the PLA (good adhesion and stiffness) The ball joints: * Check the pictures. I used 5/32" aluminium tube from the hardware store to make the joints. Basically put the joint and jaw together and then drill through the smaller hole on the joint. This is the hole you will use to mount it to the carriage or platform. <img src="https://cdn.thingiverse.com/renders/09/56/13/ea/a9/b7690b2c5b36ee455cae4dbdbfe090d4_preview_featured.jpg"> <b>CALIBRATION:</b> I found this page very helpful: http://wp.boim.com/?p=54 and I'm posting some of the information below for reference. -------------------------- MANUAL_Z_HOME_POS can be rather accurately estimated with a simple ruler. It is the distance from the extruder hot-end tip to the bed when in the home (top) position. I would enter a number a few mm larger than this into your MANUAL_Z_HOME_POS macro at first so that you have a little “working room” to adjust it. DELTA_RADIUS appears to be the length of the XY projection of the diagonal rod, when the effector head is centered. I would estimate this at first with a ruler (or square). I think that the setting of DELTA_DIAGONAL_ROD is fairly critical. This is the center-to-center distance of the holes at the ends of the diagonal push rods. Try to find somebody with good calipers to measure this as accurately as possible. <b>End stop calibration</b> If the extruder tip is not at(near) the center of the print bed after homeing and moving in pure Z to a position just above the bed : Adjust the position of the endstops so that the extruder tip would be closer to the center. Re-Home, then move to a position just above the plate, at X=0, Y=0. repeat <b>Z-height calibration</b> Home the effector. Command it to move a few mm above the center of the print bed Lower the print head (moving in -Z direction) until the extruder tip almost touches the glass (within 0.1mm or so). Read the extruder position (M114), and subtract the Z ordinate (which should be nearly 0) from the setting for MANUAL_Z_HOME_POS. Re-compile and upload with new MANUAL_Z_HOME_POS setting repeat until adjustment is (nearly) zero <b>Radius Calibration</b> Move the head to a position slightly above the print bed and near the center, and measure the actual height above the print bed. Move the head towards the edge of the bed. A pure X-Y move, constant Z. Measure the true distance to the bed. If the head is farther from the bed at the edges than the center, decrease DELTA_RADIUS. If the head is closer to the bed at the edges than the center, increase DELTA_RADIUS. repeat When the height and flattness are pretty good the residual error can be compensated for by the autoprobe procedure. If there is not an M-code to set MANUAL_Z_HOME_POS and DELTA_RADIUS and save them to the EEPROM, I think there should be. Every time you do maintenance on the frame, belts, etc… these will need to be rechecked. -------------------------- OTHER NOTES: * I printed a large vase and found that my hotend cables ended up dragging on the causing some unwanted wobble. I added two arm clips to keep them out of the way. * ...
With this file you will be able to print Delphi Delta: XL Printer made from 16mm or 5/8" Aluminium Tubes with your 3D printer. Click on the button and save the file on your computer to work, edit or customize your design. You can also find more 3D designs for printers on Delphi Delta: XL Printer made from 16mm or 5/8" Aluminium Tubes .