Delta calibration setting for Klipper
thingiverse
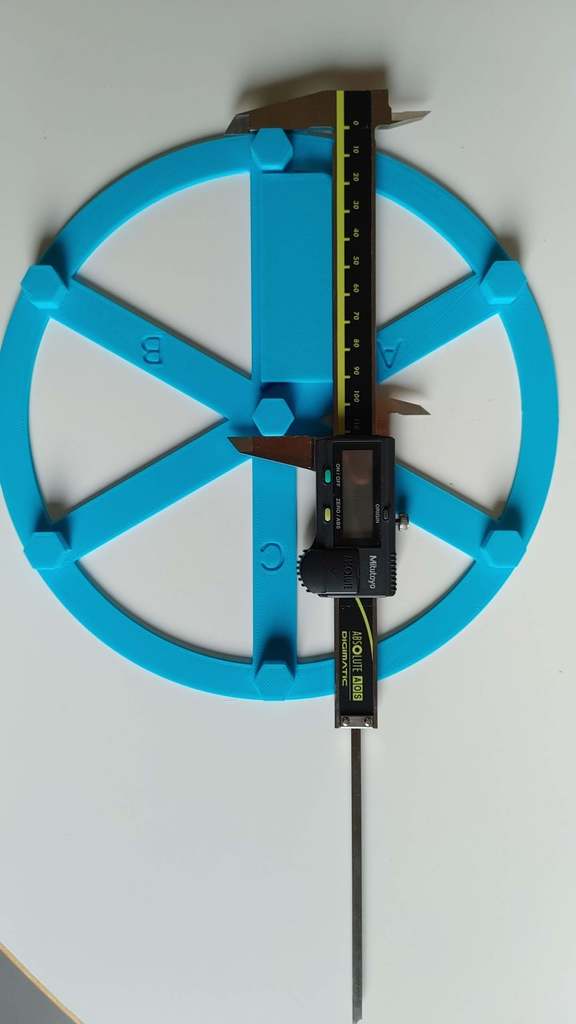
A correct enhanced Delta calibration for Klipper is very complex if you don't use a fixed base for the caliper. A fixed base where to place the rod of the caliper is necessary because in this way you are sure that the measurement always takes place in the same point and the caliper never changes inclination during the measurement. To make the measurement correctly, it is absolutely necessary to file very carefully the joint cords between one layer and the other and every face of the hexagonal parallelepipeds of 'Wheel delta calibration', otherwise the thickness of the joint cord and every imperfection on the face increases the real size of the print (and so the piece "DELTA_DIMA_MISURE" to be sure and test the misure of a final piece). You must file too every imperfection of the wheel and supports. It is also necessary to have a caliper that does not change the measure according to the pressure applied to the piece. Be very careful: the "Wheel delta calibration" file that I created is in scale 1.5 compared to the one in Klipper's instructions and for this reason it is necessary to indicate the scale 1.5 in the "DELTA_ANALYZE SCALE" field in the setting procedure explained on Klipper3d.org. I preferred to generate a larger wheel (the diameter of the wheel is 212.25 mm and the external distance from the exagonal in the same axes il 208.50 mm instead of 139 mm of the basic file on Klipper instructions) because in this way the measurement is easier to take as the hexagons are larger and have a greater support surface for the caliper. If your printer has a smaller plate remember to reduce the scale dimensions of all elements (except DELTA_DIMA_MISURE) only for the X and Y axes and not for Z. With this system it is possible to easily achieve an almost exact tolerance on the three axes. Before performing the delta calibration, you must have accurately calibrated the steps x mm (extruder - rotation distance in printer.cfg) of the filament: Furthermore, you must have calibrated the flow in the slicer to be sure that the printed walls have the size set to the width of printing; to do this I recommend printing an empty cube with no top coating and with only one wall. Remember at the end of delta calibrate procedure to repeat the bed mesh and Z distance. Afeter this, you must print the DELTA_DIMA_MISURE. After printing and before to take the misure you must file gentily the face where take the misure with the caliper, now you can take the misure. At this point open printer.cfg and scroll down until "SAVE_CONFIG" and take the misure "arm_lenght" of stepper 'a' 'b' 'c'. The DIMA is 100 mm on each axis and if your print has (for ex. in stepper 'a') 99,87 and arm lenght 345.595385 you have to do this calculation: 345.595385 x 99,87 / 100; the result is 344.9085642, now take the result and change it in stepper 'a' always in "SAVE_CONFIG" - clik on "SAVE and RESTAR"; and you reprint the "DELTA_DIMA_MISURE" you will have probably 100 mm. with a tollerance of +/- 0,05 mm. on that axis. Now redo MBL but ONLY 'bed level 2' because 'arm_lenght' are all changed and so the grid of the MBL is changed too, than clear to zero Z offset and redo the Z calibrate. Attention: 'bed level 1' always change the 'arm_lenght' misure, so if you do this procedure after delta calibration you lost the fine calibration! If with this system you have reached the calibration result you wanted, you could donate a coffee (or as much as you like) to my account; thank you.
With this file you will be able to print Delta calibration setting for Klipper with your 3D printer. Click on the button and save the file on your computer to work, edit or customize your design. You can also find more 3D designs for printers on Delta calibration setting for Klipper.