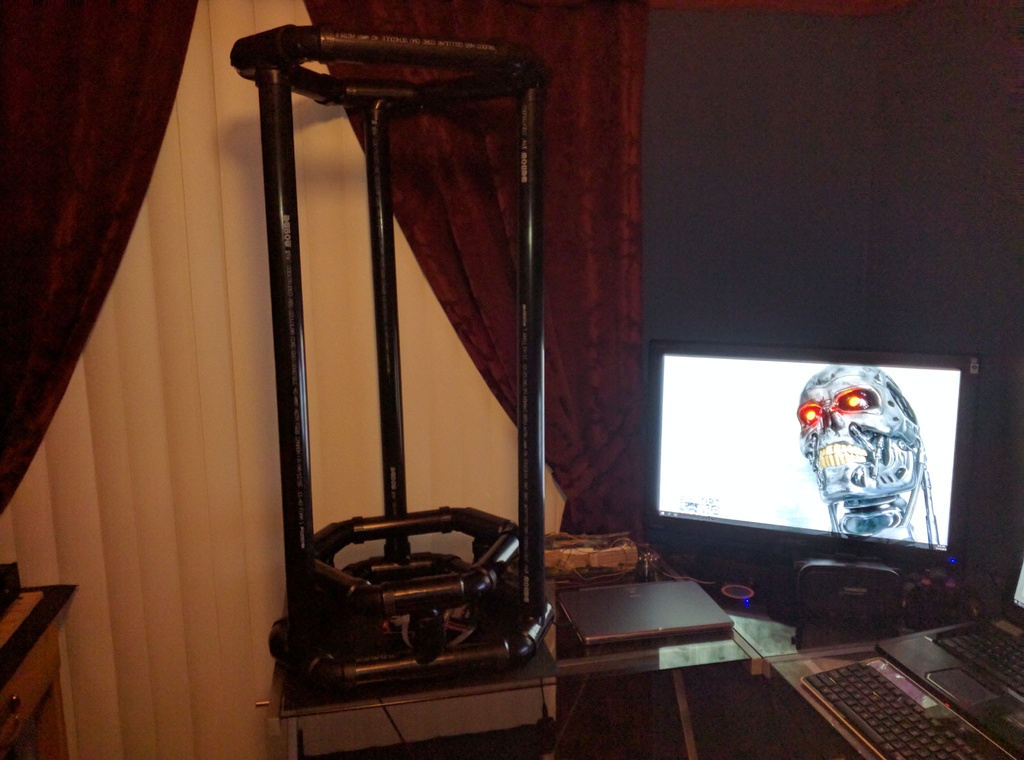
DELTA PIPE PRINTER - STEP 1 - TOP FRAME
prusaprinters
<p>While doing some renovation at home, I saw an ABS pipe and the idea flash in my head to make a DELTA printer from ABS instead of other method. After some research it's was possible, ABS pipe have 60 degrees angle, I decided to give a try and make one.</p> <p>This is a work in progress, all the files will be available soon, hopefully some will help to improve some of the part if needed.</p> <p>This should decrease the overall price of a delta printer since this design use far less screws & nuts compared to a ROSTOCK delta printer. Also no linear bearing is needed, all the parts is ABS PIPE or printed apart the magnets/metal ball and aluminum hollow tube used for the arm.</p> <p>Pros:</p> <ul> <li>You can really make the printer of any size! My design size 21" wide / 3 foots in height with a print area of 14" diameter at around 2 feet height.</li> <li>It's cheap using 1.5 inch ABS</li> <li>ABS Pipe are solid, hard to brake</li> </ul> <p>Cons:</p> <ul> <li>T shape are not 90 degrees more like 88 degrees, but this is not that much of an issue anyway we can stretches theme...</li> <li>Hard to cut lines on the tour (carriage are in the pipe, 2 balls go out for the magnetic arm, need a router table to cut unless other technique is used)</li> </ul> <p>I will update this THING over time since my printer is a work in progress. If you try to make it and have some issues with the instructions don't hesitate to help me! :)</p> <p>All the instructions will be split by small step so it is easy to follow and easy to manage for me :)</p> <p>NEXT STEPS:</p> <p>STEP 2 - BOTTOM FRAME: <a href="https://www.thingiverse.com/thing:1942980">http://www.thingiverse.com/thing:1942980</a></p> <p>STEP 3 - BED FRAME: <a href="https://www.thingiverse.com/thing:1942914">http://www.thingiverse.com/thing:1942914</a></p> <p>STEP 4 - TOWERS FRAME - <a href="https://www.thingiverse.com/thing:1946163">http://www.thingiverse.com/thing:1946163</a> (WORK IN PROGRESS)</p> <p>STEP 5 - MOTOR MOUNT - <a href="https://www.thingiverse.com/thing:1942907">http://www.thingiverse.com/thing:1942907</a></p> <p>STEP 6 - ELECTRONICS PLATE - WORK IN PROGRESS</p> <p>STEP 7 - IDLER END - <a href="https://www.thingiverse.com/thing:1969641">http://www.thingiverse.com/thing:1969641</a></p> <p>STEP 8 - CARRIAGE - WORK IN PROGRESS</p> <p>STEP 9 - EXTRUDER - WORK IN PROGRESS</p> <p>STEP 10 - PLATFORM - WORK IN PROGRESS</p> <p>UPDATE 2016-12-28: IDLER END DONE</p> <p>UPDATE 2016-12-13: MOTOR MOUNT INSTRUCTIONS DONE</p> <p>UPDATE 2016-12-12: MOTOR MOUNT STL DONE AND TESTED (I NEED TO FINISH THE INSTRUCTIONS)</p> <p>UPDATE 2016-12-07: Added STEP 5 - MOTOR MOUNT (WORK IN PROGRESS)</p> <h3>How I Designed This</h3> <p><strong>Get Your ABS Stuffs</strong></p> <p>Buy the ABS pipe in a hardware store, 1.5" inch pipe are used.</p> <p>What you need to buy first:</p> <ul> <li>ABS Cement to glue ABS pipe together</li> <li>18 x DWV 60 Degrees Hub</li> <li>12 x ABS DWV Hub x Hub x Hub Sanitary Tee</li> <li>4 X ABS 6' foots</li> </ul> <p><strong>DWV 60 Degrees Hub</strong></p> <p><strong>ABS DWV Hub x Hub x Hub Sanitary Tee</strong></p> <p><strong>ABS Cement, The product can varies, its just an example of the kind of product needed</strong></p> <p><strong>Assembling 2 ABS Part Together</strong></p> <p>This is a simple example of how to connect 2 ABS pieces together!</p> <ul> <li>Cut an ABS pipe of 1.25 inch.</li> <li>Make sure it's flush when connecting 2 part together.</li> <li>You need to put ABS cement on the part you want to connect your pipe then insert the small 1.25 inch pipe inside, push hard.</li> <li>Wait at least 15 min before using the final piece with others. I say 15 min because I want to be sure that the final piece is perfect.</li> </ul> <p>See the image bellow.</p> <p><strong>CORNER SECTION X 3</strong></p> <p>Cut 6 pieces of ABS pipe of 1.25 inch. Make sure it's flush when connecting 2 part together.</p> <p>Use 3 X ABS DWV Hub x Hub x Hub Sanitary Tee</p> <p>Use 6 x DWV 60 Degree Hub</p> <p>Use ABS Cement</p> <ul> <li>Cut your pipes.</li> <li>Assemble one ABS DWV Hub x Hub x Hub Sanitary Tee with 2 DWV 60 Degree Hub using the 1.25 pipe cut earlier. This is crucial, you weed to align the small line from the Tee with the 60 degrees, once you know how to align them retry with ABS cement. They must be glue like the picture bellow (all 3 corner sections).</li> </ul> <p>Do this 3 times!</p> <p><strong>The small lines on the side of the Tee must be aligned with the line on the 60 degrees hub.</strong></p> <p><strong>PIPE SECTION X 3</strong></p> <p>Cut 6 pieces of ABS pipe of 1.25 inch. Make sure it's flush when connecting 2 part together.</p> <p>Cut 3 pieces of ABS pipe of 26.5 cm.</p> <p>Use 3 X ABS DWV Hub x Hub x Hub Sanitary Tee</p> <p>Use 6 x DWV 60 Degree Hub</p> <p>Use ABS Cement</p> <ul> <li>Cut your pipes.</li> <li>Note this is the inverse of the Bottom Frame - Next Step, so make sure you assemble your 60 degree Hub the right way (reverse of bottom).</li> <li>Assemble one ABS DWV Hub x Hub x Hub Sanitary Tee with 2 DWV 60 Degree Hub using the 1.25 pipe cut earlier. This is crucial, you weed to align the small line from the Tee with the 60 degrees, once you know how to align them retry with ABS cement. They must be glue like the picture bellow (all 3 corner sections).</li> </ul> <p>Do this 3 times!</p> <ul> <li>Now connect all 3 pieces of pipe (26.5 cm)</li> <li>Cement them, make sure the length are the same when glued. Try without cement first and to test and then cement.</li> </ul> <p>The result should look like the image bellow.</p> Category: 3D Printers
With this file you will be able to print DELTA PIPE PRINTER - STEP 1 - TOP FRAME with your 3D printer. Click on the button and save the file on your computer to work, edit or customize your design. You can also find more 3D designs for printers on DELTA PIPE PRINTER - STEP 1 - TOP FRAME.
