Delta printer calibration test disc
thingiverse
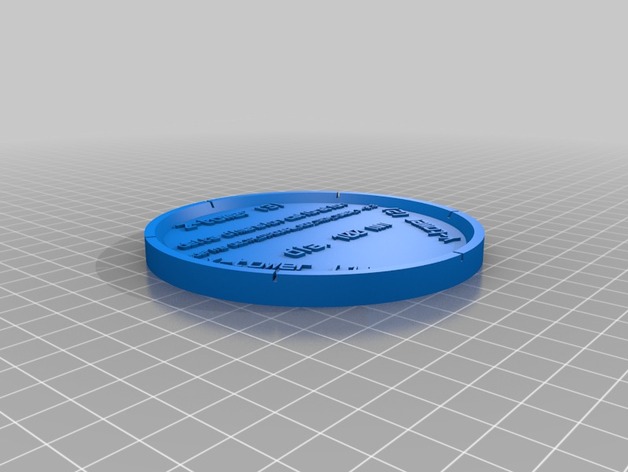
To calibrate your delta style printer with Marlin, first determine the DEFAULT_AXIS_STEPS_PER_UNIT by printing an object of known height and measuring the result. Afterwards, solve the formula x = current_steps_per_unit * expected_height / measured_height and x will be your new DEFAULT_AXIS_STEPS_PER_UNIT. After fixing the Z axis dimensions, proceed to printing this thing. Measure it across in the direction of your three towers to determine how much you have to trim each tower's diagonal rod length to get dimensionally correct prints. If you find a measurement to be different from 100 mm, you may again use a formula to correct your printer's dimensions (where x is the number of the tower you measured against): DELTA_DIAGONAL_ROD_TRIM_TOWER_x = DIAGONAL_ROD_LENGTH - (DIAGONAL_ROD_LENGTH * 100 / measured diameter)``` Example: Your printer has a DIAGONAL_ROD_LENGTH of 255 mm and you measured 102 mm for tower number 1 ("X"). The formula would be DELTA_DIAGONAL_ROD_TRIM_TOWER_1 = 255 - (255 * 100 / 102) DELTA_DIAGONAL_ROD_TRIM_TOWER_1 = 5 So, you have to put that line in your Configuration.h: #define DELTA_DIAGONAL_ROD_TRIM_TOWER_1 5 This way you'll be able to eliminate all dimensional failures without having to painstakingly measure your printer or to modify its basic mechanical settings. Be aware that setting DELTA_DIAGONAL_ROD_TRIM_TOWER_... is currently undocumented in Marlin (cf. https://github.com/MarlinFirmware/Marlin/issues/2159).
With this file you will be able to print Delta printer calibration test disc with your 3D printer. Click on the button and save the file on your computer to work, edit or customize your design. You can also find more 3D designs for printers on Delta printer calibration test disc.