Delta-T: Tensegrity 3D Printer
thingiverse
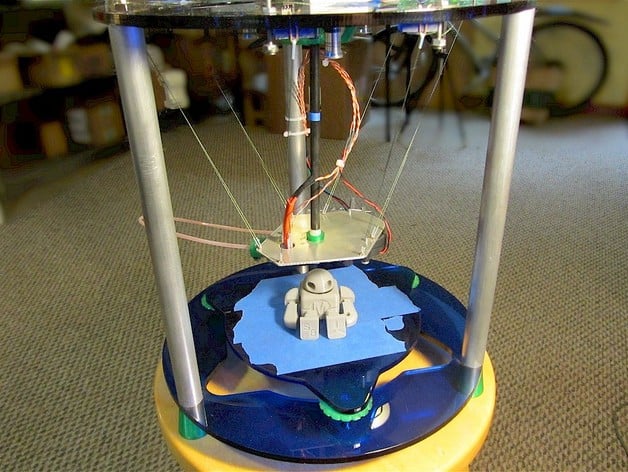
This experimental printer uses fishing line to suspend and move the print head in the workspace. The lines are all kept in tension by a spring-loaded tension pole that pushes down on the print head carriage. It is, in effect, a dynamic tensegrity (https://en.wikipedia.org/wiki/Tensegrity) structure. It looks kind of like a delta printer, but the kinematics are a little different. This is a great project for anyone wanting to spend a great deal of time figuring out how to build (and improve upon) a unique 3D printer. I know of a couple of other designs using a similar approach, so you might also want to check out:https://designmakeshare.wordpress.com/2013/09/16/introducing-skydelta/https://sites.google.com/site/3dprinterlist/delta-3d-printers/wire-suspended-deltas/flying-skydelta Watch the video: https://youtu.be/J6X3oLVhHF4 Instructions These instructions are far from complete, but they'll serve as a starting point if you are interesting in trying to build this printer. Just post any questions you have in the comments, and I'll try to fill in the gaps as we go. Keep in mind: even though I managed to get my printer working, it will take a lot of ingenuity on your part to to make your own. This project is not for the faint of heart! Frame The frame is formed by laser-cut 6mm acrylic top and bottom plates (see DXF files) separated by 3/4" dia aluminum tubes (11" long) and clamped together with internal 1/4-20 threaded rod. The build platform is actually just the internal cutout from the bottom plate rotated by 60 degrees. It rests on three 10-32 leveling screws that are topped with 3D printed adjustment knobs and round rubber bumpers. Print Head Carriage This printer uses a Bowden-type extruder, but instead of the filament being fed in-line with the extruder nozzle, it comes in at a right-angle. This is necessary because the tension post moves around in the area above the carriage and would interfere with the Bowden tube. The carriage plate is 1/16" aluminum plate (see DXF files). I won't get into the hot-end/extruder details here, but I can provide more information up request. Rigging This is the most complicated part of the printer. It uses 30# test Spectra fishing line which has very little stretch. Each of the 3 sides of the carriage plate is supported by two separate lines, similar to a delta-style printer. For any given side, both lines wrap onto a single 10mm dia. spool on the motor shaft. For one side, the line goes from spool, thru the eyelet on the upper plate, down through the eyelet on the carriage plate, back thru the same eyelet on the upper plate, and then finally to an adjustment screw. It takes quite a bit of patience to get this strung up. Examine the photos and video carefully to see how the lines are routed. Note that each line has an effective pulley reduction of 2:1 which doubles the positioning resolution. Eyelets & Adjustment Screws The eyelets are formed from 0.035" dia hardened steel wire. I started by making a U-shape in the wire and then shoving the ends of the"U" through the holes in the carriage and upper plates. I then placed a thin spacer inside the "U" and folded the legs over to make sure that all the eyelets had exactly the same height. Finally, I cut off the excess wire with a Dremel cut-off blade. To prevent abrasion of the fishing line as it goes thru the eyelets, I slid a small piece of 0.022" ID teflon sleeve over the line at each eyelet. The teflon sleeve stays in place while the fishing line slides through it. The very end of the fishing line is clamped between 2 nuts on the end of a 1" long 4-40 screw that is threaded thru the upper plate. Rotating the screw will wind up (or unwind) any excess fishing line. This is the mechanism used to fine-tune the leveling of the carriage plate. The adjustment screw can then be locked in place with another nut against the upper plate. Tension Pole The tension pole is a 0.292” dia, 18” carbon fiber tube that presses down onto the carriage plate to keep the strings in tension. At the bottom, it has a 1/2” dia. Nylon ball glued on that fits into a 3D printed cup. At the top, it has a cap with places to attach the tension springs. For springs, I've used 3” (active) lengths of 0.187” dia surgical tubing. Steel springs would probably be better, but the tubing is much easier for doing trial and error adjustments. I have the tubing stretched to about 6” when the print head is at the top. To keep the springs at more or less a constant tension, they are rigged with addition fishing line similar to the carriage plate lines. The line for each spring starts at the motor spool and is suppose to wrap up as the carriage lines unwrap. From the spool, the line goes thru an eyelet at center spacer, up thru the clip at the bottom of the spring, back down thru the same eyelet at the center spacer, and then to a clamping screw on the upper plate. Controller I've used a Printerboard running Marlin for the controller. I configured Marlin for a Delta printer, but I modified the kinematic equations for this printer. Normally, the parameter DELTA_DIAGONAL_ROD is the length of the rigid arms for a delta printer. In this implementation, this parameter is the starting length of the strings when the print head it in the top-center position. marlin_files.zip contains the modified configuration.h, pins.h and marlin_main.cpp files I used. The one big unsolved issue is homing because there's no good place to put limit switches. My hack has been to use square knobs on the back of the motors. Before starting each print, I position each knob manually to exactly the same orientation so that the carriage is at its top-center position. This is the origin, and I set the Z-offset in my slicer to distance the table is below the nozzle tip (a negative number).
With this file you will be able to print Delta-T: Tensegrity 3D Printer with your 3D printer. Click on the button and save the file on your computer to work, edit or customize your design. You can also find more 3D designs for printers on Delta-T: Tensegrity 3D Printer.