Delta Wilde Hummel
thingiverse
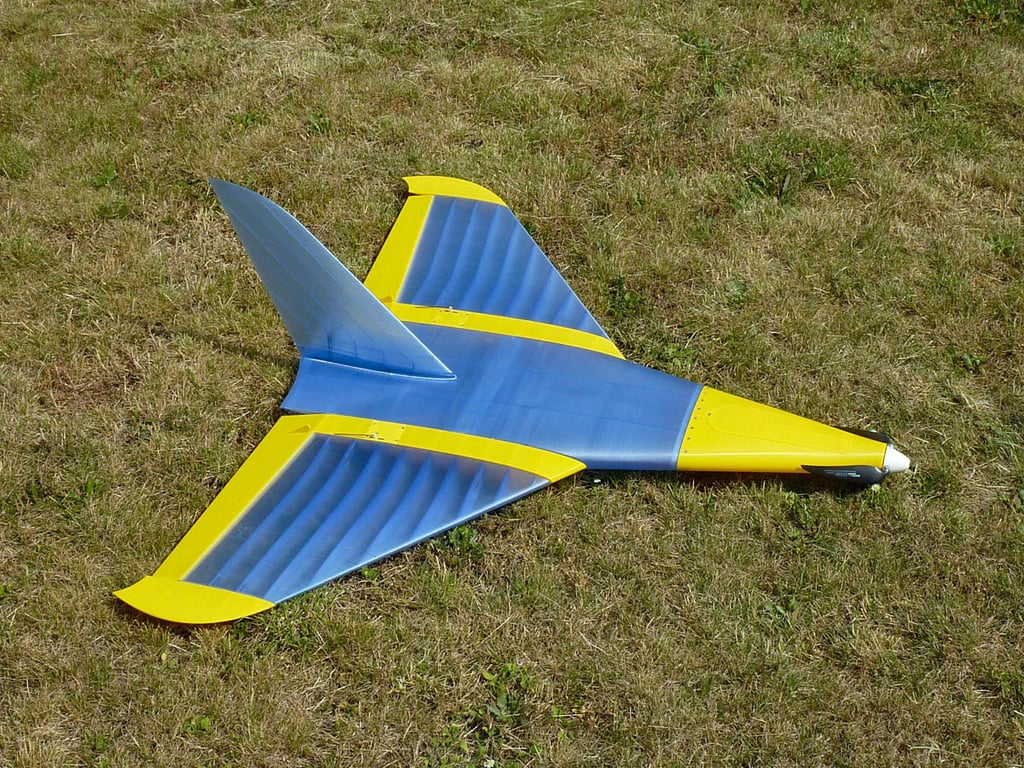
This is the printed version of the “Wilde Hummel” (wild bumblebee), which Gerd Wegner designed in 2011 in a conventional rib design. http://www2.rc-network.de/forum/show...de-Hummel-quot Specifications airfoil: NACA 0006 wing span: 1004mm wing chord: 432/166 mm CoG: 467 mm from the front of the fuselage overall weight: 1200 g (with 1300mAh 3S battery) wing area: 35 dm² wing loading: 34,3 g/dm² motor: Propdrive 28-36 1200KV propeller: Aeronaut CAM Aeronaut Carbon Classic 10 x 6" static thrust: 1300 g (3S Lipo) battery: Turnigy 1300 mAh 3S motor camber: tilted -1.5° long version, -2° short version In this first test flight it is still underpowered to get really wild. But it is enough for comfortable flights. The model is amazingly easy to fly. https://www.youtube.com/watch?v=rsS5YetUQyA The video quality is less good - this time I had to film myself. <iframe width="684" height="385" src="https://www.youtube.com/embed/rsS5YetUQyA" frameborder="0" allow="accelerometer; autoplay; clipboard-write; encrypted-media; gyroscope; picture-in-picture" allowfullscreen></iframe> There are two hull versions. The longer version (lv) is the one shown in the picture and video. Because of the long nose, the battery had to go all the way back to the front connector tube. Therefore I could only use the small 1300 mAh 3S battery. But it is possible to interrupt the carbon tube so that the battery can be pushed further back. For this purpose a bearing washer can be glued to the inner ribs. With the shorter version (sv) this should not be necessary. Therefore only fuselage 1 and fuselage 2 are exchanged, all other parts are identical. To avoid confusion (split and unsplit parts, long and short version), I upload these parts into a separate design "Short fuselage for Wilde Hummel". https://www.thingiverse.com/thing:4614006 If you have a smaller printer you can take the splitted parts and glue them together. There is a template to align the wing and the fuselage. This help ensures that the wings are glued together true to airfoil. Recommended Print Settings Attention The wings are designed to print using 0.5 mm width, 4 bottom and 4 top layers, no infill, 1 perimeter only. Should you print thinner walls, the perimeter of the upper side may not stick well enough to the perimeter of the inner stiffening construction. If you apply thicker walls, the perimeters will not come out continuously in one uninterrupted turn. The layers must build up as if you were printing in spiral vase mode. Only then you get a smooth surface on the upper side. If unsatisfied with the results, try out 0.49 or 0.48 width in your slices settings. It depends whether you use Cura, Slic3r, S3D or what you have. I suggest you experiment with some tests before printing the whole thing. The second point is: Should you print lesser layer heights, the inner stiffening construction will not connect well to the top and bottom layers. You will suffer a gap inbetween. Wing parts: layer height =0.25mm, width =0.5mm, 1 perimeter, 4 bottom/top layers, no infill Wingend: layer height =0.15mm, width =0.5 mm, 1 perimeter, 4 bottom/top layers, no infill Elevon inner: 6 solid bottom layers, spiral vase mode, no top layers Elevon outer: 4 solid bottom layers, spiral vase mode, no top layers Elevon joint: no bottom/top layers, spiral vase mode Elevon appendix: 4 solid bottom/top layers, no infill Fin: layer height =0.25mm, width =0.5mm, 1 perimeter, 4 solid bottom layers, no infill, spiral vase mode, no top layers Fin top: layer height =0.25mm, width =0.5mm, 1 perimeter, 3 solid bottom layers, no infill, spiral vase mode, no top layers Fin bottom: layer height =0.25mm, width =0.5mm, 1 perimeter, 4 solid bottom layers, 3 top lyers, no infill Fuselage The wall thickness is 0.8 mm for all fuselage parts. So print width 0.4 mm, or a little more, so that nothing is printed between the two lines/perimeters. The motor flange is 2.2 mm thick. It must be filled with solid layers. Also the rounding of approx. 2.8 mm until the wall thickness reaches 0.8 mm. That means the first 25 layers should be printed solid. However, the Prusa Slicer has a problem with solid layers. There you have to add infill. Also slightly more print width, otherwise some additional material will be blotted into the 0.8 mm wall. This is because an outer wall in the conical area is always a little wider. Therefore, I made the following settings in Prusa Slicer Fuselage 1: print width 0.43mm, layer height 0.2mm, 2 perimeters, 25 solid bottom layers, no top layers Fuselage 2 and 3: print width 0.41mm, layer height 0.2mm, 3 perimeters, 3 solid bottom/top layers Access panels: print width 0.4mm, layer height 0.2mm, spiral vase no solid bottom/top layers Acces panel brackets: print width 0.5mm, layer height 0.2mm, spiral vase no solid bottom/top layers
With this file you will be able to print Delta Wilde Hummel with your 3D printer. Click on the button and save the file on your computer to work, edit or customize your design. You can also find more 3D designs for printers on Delta Wilde Hummel.