Deluxe Deck Box for Magic The Gathering
thingiverse
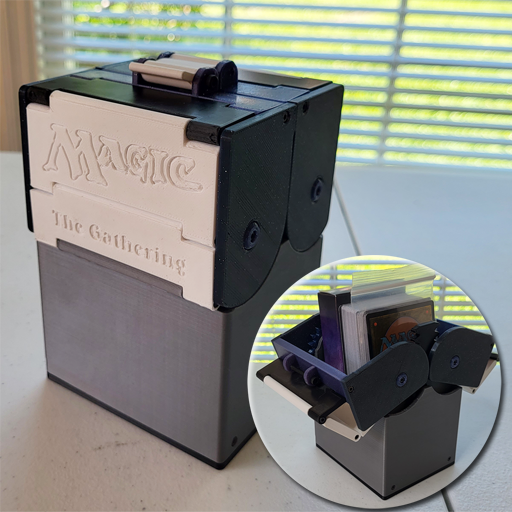
An overhaul of the MTG Rack and Pinion deck box. With an optional hinge taken from Whity's [Rugged Box](https://www.printables.com/model/258431-rugged-box-parametric), that seems to be taking the 3D printed latched box world by storm. https://youtu.be/xJXIXU-hgLo There are a few of these remixes floating around. The original box seems to be derived from a plywood box-hinge design. I decided to avoid things that would typically be friction fit (or glue) and design it with M2 hex socket screws in mind. I also wanted a box that was as flush as possible and removed low-hanging fruit for backlash and play. ## Parts The design revolves around M2 screws. - M2-8 screws (x4) Hex socket head - For pins - M2-10 screws (x4) Hex socket head - For attaching the box to the bottom - M2-20 screws (x20) Hex socket head - Top bar and sectional hinges. And if making one with a door latch, - M3-30 screws (x2) Head doesn't matter as long as it's not countersunk - Latch bars ## Printing Parts should be uploaded in the correct orientation. Print without supports. - Deckbox (x1) - Bottom (x1) - Rack (x2) - LiftFloor(x1) - SectionalWallBottom (x2) - `Plain` version is interchangeable with `TheGathering`. - SectionalWallTop (x2) - `Plain` version is interchangeable with `Magic`. - TopBridgeBar (x2) - `Plain` version is interchangeable with `Latch`. Whichever you choose, print as a pair. - PinionDoor_A (x2) - PinionDoor_B (x2) - PinFemale (x4) - PinMale (x4) - Latch (x1) - Only if using with `TopBridgeBar_Latch`. - SectionalRoof (x2) ## Assembly See the video link above. This thing definitely has *a few* steps for assembly. Note that the M2 bores are small by design and will require some effort to tap them initially. All bores are smooth and will self-thread into the plastic. There are a lot of long screws involved, so a power drill is recommended, but make sure: to have a drill bit that doesn't strip easily, be gentle and go slow. And still do the last few turns by hand; power drills can easily over overdrive screws which can destroy the entire threading of these bores. - Bottom and lift floor - Connect racks to floor lift plate. Make sure the top of the lift plate is the flat side. Make sure the linear guides for the racks are on the inside. - Push rack-lift-floor subassembly into the box from the bottom. - Insert M2-10s on the bottom the fasten the rack-lift-floor subassembly to the box. - Attach the sectional walls to each other and the box - Connect the bottom sectional wall to the box - use x2 M2-20 screws to fasten and hinge. - Connect top sectional wall to bottom wall - use x2 M2-20 screws to fasten and hinge. - Connect the sectional roof to the top sectional wall - use x2 M2-20 screws to fasten and hinge. - Connect the top bar to the sectional roof - If using the latch, make sure the hinge is facing upwards - use x2 M2-20 screws to fasten and hinge. - Do the same for the other side. - Pinion doors - Rotate the hinges to what they would approximately be when closed. - Fit 4 doors. Make sure the top triangle clears the door. Make sure the gears mate properly with the rack teeth. Make sure the indexing guide (the box sticking out) fits into the top bar cavities. - Use x1 M2-20 screw per door to fasten the pinions to the top bars through the indexing guides. - Pinion hinges - Note the hinges come in 3 parts, a male part, a female part, and a M2-8 screw. - For the 4 male parts, with pliers, hold them by their flat side. Then thread the screw through until the head is fully sunken. - Make sure the box assembly is in a closed configuration. - Open one door to get access to the inside. - From the inside, insert the female pins to the closed door. - Using pliers, hold them in place (turn them if needed to get proper leverage), and from the other side, fasten them with the male part (that should have screws through them). - Close the open door. - Insert the female pins for the other door - this is temporary. - Open the doors to open the box and engage the rack and pinions. This is done to ensure the rack and pinion stays aligned. - Without moving the pinion doors, pop out the pins and place them from the inside. - Attach the male ends to them from the outside. - Latch (optional) - Insert M3-30 screw through each top-bar. Note that one bore is slightly bigger than the other. Insert screw from the big side, and fasten on the small side. - For one of them, thread the latch in the middle. - Post - Work the device for a while; the hinges will probably need to loosen a bit still from being turned. ## Changes Changes that were made from the thing it was remixed from: - Sectional wall allows for moving the doors slightly lower, getting more out of the rack and door hinge. - Section walls have optional logos. - The bottom piece is screwed on. - Door pins use screws and have an even lower profile. - Seams have been modified to have less play. - The wall is moved flush to the side. - Rack has less backlash for linear rail. - Rack teeth are dilated for less backlash with pinion gears. - Connecting top bar tolerances are adjusted for less play. - Connecting top bar is screwed in. - Sectional hinges take M2 screws with a cavity for sunken screw heads. - Added latch. - When closed, the sectional roof is level with the rest of the top. - Floor piece dimensions are readjusted for less play. - Irrelevant rack teeth are removed.
With this file you will be able to print Deluxe Deck Box for Magic The Gathering with your 3D printer. Click on the button and save the file on your computer to work, edit or customize your design. You can also find more 3D designs for printers on Deluxe Deck Box for Magic The Gathering.