Deluxe Eppendorf pipette holder
thingiverse
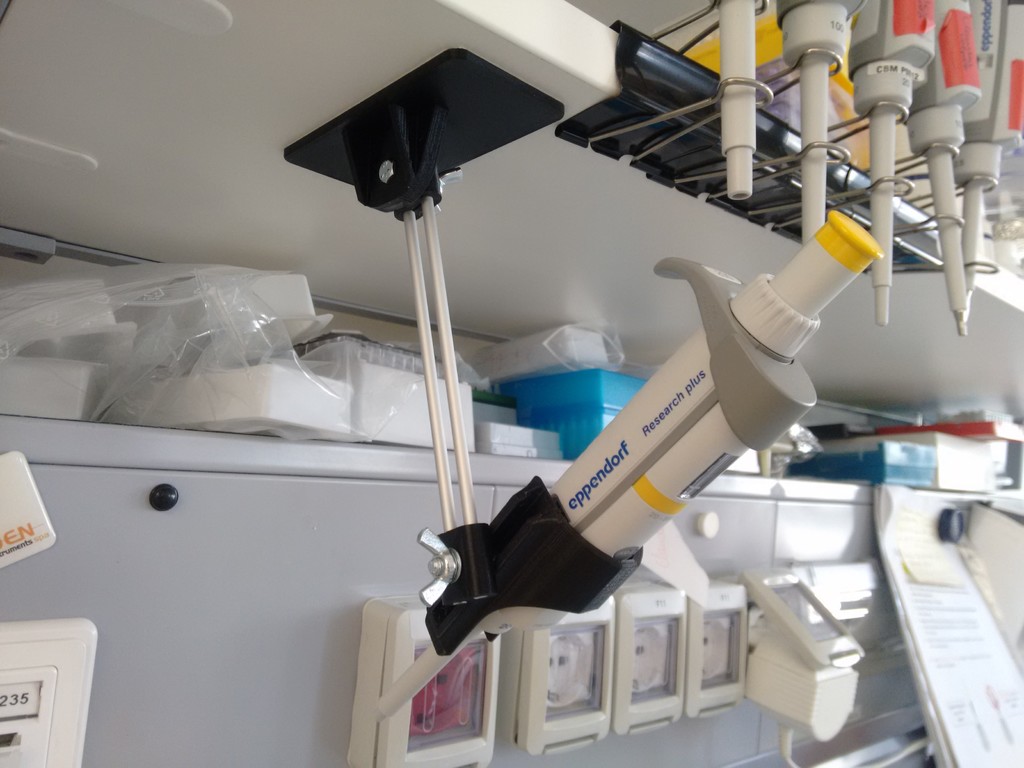
When "Ultimate" just doesn't cut it anymore, enter the... # De-Luxe Eppendorf pipette holder Height-and-tilt adjustable Eppendorf pipette holder for wall or under-the-shelf mount. The patent-pending™ Quick-Draw© holster allows to insert and remove the pipette quickly by tilting the pipette forward and sideways without changing your grip. Fits both "Research" and "Research Plus" models. Don't loose precious time with clips or carousels! Print *your* holder **now** ;-) # Materials required - 4mm aluminum rod (2x 18cm minimum) - 2x M5 20mm screw with hex head - 2x M5 butterfly nut - 2x M5 washer - Superglue or (preferably) epoxy - Screw-locker (medium or low strength) - Strong 5cm double-sided tape or adhesive velcro strips # Printing Print all pieces at 0.2mm, 5 perimeters using a 0.4 nozzle and 30% infill. If using Slic3r, setting the minimal fill area to 50mmq is recommended too. We used PET for all parts. No supports are required and the correct printing orientation is already laid-out. Print preferably without brim to ensure correct hole widths. After printing remove any excess material in the clamp holes using a 4mm drill. The fit should be *tight*. # Assembly The hook and the main holder should be glued using superglue or preferably epoxy. Pre-check the fit of the hook before applying glue to the recess:  Please note the correct orientation:  The flat side of the hook should point *outwards*. When setting the glue, use the entire surface available: bottom and side walls. Do not put too much, just line the walls! Let the epoxy cure for at least 24 hours. Superglue needs 2-3 hours depending on the environment. Insert the screw into the side slot of the holder:  Ensure the screw can move freely left-to-right in the rail but *cannot* be rotated. Remove any excess of material that might prevent any movement.  Fit the aluminum rod (still uncut) in the support clamp until one side is flush against the edge. Then insert the clamp into the main support screw. Insert a washer and the butterfly nut:  Go in the lab and measure the optimal rod length for your bench and position. The rods can be anywhere between 18cm to 50cm. Sizes shorter than 18cm might not allow full range of motion when installed under the shelf, while sizes longer than 50cm will be too wobbly to be comfortable. We used anodized rods for a nice finish! Once measured, cut two rods of the same length and insert the rods into the clamps. Fit the clamps into the screws of both the support and base, then add the washers and butterfly nuts back as done previously. It's now a good time to put a drop of screw locker on the thread beneath the butterfly nuts to avoid self-loosening when adjusting the holder later on. The orientation of the base can be chosen freely depending on your available surfaces. By attaching the base under the shelf you can free up some (much needed!) space above it! Thoroughly clean the surface of the base and the receiving spot on the bench. Apply strong double-sided tape and press firmly. Alternatively, adhesive velcro is also an option if you want to relocate the support! Use a large 5x10cm strip to ensure good adhesion. # Finishing touches Apply some gentle tension to the butterfly nuts and adjust the position of the holder to your favorite spot. Then tighten the nuts so that the holder stays in position during normal usage, but can still be adjusted with some force. Let the screw-locker cure for a day before doing further adjustments. It's now a perfect time to post a "make" picture and make us happy! ;-) # Lefty edition The holder is designed so that you can insert the pipette both straight down (as done with regular clips) or by leveraging the open right side. When doing the sideway motion, the default orientation is optimized for right-handedness. Mirror the holder and hook (or just the entire plate) along the X axis to reverse the preferred direction!
With this file you will be able to print Deluxe Eppendorf pipette holder with your 3D printer. Click on the button and save the file on your computer to work, edit or customize your design. You can also find more 3D designs for printers on Deluxe Eppendorf pipette holder.